
How to Enable Macros in Excel on Mac
Enable Macros In Excel On Mac can save you a lot of time by automating repetitive tasks. However, they can also pose a security risk if they contain malicious code.
To protect your system, Microsoft blocks macros when you open files from untrusted sources. This prevents viruses and malware from infecting your computer.
Enabling macros in Excel on a Mac involves a few steps to ensure that your workbook is set up to run macros safely. Follow these instructions, broken down into key sections.
Section 1: Enable Developer Tab
- Open Excel on your Mac.
- Click on “Excel” in the top menu, and select “Preferences.”
- In the Preferences window, select “Ribbon & Toolbar.”
- Check the box next to “Developer” to enable the Developer tab on the ribbon.
2: Change Macro Security Settings
- With your workbook open, go to the “Developer” tab on the ribbon.
- Click on “Macros” in the Developer tab.
- In the Macros dialog box, you will see options for security settings. Choose “Disable all macros with notification.”
- Close the Macros dialog box.
3: Save Workbook as Macro-Enabled
- Click on “File” in the top menu and select “Save As.”
- Choose a location to save your workbook.
- In the “Format” dropdown, select “Excel Macro-Enabled Workbook (.xlsm).”
- Provide a name for your workbook and click “Save.”
4: Enable Content
- Close and reopen your workbook.
- You may see a security warning at the top of the workbook stating that macros are disabled. Click on “Enable Content.”
5: Trust Center Settings
- Go to the “Excel” menu and select “Preferences.”
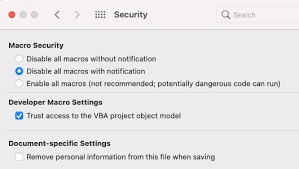
- In the Preferences window, select “Security.”
- Click on the “Macro Security” button.
- In the Macro Security dialog box, choose “Enable all macros” and check the box next to “Trust access to the VBA project object model.”
- Click “OK” to apply the changes.
6: Run Macros
- Return to the “Developer” tab on the ribbon.
- Click on “Macros” and select the macro you want to run from the list.
- Click “Run.”
7: Troubleshooting
- If your macros still aren’t running, double-check your security settings and make sure the workbook is saved as a macro-enabled workbook.
- Ensure that your macros are written correctly and do not contain any errors that might prevent them from running.
8: Additional Tips
- Regularly update your Excel application to benefit from the latest security features and bug fixes.
- Be cautious when enabling macros, especially in workbooks obtained from external sources, as they can potentially contain harmful code.
By following these comprehensive steps, you should be able to successfully enable and run macros in Excel on your Mac. Always exercise caution when working with macros to prevent potential security risks.
1. Go to the Developer tab
Macros are a set of instructions that can be used to automate tasks, making them easier and faster to complete. They can also help to improve accuracy, as the instructions are followed precisely. Macros are written in the Visual Basic for Applications (VBA) programming language, and can be created by using the Code Editor that is included with Excel.
When you open a workbook that contains macros, a security warning will appear, asking whether you want to enable or disable them. By default, the Microsoft Office application disables all macros and shows a warning message when you open a document that contains them. If you click the Enable Content button, macros will be enabled and will run when you open the file.
However, this option can pose a security risk, especially if you open files from untrusted sources. This is because the macros may contain malicious code that could be activated and cause harm to your computer or data.
To avoid this, it is best to use the option that disables macros with notification, which will prevent you from running any macros, even those that are safe and trusted. You can change this setting by going to the Options menu and selecting Trust Center Settings from the left pane. You can also select the Enable all macros without a warning radio button to enable them for all files from now on, but you will need to close and reopen the files for this option to take effect.
2. Record a Macro
Enable Macros In Excel On Mac are short pieces of code that perform complex actions. They can automate tasks, speed up processing time and help you create professional-looking results. However, it’s important to be careful when using macros. They can contain malware, which can infect your computer and damage your data. Therefore, it’s best to use macros only from trusted sources.
To record a macro, start Excel and open a workbook. Then click the Developer tab, and then select Record Macro in the Code group. A pop-up window appears. Enter a name for the macro and select the shortcut key you want to use to run it. In the Store macro in drop-down menu, select This Workbook.
When you’re finished, close the macro window and save your workbook. Then double-click the file to open it. If the workbook isn’t in a trusted location, you’ll see a security warning that says “Macros are disabled in this document.” To enable macros in the file, click Enable Content.
To make the file a trusted document so that macros are enabled whenever you open it, move it to a folder that’s considered safe by Excel. You can also set the Trust Center settings to enable all macros without a warning, which is the least secure option. But be aware that this will allow all macros in all of your Excel files, including those you haven’t created, to run automatically without a notification.
3. Save the Macro
Macros are saved in modules that you can copy to other workbooks. This means you can use a macro in file A and then run it in file B without having to open both files or save the macro to the Personal Macro Workbook. To do this, select the macro in the Developer tab and click either Save Macro or Store macro in:. When the dialog box opens, select Personal Macro Workbook from the dropdown list.
When you create a macro, you can choose to enable it automatically in all future documents or enable it on a case-by-case basis. If you choose to enable a macro in a document, you’ll see a warning message when you open that file again. This prevents viruses and malware from infecting your computer if the macro contains an infection.
Whenever you edit an Excel file, you can change the macro security settings in Backstage view or the message bar. If you select Disable all macros without notification, all macros in the workbook will be disabled. If you select Enable all macros (not recommended; potentially dangerous code can run), all macros in the file will be enabled, and the warning will not appear.
4. Run the Macro
Macros are a powerful tool that can help you automate tasks in Excel. They can save you time and resources by performing repetitive actions for you. However, macros also come with security challenges that you should be aware of before you use them. For example, malicious code embedded in macros can bypass your security walls and access your computer’s files and personal information. In addition, these codes can spread viruses and malware to other computers. To prevent this, you should always use antivirus software and enable macros in a secure environment.
When you open a macro-enabled Excel file on your Mac, you’ll receive a warning message. If you want to run the macro, click Yes. If you don’t want to enable macros, select Disable Macros.
You can enable macros on a case-by-case basis by selecting the checkbox next to the name of the workbook in question. If you do this, your workbook will be considered a trusted document and you’ll never receive a warning again when you open it.
You can also select one of the macro security options in the Trust Center to set the default level of security for all future macro-enabled Excel files you open. The options range from enabling all macros without notification to allowing only the macros that are digitally signed by a trusted publisher.
Leave a Reply