
How to Enable Macros in Excel 365 Without Getting a Yellow Security Warning
Enable Macros In Excel 365 are simple programs that automate tasks in Excel to help you work faster. However, they can be dangerous if they are not created and signed correctly. Therefore, Microsoft has safety regulations that disable macros by default.
If you find a file with macros that you trust, you can enable them by making the file a trusted document. However, this method is time consuming.
Enabling macros in Excel 365 involves a few steps to ensure that you can run and use macros in your workbooks. Macros are sequences of instructions that automate repetitive tasks, and they are written in the Visual Basic for Applications (VBA) programming language. Here’s a detailed guide on enabling macros in Excel 365.
1. Understanding Macros:
Before enabling macros, it’s essential to understand what they are and how they work. Macros automate repetitive tasks by recording or scripting a series of actions in Excel. These actions can then be played back with a single command.
2. Security Concerns:
Macros can pose a security risk as they can contain malicious code. Excel has security features to protect users from potential harm. By default, macros are disabled to ensure the safety of your data.
3. Accessing the Trust Center:
The Trust Center is where you manage security settings for Excel, including macro settings. To access it:
- Click on the “File” tab in the Excel ribbon.
- Select “Options” at the bottom of the left-hand menu.
- In the Excel Options dialog box, choose “Trust Center” from the left-side menu.
4. Navigating Trust Center Settings:
- Within the Trust Center, click on “Trust Center Settings” to open the Trust Center dialog box.
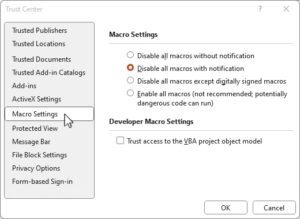
- Go to the “Macro Settings” category.
5. Macro Settings:
- In the Macro Settings tab, you will find various options for controlling macro behavior.
- Choose the option that suits your needs. “Disable all macros with notification” is a commonly used setting. This option allows you to enable macros on a case-by-case basis.
6. Enabling Macros:
- After choosing your preferred macro setting, click “OK” to save changes.
- If you selected a setting that disables all macros, you will be prompted to enable macros when opening a workbook containing them.
7. File Origin and Trusted Documents:
- Excel may treat files from the internet or other potentially unsafe locations differently. Check the “File Block Settings” in the Trust Center to adjust these preferences.
- Additionally, consider marking certain folders or workbooks as trusted locations to simplify macro execution.
8. Digital Signatures:
- Digital signatures provide a way to verify the authenticity of a macro. If a macro is signed by a trusted source, Excel is more likely to allow its execution.
- Consider using digital signatures, especially for macros that you share with others.
9. Developer Tab:
- The Developer tab provides access to advanced Excel features, including macros. To enable it:
- Go to the “File” tab, select “Options,” and choose “Customize Ribbon.”
- In the right panel, check the “Developer” option, and click “OK.”
10. Running Macros:
- With macros enabled, the Developer tab will contain the “Macros” group, allowing you to run, record, and manage macros.
- To run a macro, go to the Developer tab, click “Macros,” select the desired macro, and click “Run.”
11. Updating and Patching:
- Keep your Excel application up to date with the latest patches and updates. This ensures that you have the latest security features and bug fixes.
12. Educate Users:
- If you’re working in a shared environment, educate users about the potential risks associated with macros. Encourage safe macro practices, such as only enabling macros from trusted sources.
13. Final Thoughts:
- Always exercise caution when enabling macros, especially in workbooks from unknown or untrusted sources. Be aware of the security implications and take appropriate measures to protect your data.
By following these steps and understanding the security considerations, you can safely enable and use macros in Excel 365 for increased productivity and automation.
1. Open a workbook with macros
Microsoft Excel is a powerful, versatile spreadsheet software program that allows you to automate common tasks. It also has a more advanced feature called macros, which are simple programs written in Visual Basic for Applications (VBA). Macros are favored by expert users because they help reduce errors and speed up data entry and manipulation. However, they are dangerous from a security standpoint because they can be compromised and used to run potentially malicious VBA code. For this reason, Microsoft has safety regulations in place that disable macros by default.
In the Trust Center settings, select “Disable all macros without notification” or choose another option. You will still get a security warning when you enable these macros. The other option “Enable all macros” allows you to enable the macros in a specific file on a case-by-case basis. This setting is not recommended as it can make your computer vulnerable to potentially dangerous macros.
2. Open a workbook without macros
If you want to enable macros in an Excel file without receiving a security warning each time, there’s a simple solution. Instead of clicking “Enable Content” in the yellow Security Warning message bar, click “Learn More”.
Once you understand the risks of running macros, you can choose to disable them permanently. To do this, open the Options window by clicking File and then Options. Next, select the Trust Center settings option in the left pane of the Options window. Within the Trust Center, select Macro Settings. Here, you’ll find four security levels that you can choose from. The highest level, Disable all macros without notification, offers the most protection against malware.
Macros are small programs or scripts that automate tasks to save you time. Although they can be useful, they also present a potential risk to your computer’s safety, as they are a vessel for malware known as macro viruses. As such, Microsoft has safety regulations that disable macros by default. However, you can override this setting to enable macros in certain scenarios. To do this, you’ll need to use a robust recovery software such as EaseUS Data Recovery Wizard. This software will help you recover lost or deleted files, including those that contain macros.
3. Select a workbook with macros
Macros are sets of instructions that tell the computer to perform an action. They are commonly used in spreadsheet applications, such as Microsoft Excel, to save time and reduce repetitive tasks. The code for a macro is created using the programming language Visual Basic for Applications (VBA). If you use Excel, you can enable and disable macros from the Options menu in Backstage view or from the Trust Center settings.
In addition to enabling or disabling macros, you can also customize the macro security level from the Trust Center. The four levels allow you to choose the level of security that suits your needs. ‘Disable all macros without notification’ offers the highest level of protection, while ‘Enable all macros’ offers the lowest.
To Enable Macros In Excel 365, select the Workbook with macros option from the Trust Center. If you’re unsure which macros are in the workbook, open the file and click the Info tab. Then, in the Macro Settings area, click Enable content for this session and select the macros you want to enable. This will prevent the macros from being disabled when you close and reopen the file. It will also make the file a trusted document, so you won’t get the security warning the next time you open it.
4. Select a workbook without macros
Macros are small programs that run within spreadsheet applications like Microsoft Excel to automate a series of steps. They are used to perform routine tasks that can be time-consuming and labor-intensive to do manually. Macros can also be used to execute malicious code, which could compromise your computer’s security. For this reason, Microsoft has safety regulations that disable macros by default to protect user computers from potential malware infections.
To enable a workbook’s macros, you can either open the file and click Enable Content in the security warning message bar or use the options in Backstage view. If you select Enable all macros, the file becomes a trusted document, which means that future openings of the file will not display the security warning message. However, this choice is not recommended because it could allow malicious macros to run without your knowledge.
When you save a workbook with macros in the XLSX file format, any VBA code will be removed automatically when you click Save As. Alternatively, you can save the file in another format such as XLS or XLSB, which supports macros.
To avoid the security warning when you reopen the workbook, select the option in the message bar to disable all macros. You can also change the macro settings in your Trust Center by clicking Options at the bottom of the left bar.
Leave a Reply