
How to Enable Internet Explorer in Windows 7
If you want to enable Internet Explorer in Windows 7, you need to know where to find it. You can find it in the Program Files folder or in This PC. Type c:program filesinternet exploreriexplore in the search box and hit enter. Then, you can double-click on the Internet Explorer icon. Once it is opened, you can type in the correct location: c:program filesinternet exploreriexplore.
In order to disable Internet Explorer on your PC, you can use the Group Policy Editor. Once you have made this change, you should restart your computer. After doing this, Internet Explorer will no longer be present in the “Set Default Programs” list, and its icon will be absent from the “Accessories” submenu on the Start menu. Additionally, you will not be able to open any of the browser’s related files from the start menu Google.
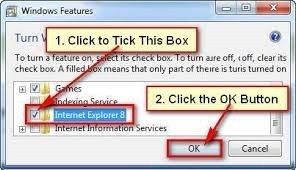
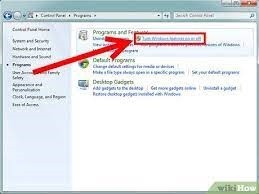
You can also uninstall Internet Explorer from Windows 7 by following a couple of steps. First, click on the “Turn Windows features on or off” link on the left side of the window. Next, click on the “Internet Explorer” folder. After clicking the folder, a confirmation dialog box will appear. Click Yes to confirm the removal of the browser. Your computer will now have a built-in web browser called Microsoft Edge.
How To Reload In Internet Explorer Mode:
In Microsoft Edge, you can reload the current tab in Internet Explorer mode. If you click the IE mode icon at the left of the address bar, a flyout will appear where you can choose to open the page in IE mode the next time you visit the site. Clicking Open in Internet Explorer mode next time adds the page to a local list that will automatically open the site in IE mode for the next 30 days.
To force Edge to load websites in IE mode, open the Settings menu. On the IE tab, click the Internet Explorer icon. A popup window will appear. Click the “Internet Explorer” icon in the menu bar. Now, click “Internet Explorer” from the list. Your computer will automatically switch to Internet Explorer mode. This mode is useful when you need to view pages in a different browser, but be sure to check IE compatibility first to make sure that the settings work properly.
How To Uninstall Internet Explorer:
If you are looking for a safe and effective way to uninstall Internet Explorer, read on. Internet Explorer is a very useful program, but it’s also essential for the functioning of your PC, so you must take precautions to avoid unintended consequences. Before you try uninstalling Internet Explorer in Windows 7, make sure that you have backed up your system and that you have no open windows files or folders. The uninstallation process is simple, but you should always backup your system before you try it.
If you cannot uninstall Internet Explorer, the most common solution is to use a third-party tool, such as a registry cleaner. The utility will detect Internet Explorer on your PC and remove it from your PC. Once it’s removed, you will need to reboot your computer. You may want to restart your computer after the removal process to ensure that the changes take effect. If you haven’t done so, you might have messed up your system.
How To Uninstall Internet Explorer 11:
If you are not satisfied with the current version of Internet Explorer 11, you can uninstall it in Windows 7 easily. This browser offers a lot of useful features to its users. If you are still using it, you can download and install Opera browser on your computer. Opera has low resource usage, a built-in VPN, and ad-blocker to protect you from phishing attacks. It also comes with turbo mode, which allows you to browse the Internet safely.
To uninstall Internet Explorer 11, open the Control Panel. Click Start > Control Panel. From the Control Panel, navigate to the Programs and Features window. Scroll down to the “Internet Explorer” category and click the General tab. From there, click Remove to uninstall Internet Explorer. Alternatively, you can use the Add or Remove Programs tool in the Windows 7 Start Menu. Click on Add or Remove Programs, select Internet Explorer, and click Uninstall.
How To Remove Check From Internet Explorer:
If you’d like to remove Internet Explorer from your computer, you can do so by unchecking the “Add Internet Explorer” check box. You can also restart your computer to reinstall Internet Explorer. This procedure is valid for most versions of Windows. Before proceeding, be sure to make a backup of your system. The procedure for uninstalling Internet Explorer is simple, but it also carries risks. If you’re worried about the consequences, read on for some tips.
Follow These Steps:
- Select Start > Settings.
- Select Applications.
- Optional Features.
- Select Add Feature.
- Select Internet Explorer 11.
- Select Install (1).
- Restart your computer when prompted to restart.
To uninstall Internet Explorer from your system, you can either go to Control Panel > Programs and Features>Internet Explorer, or go to Control Panel >> System>Add or Remove Programs and Features. Once you’ve uninstalled Internet Explorer, you can restart your PC. Then, you’ll notice that it no longer appears in Set Default Programs, Open with context menu, and Choose another app submenu. Also, you’ll notice that it’s not listed in the list of programs for related files, either.
Leave a Reply