
How to Enable Developer Options on Samsung
Enable Developer Options On Samsung Depending on your device and software, the developer options menu may appear in different places. To enable the menu, tap Build number seven times in a row.
The Android developer mode contains advanced settings that are not intended for average users and should only be used by people familiar with app development. It includes useful tools and allows you to tweak options such as animation draw speed.
Enabling Developer Options on a Samsung device involves a series of steps that are typically hidden from regular users. This feature is designed for developers and advanced users to access additional settings and debugging options on their Android device. Here’s a detailed guide with explanations for each step.
Step 1: Locate “Settings”
Begin by unlocking your Samsung device and finding the “Settings” app.
Step 2: Open “About Phone”
Scroll down in the “Settings” menu until you find an option named “About Phone” or “About Device.” Tap on it to proceed.
Step 3: Find “Software Information”
In the “About Phone” section, locate an option labeled “Software Information” or a similar name. This is where you’ll find details about your device’s software.
Step 4: Tap “Build Number” Seven Times
In the “Software Information” section, look for an entry named “Build Number” or a similar term. You need to tap on this entry seven times consecutively. After each tap, you might be prompted to enter your device’s PIN or unlock pattern.
Step 5: Enter Device Unlock Information
After the seventh tap, you will be asked to enter your device’s unlock information, such as your PIN or unlock pattern. This is a security measure to ensure that only authorized users can enable Developer Options.
Step 6: Enable Developer Options
Once you’ve successfully entered your device unlock information, you will see a message indicating that you are now a developer. Developer Options should now be accessible from the main “Settings” menu.
Step 7: Access Developer Options
Return to the main “Settings” menu, and you should now see a new option labeled “Developer Options” or “System” with Developer Options inside. Tap on this option to access the additional settings.
Step 8: Explore Developer Options
Within the Developer Options menu, you’ll find a variety of advanced settings and options. Be cautious while making changes here, as modifying certain settings can affect the normal functioning of your device.
Optional Step: USB Debugging
One of the most commonly used features within Developer Options is USB Debugging. This allows your device to communicate with a computer via a USB cable, which is particularly useful for tasks like Android development and debugging. To enable USB Debugging, find the corresponding toggle switch within the Developer Options menu and turn it on.
Important Notes:
- Be cautious in the Developer Options menu, as changing certain settings may result in unintended consequences or make your device less secure.
- USB Debugging should only be enabled when necessary, as it allows external devices to access your phone’s data.
- If you ever wish to disable Developer Options, simply go back to the menu and toggle the switch at the top of the screen.
Congratulations! You’ve successfully enabled Developer Options on your Samsung device, and you can now explore and utilize the advanced settings provided for developers and advanced users.
How to enable developer options
If you’re using an Android phone and want to go slightly more in-depth than your default options, it’s worth checking out the hidden Developer options menu.
Getting to the menu is fairly easy, though the exact steps may vary depending on your phone and software version. In general, you’ll want to open the Settings app and scroll down to ‘About device’ or ‘About phone’. Tap the ‘Build number’ option several times—generally seven in a row, though again this is something that can vary depending on your phone and OS version. Once you hit the build number seven times, a message will appear saying that developer options are now enabled.
From here, you’ll be able to access the full set of developer options—which you can then turn off from the Settings menu by tapping on the toggle button. Keep in mind that interfering with these options without understanding them may negatively impact your device, so it’s best to only use them when necessary. Also, some of the options in here are experimental and may not work well on your phone.
What are developer options?
Enable Developer Options On Samsung Android phones offer a plethora of tweaks and advanced settings to make your device more useful or personalized. These built-in tools can potentially cause issues with other apps or even your phone’s functionality if tampered with improperly.
These settings aren’t for the faint of heart and should only be accessed by those who have a solid understanding of what they’re doing. To activate them, you can head to the Settings menu and tap the build number seven times in a row. This will prompt a message saying that you’re now a developer, and a new menu called “Developer options” will appear either inside of the System menu or above it, depending on your device.
Once enabled, you can access the various developer options that allow you to change audio codecs, enable mock locations, and more. You can also access some GPU features that improve graphics processing speed and performance, especially for gamers. You can also use the memory option to see a breakdown of RAM usage for all your installed apps, which can be helpful for troubleshooting.
What are developer tools?
The Android Developer Options menu is a collection of advanced settings that let developers check how an in-development app performs on the device, manipulate system responses and functionality, and test hardware performance.
Activating the menu is simple enough. Depending on your device and operating system, head to ‘Settings’ and tap ‘About devices’ or ‘Software information’ to open the Developer options page. Here you’ll find a field marked ‘Build number’; tapping this a total of seven times will enable the menu.
Enable Developer Options On Samsung, the menu will appear in a new Settings tab. You’ll also see a Developer options switch in the Quick settings menu. If you want to disable the menu, head back to Settings and toggle the switch to off.
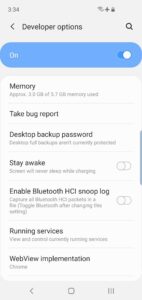
Among the many useful troubleshooting and diagnostic tools available are the Memory setting, which displays the amount of RAM each of your apps is using in a graph over time. You can select different time periods and see usage for individual apps from the drop-down menu at the top, and you can even choose to only show memory used by recently launched apps.
What are developer settings?
The developer options menu is designed to let software developers configure system behaviors that can help profile and debug app performance. It is hidden by default from most users, but it contains a range of power features that can improve your device’s functionality and speed.
For example, you can activate a toggle that blocks all of your smartphone’s on-device sensors. This includes the GPS, camera, microphone, gyroscope and accelerometer. This is a handy feature if you’re worried about privacy or want to save battery by blocking unnecessary sensors.
Other useful developer options include a screen recorder and settings to increase animation draw speed and boost high-end gaming performance. You can also enable a dark theme for your phone’s apps and system sections. This is a nice feature if you want to save your eyes from the blue light emitted by most apps.
Activating these powerful settings can have negative effects on your device, so it is not recommended to use them unless you understand what they do. Some settings can even void your warranty. It’s best to stick with the default settings if you’re not a developer and don’t plan on changing any of these options often. Otherwise, you may have to pay for repairs or even a new device.
Leave a Reply