How to Enable Closed Captions on Zoom
Enable Closed Captions On Zoom meeting, participants can enable captions to view manual or automated transcripts of the conversation. A live transcript is also available for download as a text file.
This built-in feature offers ease of use and is free to Zoom account holders. However, it lacks advanced customization and speaker identification options.
Enabling closed captions on Zoom is a straightforward process that enhances communication for participants who are deaf or hard of hearing. Zoom offers built-in closed captioning features to accommodate diverse needs.
Follow these steps to enable closed captions on Zoom:
1. Sign In to Zoom: Ensure that you have the Zoom application installed on your device. Open the application and sign in to your Zoom account.
2. Join or Host a Meeting: You can either join an existing meeting or host a new one. If you’re joining a meeting, enter the meeting ID or use the link provided. If you’re hosting a meeting, click on “New Meeting” or schedule one in advance.
3. Start the Meeting: Once you are in the meeting, click on the “Start Video” button if your video is not already enabled.
4. Access the Meeting Controls: Locate the meeting controls at the bottom of the screen. You will find icons for various functions such as video, audio, and participants.
5. Click on the “More” Button: Find the “More” button, often represented by three dots (…) or an ellipsis. Click on it to reveal additional options.
6. Select “Show Subtitle” or “Closed Caption”:
In the dropdown menu that appears after clicking “More,” you should find an option such as “Show Subtitle” or “Closed Caption.” Click on this option.
7. Enable Closed Captions: A submenu will appear with options related to closed captions. Click on the option that says “Enable Closed Captioning” or a similar phrase. This action will activate closed captions for the meeting.
8. View Closed Captions: Once closed captions are enabled, you and other participants will start seeing the captions on the screen. The captions will typically appear at the bottom of the Zoom window.
9. Adjust Closed Caption Settings (Optional): Zoom provides additional settings to customize closed captions. You can adjust the font size, style, and background color to suit your preferences. To access these settings, click on the “Closed Caption” button during the meeting and select “Subtitle Settings.”
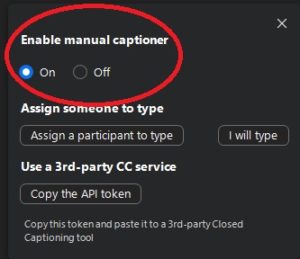
10. Assign a Closed Captionist (Optional): If you have a designated closed captionist, you can assign them to type the captions in real-time. To do this, click on the “Assign a participant to type” option in the closed caption settings.
11. Save Closed Caption Transcript (Optional): If you want a record of the closed captions after the meeting, you can save the transcript. To do this, click on the “Save Transcript” option in the closed caption settings.
12. End the Meeting: When the meeting concludes, you can end the session by clicking on the “End Meeting” button. Participants will no longer see closed captions once the meeting is ended.
By following these steps, you can successfully enable closed captions on Zoom, making your virtual meetings more accessible to a wider audience. Remember that closed caption availability may vary depending on your Zoom plan, so ensure that your account supports this feature.
Manual Captions
If you are using Zoom with an audio transcript service and want to view captions, you can enable them by going to the Settings page of your account. From there, select the ‘Meetings’ tab and click on ‘In Meeting (Advanced)’. Scroll down to find the ‘Manual Captions’ and ‘Automated Captions’ options, and then enable them. If a verification dialog box appears, click ‘Enable’ or ‘Disable’ to confirm your choice.
Alternatively, if you are the host of a Zoom meeting or webinar, you can enable automatic subtitles and transcriptions by clicking the ‘Always show subtitles’ option in your video control toolbar. Note that this will automatically transcribe the entire meeting, including breaks and slide shows.
The host can also assign one participant to enter real-time closed captioning for the meeting by hovering over their name in the participants list and clicking ‘Assign to type captions’. For details, see the Zoom Learning Center article on Accessibility features in Zoom meetings. Alternatively, you can request third party captioning services on behalf of faculty, staff, or students with disabilities by contacting the UW Disability Services Office or Disability Resources for Students. You can also use the Zoom web portal to request live captions for archived videos that are uploaded to the platform. This feature requires a minimum Global version of the Zoom desktop client for Windows, macOS, or Linux and a minimum version of 5.11.9 to support automated transcription for languages other than English.
Automated Captions
The Zoom automated captioning feature is a valuable tool to support inclusive communication during virtual meetings and webinars. This type of captioning uses automatic speech recognition technology to transcribe meeting audio. Depending on the quality of recording, automated captions may be less accurate than manually entered captions. The CC button on the Zoom floating toolbar allows participants to request and enable captions during a meeting, which will appear as subtitles within the video window. Captions can also be saved as a transcript using the CC Live Transcript option.
Zoom also offers the option for meeting hosts to assign a participant to type captions manually. This method is typically more reliable than automated captioning, and can increase accuracy for participants who speak with a difficult accent or have low audio quality. This is an optional feature available to all participants during a Zoom meeting.
For more information about using this feature, please visit Zoom’s Captions and Transcription page. If you are a UW student and would like to use a third-party service to record and caption your Zoom sessions, please contact either Disability Services for Students or the ADA Coordinator’s Office to arrange a third party captioning provider. For faculty and staff, please note that using a third-party service is not a replacement for UW’s ADA-required accommodation of closed captions during Zoom sessions.
Third-Party Captions
There are several captioning options available through Zoom, including manual captioning and automated captioning (or Zoom live transcription). Manual captioning involves a designated participant typing captions in real-time during the meeting or webinar. This method ensures that the captions are accurate because the captioner is actively listening to and typing the content being discussed in the meeting or webinar. In addition to manual captioning, there are also third-party services that provide automatic captions for Zoom meetings. These services use advanced speech recognition technology or professional captioners to generate the captions, and can be integrated with Zoom through a dedicated caption URL.
To enable automated captioning on zoom, the host must log in to the Zoom web portal and click Settings. From there, the host must select the “Meeting” tab and then scroll down to “In Meeting (Advanced)”. Then, the host should toggle the captioning switch so that it is blue.
If the automated captioning option is enabled, participants will see a transcript side panel during the Zoom session or webinar. If the full transcript is saved to the computer, the attendees can review it for later reference. This is a great feature for students with learning disabilities. However, it is important to note that the full transcript of a zoom session or webinar does not include the closed captions.
Transcripts
Closed captioning promotes inclusion via universal design, making it easy for students with hearing disabilities or learning challenges to understand a Zoom lecture. In addition, it can help students who are learning in noisy environments.
eClass instructors are encouraged to enable captioning for all of their Zoom sessions. There are several options for captioning a Zoom session, including manual and automated captions. The manual captioning option involves having a designated participant type the captions during a Zoom meeting or webinar. The automatic captioning option uses a third-party service that streams text from its closed captioning software to the Zoom meeting.
In the Zoom web portal, go to ‘Settings’ and select ‘Meeting’ along the left. Scroll down to the ‘In meeting (advanced)’ section and click the ‘Closed Captioning’ switch. Once you enable this, the ‘Assign a participant to type captions’ and ‘Enable Auto-Transcription’ options will be enabled.
If you choose to enable these options, a transcript will be saved under your meetings located in your Zoom account, and is available to download or edit. It will also be included in the recording if you are recording the session as the host or as a participant. You can view or download the transcript by selecting the CC Live Transcript or Gallery View mp4 file. You can adjust the appearance of subtitles/captions by clicking the caret above ‘Hide Captions’ and selecting Caption Settings.
Leave a Reply