How to Enable Closed Captioning on Zoom With Pathable
Enable Closed Captioning On Zoom captioning helps make videos understandable for audiences who can’t hear, while subtitles translate audio into other languages. This article describes how to enable manual or automated closed captions in your zoom sessions with Pathable.
Start by logging into the zoom web portal and selecting ‘settings’ from the navigation panel. Then select ’Meeting (Advanced)’ and locate the toggle switch next to ‘Manual Captions’.
Enabling closed captioning on Zoom is a straightforward process that enhances accessibility for participants who may be deaf or hard of hearing.
Step-By-Step Guide Below to enable closed captioning in Zoom.
1. Sign in to Zoom:
- Open the Zoom application on your computer.
- Sign in with your Zoom account credentials.
2. Join or Host a Meeting:
- To enable closed captioning, you need to be either the host of a meeting or have the host’s permission to enable this feature.
3. Start or Join a Meeting:
- Click on the “New Meeting” button to start a new meeting or join an existing one by entering the meeting ID.
4. In-Meeting Settings:
- Once in the meeting, look for the toolbar at the bottom of the Zoom window.
- Click on the “Participants” button to open the Participants panel.
5. Participants Panel:
- Locate the participant for whom you want to enable closed captioning.
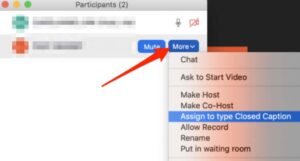
- Hover over the participant’s name until the “More” button (three dots) appears.
6. More Options:
- Click on the “More” button, and a menu will appear.
7. Assigning Closed Captioning:
- From the menu, select “Assign to Type > Closed Caption.”
8. Enable Closed Captioning:
- A pop-up window will appear, confirming that you want to assign closed captioning to the selected participant. Click “Assign.”
9. Host Approval (if applicable):
- If you are not the host, the host may need to approve the request for closed captioning. The host will receive a notification and can choose to enable closed captioning for the participant.
10. View Closed Captioning: – Once closed captioning is assigned and approved, participants can view the captions by clicking on the “CC” button located in the Zoom toolbar.
11. Customizing Closed Caption Appearance: – Participants can customize the appearance of closed captions by clicking on the “CC” button and selecting “Subtitle Settings.” Here, you can adjust the font, size, and color of the captions.
12. Enabling Automatic Closed Captioning (Optional): – Zoom also offers an automatic closed captioning feature. The host can enable this by clicking on the “Live Transcript” button in the Zoom toolbar and selecting “Enable Auto-Transcription.”
13. Troubleshooting: – If closed captioning is not working correctly, ensure that you are using the latest version of the Zoom application. You can check for updates in the settings menu.
14. End the Meeting: – To stop closed captioning, the host can click on the “Live Transcript” button and select “Stop Subtitle.”
By following these steps, you can easily enable closed captioning in Zoom, promoting inclusivity and accessibility in your virtual meetings.
How to Turn On Captions
Closed Captioning allows for real-time transcription of spoken words during a Zoom session, similar to subtitles in a movie. Closed captioning is important for accessibility in eLearning lectures and allows students with hearing impairments or other limitations to follow along. In addition, closed captioning can help prevent miscommunications and provide clarification for non-native speakers in the classroom.
For Zoom accounts through DePaul, enabling closed captioning is a simple process that requires only one action from the meeting host. Within a Zoom meeting, participants will see a new button option in the toolbar at the bottom. This will allow them to toggle CC Live Transcription on and off, as well as view the full transcript in the sidebar if desired.
The CC button will either display a pre-existing text transcript (transcript) or an automatically generated caption based on the audio in the video conference call. If the host of the Zoom meeting has enabled Auto-Transcription, participants will also be able to select a third-party service that will provide live remote captioning for the videoconference.
Alternatively, the host can enable manually typed captions by assigning a participant to do so. If the host selects a participant to manually type captions, a new option will appear in the participants window that reads “Assign me to type captions.” To learn more about this feature, please check out the Zoom documentation for details.
How to Enable Auto-Transcription
If you’re a meeting host, you can enable automatic captions for all your Zoom meetings by clicking the Auto-Transcription toggle in the Settings panel. This will transcribe your speech and audio in real time and display it as subtitles during the meeting.
Note that you’ll need a microphone with good sound quality for this to work well. Also, you’ll need to speak slowly so that the transcription matches your words exactly. If you don’t, your transcription may be inaccurate or even difficult to read.
Another option is to use manual captioning for your Zoom meetings. This allows you to add captions for any audio in your meeting, enabling people who are deaf or hard of hearing to participate in the conversation. To enable manually-entered captions, the Zoom host must assign a meeting attendee to type the captions. Then, the meeting attendees can view the captions as they listen to the recording on the web or download the transcript for later.
Finally, you can use a third-party captioning service to transcribe your Zoom meetings and webinars in real time. These services offer advanced capabilities, customization options, and professional support. To get started, the Zoom host or meeting participant must obtain an API token from the third-party captioning service and paste it into the Zoom Settings panel. Once the transcript is saved, you can access it from the ‘Full Transcript’ option in the Settings panel.
How to View the Full Transcript
Enable Closed Captioning On Zoom has a built-in feature that automatically transcribes speech and audio during meetings or webinars. This feature is available for all Zoom accounts and is free of charge.
Once enabled, you will see a live transcript button in your Zoom meeting controls bar. You can choose to view a transcript of the entire meeting, or you can select the arrow next to it to view a list of the individual participants who have typed captions. You can also download a copy of the full transcript as text file on your computer.
Note: If you are using an old version of the Zoom web client, you may not be able to use automatic transcription. If this is the case, you can manually type your captions. This is recommended since machine-generated captions can be incorrect, especially when it comes to technical or specialized vocabulary.
You can enable manual captions by going to your account settings and selecting ‘Manual Captions.’ You can choose to enable them at the account level, or you can set them for specific groups. Once you have configured your settings, click ‘Save’ to save them. Then, when you attend a Zoom call, the transcript will appear as subtitles for your video, or it can be displayed in the chat window if the host has enabled that option.
How to Turn Off Captions
When a Zoom user disables manual captioning, any attendees using a version of the Zoom web client prior to the 5.9.0 update will not be able to view automatic captions during their meetings. To enable automated captioning, the host or admin will need to log into the Zoom portal and go to Account Management > Caption Settings. Then, the captions option will be set to ‘Always show captions’.
The next time a zoom user hosts or joins a meeting, the ‘Closed Captioning’ button will appear along the bottom of the screen. The user can then click the ‘Live Transcript’ option to view the subtitles that are generated during the meeting.
Alternatively, a participant can use a 3rd party service to generate closed captioning for the video that is being broadcast during a zoom session. This can be a much faster and cheaper solution to the host of a zoom session, as they do not have to pay for an employee to be present during the meeting to type in the subtitles.
To enable this option, the host will need to sign into the Zoom web portal and click the ‘Settings’ link that is located along the left side of the page. From here, the Zoom admin will need to navigate to ‘Meetings (Advanced)’ and scroll rapidly down to find the ‘Closed Captioning’ option that will need to be toggled on.
Leave a Reply