How to Enable Chromebook on Developer Mode
Enable Chromebook On Developer Mode gives you access to the command line on your Chromebook. It also lets you install Linux applications and make other advanced modifications to your device. It can be risky, however, and it can void your warranty. I also wipes all locally stored data.
To enable developer mode, press and hold the Esc + Refresh keys, then press the power button. Wait for the screen that says “OS verification is off” to appear.
Enabling Developer Mode on a Chromebook is a process that allows users to access advanced features, install other operating systems, and have greater control over their device. It’s important to note that enabling Developer Mode will wipe all local data, so make sure to back up any important files before proceeding. Additionally, keep in mind that this process may void your warranty, and you should proceed at your own risk.
Follow These Steps:
1. Backup Your Data: Before you begin, ensure that you have backed up all important data. Enabling Developer Mode will erase all local data on the Chromebook.
2. Power Off Your Chromebook: Make sure your Chromebook is powered off before proceeding to the next steps.
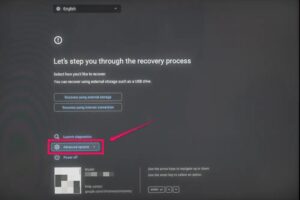
3. Enter Recovery Mode: To enter Recovery Mode, press and hold the Esc and Refresh keys simultaneously, then press the Power button. Once in Recovery Mode, you’ll see a screen with a yellow exclamation mark.
4. Enable Developer Mode: Press Ctrl + D on your keyboard. You’ll see a prompt asking if you want to turn on Developer Mode. Press Enter to confirm. Note that this process will take a few minutes, and your Chromebook will display a warning screen during boot-up.
5. Wait for Developer Mode to Enable: Your Chromebook will now reboot and enable Developer Mode. This process may take some time, so be patient.
6. Bypass OS Verification: After Developer Mode is enabled, your Chromebook will show a screen with a red exclamation mark. To bypass OS verification, press Ctrl + D. Your Chromebook will boot into Developer Mode.
Follow These steps
7. Set Up Developer Mode: Follow the on-screen instructions to set up Developer Mode. This includes configuring language, keyboard, and network settings. Once completed, your Chromebook will boot into Developer Mode.
8. Enable Boot Legacy Mode (Optional): If you plan to install a different operating system, you might need to enable Legacy Boot Mode. To do this, press Ctrl + D at the OS verification screen, then press Enter. After enabling Legacy Boot, follow the on-screen instructions.
9. Install Custom Firmware (Optional): To gain even more control over your Chromebook, you can install custom firmware like SeaBIOS. This step is optional and requires additional technical knowledge. Instructions for installing custom firmware can be found on developer forums and websites.
10. Restore Data (Optional): If you backed up your data in the first step, you can now restore it to your Chromebook.
Remember that enabling Developer Mode and making modifications to your Chromebook may have security implications and could void your warranty. Additionally, be cautious when installing custom firmware or other operating systems, as it may not be officially supported and could lead to unexpected issues. Always follow instructions carefully and research thoroughly before making significant modifications to your device.
1. Turn Off Your Chromebook
You should make sure that your Chromebook is turned off before attempting to enter developer mode. This is because enabling developer mode will wipe all data from your Chromebook and remove the security feature known as Verified Boot that helps keep malware from attacking your device.
You can turn off your chromebook by pressing and holding the Esc + Refresh keys and the Power button simultaneously. The location of the power button may vary depending on your model, but it is typically found on the right side of the keyboard or near a circular icon with a vertical line.
This will open the shutdown screen, and you can then select the option to shut down your device. Once you’ve done this, your device will be powered off and entered Recovery Mode.
2. Press and Hold the Esc + Refresh Keys
As Chrome OS devices continue to grow more powerful and capable, some users may wish to tinker with their device beyond what’s normally available. This can be done by entering Developer Mode, which removes the system’s user locks and gives you access to abilities that aren’t officially supported.
It’s important to note that this process also powerwashes the device, deleting any local data, so backup is advised before proceeding. Additionally, once the device is in Developer Mode, it will display a warning message and sound a beep each time it restarts.
Lastly, enabling Developer Mode will generally void your warranty, so be sure to disable it before seeking support for any hardware issues you might have. Despite these risks, this process is relatively simple and shouldn’t take more than a few minutes.
3. Press the Power Button
Chromebooks are inexpensive, lightweight laptops that can run a variety of different applications. However, they have some limitations that can prevent you from utilizing them to their full potential. For example, they lack the ability to install third-party software or alternative operating systems.
To bypass this limitation, you need to enable Developer Mode on your Chromebook. This will allow you to access advanced settings and install new software. However, it should be noted that Developer Mode disables some of the security features of your Chromebook and will also wipe all of your user data.
To enable Developer Mode, you need to press and hold the Esc, Refresh, and Power buttons simultaneously. This will reboot your Chromebook to a recovery screen and will display a message that says “OS verification is OFF.” This process also Powerwashes your device, erasing all local data.
4. Press the Ctrl + D Keys
Developer mode is a powerful tool that allows you to access features that are normally locked out. For example, you can sideload apps and install other operating systems. However, it can also make your device less secure and may even void the warranty.
To enable developer mode, press and hold the Esc + Refresh keys (usually the fourth key from the left on the top row of keys) on your keyboard and then press the power button. Your Chromebook will then display a screen that says “Chrome OS is missing or damaged”.
The process of disabling developer mode is much simpler than enabling it. To disable it, reboot your Chromebook and select “Return to secure mode” from the recovery menu. Then, follow the on-screen instructions to finish the process.
5. Restart Your Chromebook
There are a few things you should know before you enable Developer Mode. First, all data stored on your Chromebook will be wiped, including files in your personal download folder. Second, the process of enabling Developer Mode can damage your device by removing the security features that keep it safe from malware and other unauthorized software. Finally, it generally voids the warranty of most Chromebooks.
To avoid these risks, you should only enable Developer Mode if you are an experienced user and understand the consequences. Also, be sure to save any work or open tabs and log out of your account before shutting down your device. You can do this by selecting the time in the bottom corner of your screen and then choosing ‘Shut Down’.
Leave a Reply