How to Enable and Disable a Form
Enable And Disable A Form a good intro paragraph identifies the subject of your article and establishes your point of view. It also helps your readers understand why they should care about the topic.
The disabled attribute is a boolean value that applies to form controls (input>, select>, and textarea>) and their descendants. Browsers display these elements as grey since they won’t receive browsing events like mouse clicks and aren’t submitted with the form.
Enabling and disabling a form is a crucial aspect of web development, as it allows developers to control user interactions and data submission. In this comprehensive guide, we will explore the various techniques and best practices for enabling and disabling forms in web applications. This guide assumes a basic understanding of HTML, CSS, and JavaScript.
Understanding Form State
A form typically consists of various input elements such as text fields, checkboxes, radio buttons, and buttons. Enabling and disabling a form involves manipulating the state of these elements to control user interaction. The primary goal is to prevent users from submitting incomplete or invalid data.
Using HTML Attributes
HTML provides the disabled attribute, which can be used to disable individual form elements. For example, to disable a text input field, you can include the following attribute:
<input type="text" name="username" disabled>
This simple attribute can be applied to various form elements like buttons, checkboxes, and select elements. It prevents user interaction and visually indicates that the element is inactive.
JavaScript for Dynamic Control
While static disabling through HTML attributes is useful, dynamic control using JavaScript allows for more flexibility. By leveraging JavaScript, you can enable or disable form elements based on user actions, form validation, or other dynamic criteria.
Example: JavaScript Function to Enable/Disable Form Elements
function toggleForm(enable) {

// Get form elements by their IDs or other selectors

var usernameInput = document.getElementById('username');

var submitButton = document.getElementById('submit');usernameInput.disabled = !enable;
submitButton.disabled = !enable;
}
In this example, calling toggleForm(true) would enable the form elements, while toggleForm(false) would disable them. This function can be triggered in response to user actions, form validation, or any other relevant event.
Conditional Disabling with Validation
Form validation is a common scenario where enabling and disabling form elements is crucial. You can use JavaScript to check the validity of user inputs and enable/disable the submit button accordingly.
Example: Form Validation with JavaScript
function validateForm() {

var usernameInput = document.getElementById('username');

var passwordInput = document.getElementById('password');

var submitButton = document.getElementById('submit');var isValid = usernameInput.value.length > 0 && passwordInput.value.length > 0;
submitButton.disabled = !isValid;
}
In this example, the validateForm function checks if both the username and password fields have non-empty values. If they do, the submit button is enabled; otherwise, it remains disabled.
Frameworks and Libraries
Modern web development often involves the use of frameworks and libraries that simplify complex tasks. Frameworks like React, Angular, and Vue provide their ways to handle form state.
Example: React State Management
import React, { useState } from 'react';
function MyForm() {
const [username, setUsername] = useState(”);
const [password, setPassword] = useState(”);
return (
<form>
<input
type=“text”
value={username}
onChange={(e) => setUsername(e.target.value)}
/>
<input
type=“password”
value={password}
onChange={(e) => setPassword(e.target.value)}
/>
<button type=“submit” disabled={!username || !password}>
Submit
</button>
</form>
);
}
In this React example, the form elements are controlled by the component’s state. The disabled attribute of the submit button is dynamically set based on the presence of values in the username and password fields.
How to enable a form
Forms can serve many different purposes for an organization or company. These forms can range from a feedback survey to an employee performance review. Often these forms can be submitted electronically and stored in an easy-to-access location for future use.
HTML forms have the option of disabling their input fields and buttons using the disabled attribute. When this Boolean value is added to an input> element or its descendant controls (select>, textarea>, button>) it makes them unclickable and unusable until they are enabled. Disabled control elements won’t receive browsing events like mouse clicks or focus-related ones and are generally displayed as gray.
jQuery has an instance method for setting the disabled attribute on form elements and their controls. This is the prop() method and it can be used to set or return the property on an element or a group of elements. When an element supports the disabled attribute and it is set, its descendants match the :disabled pseudo-class and vice versa.
How to disable a form
If you want to disable a form, you can do so by adding the disabled attribute to the form element. When this attribute is added, the form becomes immutable and its controls become disabled. Disabled controls are not focusable, cannot receive clicks or other browsing events, and they don’t participate in constraint validation.
The disabled attribute is supported by input>, select>, textarea>, and button> elements, as well as their descendants. Browsers usually display disabled forms and their descendants as grey.
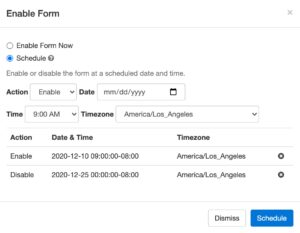
In Jotform, you can disable a form using an expiration date or submission limit. You can also pause a form to prevent new submissions until you’re ready to enable it again. You can also use a custom message to inform respondents that the form is unavailable. Then, when you’re ready to reactivate the form, just select it from the list of your forms. It’s that easy! Learn how to disable and reactivate your forms with our course Coding for Everyone.
How to pause form submissions
If you want to disable form submissions after a certain date, you can do this in the Form settings. You can also add a message that says submissions are closed and hide the submit button.
The disabled attribute is supported by input>, select>, textarea> and button> elements. When a control has this attribute, it and its descendant controls don’t participate in constraint validation and aren’t eligible to receive browsing events like mouse clicks and focus-related ones. Browsers often display such controls as gray.
You can enable a form’s submissions from your forms listing (home page) by hovering over the horizontal ellipsis of the desired form and selecting Enable. You can also create a form that has the ability for respondents to pause their submissions and resume them later by sending a resume link to them. This is especially handy for large forms where you want respondents to be able to complete them over multiple sessions.
How to limit form submissions
If you want to limit the number of submissions a form receives, you can do so using the Form Limiter addon.
When the form reaches its submissions cap, the submit button will display a message letting users know that the form is closed. You can edit the text that appears in this field by clicking the “Edit Form Submissions Cap/End Date Reached Message” link when editing the form.
The Form Limiter addon will allow you to limit your form’s responses based on either a fixed number of submissions or a specific date and time range. This will ensure that your Google Form always closes after the predetermined criteria are met, eliminating the need for manual monitoring and intervention. The addon will also display an error message if the number of submissions exceeds the limits that you set.
Conclusion
Enabling and disabling forms involves a combination of HTML attributes and JavaScript functionality. Whether you’re working with static pages or dynamic web applications using frameworks, understanding how to control form state is essential for a seamless user experience. By leveraging these techniques, developers can ensure that users submit valid and complete data while maintaining a responsive and interactive interface.
Leave a Reply