How to Enable a USB Port in Windows 10
Enable A USB Port In Windows 10 ports are used to connect external devices to a computer. They can also be used to transfer files between computers and other devices.
USBs can be a security threat to your system, because they allow users to copy your sensitive data without permission. Disabling USBs prevents people from stealing data and injecting viruses into your system.
Enabling a USB port in Windows 10 is a straightforward process, and you can do it using various methods. In this guide, I will walk you through different ways to enable a USB port on your Windows 10 computer.
Method 1: Check USB Port Hardware
- Inspect the Physical Connection:
- Ensure that the USB device is properly connected to the USB port.
- Try using a different USB cable or device to rule out any issues with the hardware.
- Check for Physical Damage:
- Examine the USB port for any physical damage, bent pins, or foreign objects.
- If you find any damage, consider getting professional assistance for repairs.
2: Update USB Drivers
- Open Device Manager:
- Right-click on the Start button and select “Device Manager.”
- Locate USB Controllers:
- Expand the “Universal Serial Bus controllers” section.
- Update USB Drivers:
- Right-click on each USB Root Hub and select “Update driver.”
- Choose “Search automatically for updated driver software.”
- Restart Your Computer:
- After updating drivers, restart your computer to apply the changes.
3: Enable USB Port in BIOS/UEFI
- Access BIOS/UEFI Settings:
- Restart your computer and enter the BIOS/UEFI settings. You can usually do this by pressing a key like F2, F10, F12, or Del during startup.
- Enable USB Ports:
- Navigate to the “Advanced” or “Integrated Peripherals” section.
- Look for an option related to USB configuration.
- Ensure that USB ports are enabled. Save changes and exit.
4: Check Power Management Settings
- Open Device Manager:
- Right-click on the Start button and select “Device Manager.”
- Adjust Power Settings:
- Under “Universal Serial Bus controllers,” right-click on each USB Root Hub and choose “Properties.”
- Go to the “Power Management” tab and uncheck “Allow the computer to turn off this device to save power.”
- Repeat this process for all USB Root Hubs.
5: Disable USB Selective Suspend
- Access Power Options:
- Open the Control Panel and go to “Power Options.”
- Change Plan Settings:
- Click on “Change plan settings” for your selected power plan.
- Disable USB Selective Suspend:
- Click on “Change advanced power settings.”
- Expand the “USB settings” and “USB selective suspend setting.”
- Set both “On battery” and “Plugged in” options to “Disabled.”
6: Registry Editor (Advanced Users)
- Open Registry Editor:
- Press Win + R, type “regedit,” and press Enter.
- Navigate to USB Key:
- Go to
HKEY_LOCAL_MACHINE\SYSTEM\CurrentControlSet\Services\USBSTOR.
- Go to
- Modify Start Value:
- Double-click on “Start” in the right pane.
- Change the value data to “3” to enable USB ports.
- Click OK and restart your computer.
7: System Restore
- Open System Restore:
- Type “Create a restore point” in the Windows search bar and select the corresponding result.
- Restore System:
- Click on the “System Restore” button.
- Follow the on-screen instructions to restore your system to a previous state.
8: Check Group Policy Settings
- Open Group Policy Editor:
- Press Win + R, type “gpedit.msc,” and press Enter.
- Navigate to USB Restrictions:
- Go to
Computer Configuration -> Administrative Templates -> System -> Removable Storage Access.
- Go to
- Enable All Removable Storage Classes:
- Double-click on “All Removable Storage classes: Deny all access” and set it to “Not Configured.”
- Restart Your Computer:
- After making changes, restart your computer for the settings to take effect.
By following these methods, you should be able to enable a USB port on your Windows 10 computer. If the issue persists, consider seeking assistance from a professional or contacting your device manufacturer’s support.
Device Manager
The Device Manager is a Windows tool that can help you check the status of USB ports on your computer. This tool can also be used to enable, disable, and update USB drivers. It can also be used to troubleshoot problems with USB devices. However, before you begin troubleshooting, it’s important to determine whether the USB port is faulty or not. To do this, simply plug the USB device into another computer. If it works, then the port is probably fine. Otherwise, you’ll need to replace it.
Sometimes, you may find that your computer’s USB ports are blocked by an administrator. This is especially common on corporate computers. This is done to prevent unauthorized access and data theft. However, this can be a frustrating issue for users. In this article, we will show you how to enable USB ports that are blocked by an admin.
First, you’ll need to open the Device Manager and expand the Universal Serial Bus controllers section. This will display all of your USB ports on the screen. If any of them are showing a yellow exclamation mark, this means that there is an issue with the port. You can try removing the device and then reconnecting it. If this doesn’t fix the problem, you can try changing your power settings. Make sure that the USB selective suspend setting is disabled.
Registry Editor
The USB ports on a computer allow users to connect and use external drives, keyboards and mice. They can also transfer files between computers. However, it can become difficult to access USB storage devices if the system administrator has blocked them. Fortunately, there are several ways to enable USB ports that have been disabled by the administrator.
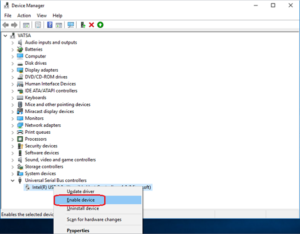
The first way is to open the Device Manager. Then, select the Universal Serial Bus controllers option. Next, right-click on the USB controller and select “Enable device.” Repeat this step for each of the USB devices on your computer.
Another method is to use the Registry Editor. This is an advanced tool that allows users to make changes to the Windows operating system. This method may not work for all PCs, and it is recommended that you consult a professional before using this tool.
Once you have enabled the USB ports, restart your computer and check to see if they are working properly. If they aren’t, try updating the drivers for your device. You can download the latest driver from the manufacturer’s website or using a free system information tool. In addition, you can also try changing the power settings on your computer. These options may fix the problem by removing conflicting power sources from your computer. If these methods don’t work, you can always contact the support team of your device manufacturer for further help.
Local Group Policy Editor
The computer’s USB ports let you quickly connect and use a keyboard, mouse, external hard drive or any other peripheral. You can even charge your mobile phone, MP3 player or digital camera. But if a USB port isn’t working, the administrator for your business or home may have disabled it. If this is the case, you can enable it using the Device Manager or by changing the registry.
First, make sure you have a shortcut to the Local Group Policy Editor. The easiest way to do this is to pin it to your taskbar or Start menu, but you can also create a shortcut on the desktop. You can then access the new right-click options by clicking or tapping on the shortcut.
Once you’ve created a shortcut, click or tap it to open the Microsoft Management Console. You can also launch it by pressing Windows + R and typing mmc into the window that appears.
In the Local Group Policy Editor, navigate to “Computer configuration” –> “Administrative templates” –> “System” –> “Device Installation Restrictions”. Expand “USB Controllers”, then right-click each entry and select “Disable device”. To re-enable USB devices, change the value of the DWORD to 3. Restart your computer and then try connecting a USB device. If it is able to connect, the settings have been successfully changed.
Troubleshooting
USB ports enable you to connect a variety of devices, including mice and keyboards, to your computer. They also let you plug in external hard drives and MP3 players, and transfer files between computers. However, if your USB device stops working after you upgrade to Windows 10, there are several troubleshooting steps you can try.
One of the most common causes of USB ports not working is that they are missing or outdated drivers. To fix this, you can manually install updated drivers or use a professional driver update tool to automatically scan and update outdated drivers.
Another possibility is that your laptop’s power settings are interfering with the USB controllers. To fix this, you can open the Control Panel and navigate to the Power Options menu. Select the Advanced power management settings option and change the power management settings to disable the “Allow the computer to turn off this device when it is not in use” option.
If none of these methods work, it may be that your USB port is faulty or damaged. If this is the case, you can contact the manufacturer of your laptop or consult a technician. In the meantime, you can use an application like Wonder share Recoverin Data Recovery to recover any lost files. The program supports most of the major file formats and is available for both Mac and Windows.
Leave a Reply