How to Disable Bixby and Enable Google Assistant
Disable Bixby And Enable Google Assistant is Samsung’s own digital assistant that has a few useful features. But if you’re more interested in Google Assistant, you can replace Bixby with it without losing any functionality.
The only hurdle is the Bixby button, which cannot be fully disabled but can be remapped to launch Google Assistant. Luckily, there are several apps available that can do just that.
Disabling Bixby and enabling Google Assistant on your Samsung device can be a bit of a process, as Samsung tends to integrate its services deeply into the system. However, with some patience and a few steps, you can make the switch. Help you disable Bixby and enable Google Assistant on your Samsung device.

Enabling Google Assistant Steps:
1: Unlock Your Device Begin by unlocking your Samsung device and navigating to the home screen.
2: Access Bixby Home Swipe right on your home screen to access Bixby Home. This is where you can find Bixby-related settings.
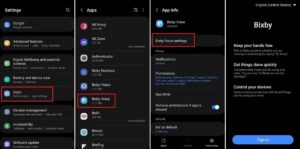
3: Disable Bixby Voice Bixby Voice is one of the main components you’ll want to disable. To do this, press the Bixby button (located on the left side of your device) or swipe right on your home screen to access Bixby Home. Tap the three vertical dots in the upper-right corner, select “Settings,” and then toggle off the “Bixby Voice” option.
4: Disable Bixby Routines Bixby Routines can also interfere with your preferred assistant. To disable Bixby Routines, go back to the Bixby Home settings and toggle off the “Bixby Routines” option.
5: Disable Bixby Home
Return to the home screen, press and hold on an empty space, and swipe to the rightmost panel. Here, you’ll find Bixby Home. Disable it by toggling off the switch at the top.
6: Disable Bixby Button If your device has a dedicated Bixby button, you’ll want to disable it to prevent accidental Bixby activations. To do this, press the button to open Bixby, tap the three vertical dots in the upper-right corner, and select “Settings.” Toggle off the “Bixby Key” option.
7: Disable Bixby Vision Bixby Vision is another Bixby feature that you might want to disable. Open the Camera app, tap on the Bixby Vision icon (usually located on the bottom left), and toggle it off.
8: Download and Install Google Assistant If Google Assistant is not already installed on your device, you can download it from the Google Play Store. Open the Play Store, search for “Google Assistant,” and install the app.
9: Set Up Google Assistant Once installed, open the Google Assistant app and follow the on-screen instructions to set it up. This usually involves signing in with your Google account and configuring your preferences.
10: Configure Voice Activation
To make Google Assistant easily accessible, you might want to set up voice activation. Open the Google Assistant app, tap on your profile picture in the top right, select “Settings,” go to the “Voice” section, and enable “Hey Google.”
11: Adjust Default Voice Assistant Now that Google Assistant is set up, you need to make it your default voice assistant. Go to your device’s settings, find the “Apps” or “Applications” section, tap on the three vertical dots in the top-right corner, and select “Default apps” or “Default applications.” Look for “Device assistance app” or a similar option and choose Google Assistant.
12: Test Google Assistant Ensure that Google Assistant is working correctly by using the voice command “Hey Google” or by tapping and holding the home button (if configured that way). If Google Assistant responds, you’ve successfully enabled it on your Samsung device.
13: Optional – Install Google App Updates It’s a good idea to keep the Google app updated for the latest features and improvements. Open the Google Play Store, go to “My apps & games,” and update the Google app if there’s an available update.
14: Optional – Disable Bixby Services To further clean up your device, you can disable or uninstall some Bixby-related services. Go to your device’s settings, navigate to “Apps” or “Applications,” find and select “Bixby Home,” and either disable it or force stop it. Repeat this process for other Bixby-related apps, such as “Bixby Service” or “Bixby Voice.”
How to disable bixby
If you’re not a fan of Samsung’s Bixby digital assistant, there are several ways to disable it. You can change the Bixby key button to launch Google Assistant instead of its default action, and you can also remap the double-tap action to work with apps other than Bixby. This method works on any device that supports Bixby button remapping, including the Galaxy S9 and S9 Plus, S10 and S10 Plus, and Galaxy Note 8 and Note 9.
First, you’ll need to log into your Samsung account (if you haven’t already). Open Bixby and tap the three-dot menu to the right of the home screen. Select Settings and then turn off Bixby key button remapping.
On the Power key options page, tap the switch next to “Open app.” Choose a custom app to launch when you press the power button. This replaces the Bixby Voice Wake-up function and makes it easier to access your phone’s digital assistant.
You can still activate Bixby by pressing the power button, but it will only launch the selected app. The process may differ slightly depending on your device model and Android version, so you’ll need to refer to your user manual or perform an online search for specific instructions. There are a few other methods for disabling Bixby, but they require third-party apps and may not work on all devices. For example, an experimental app called bxActions can reprogram your power button to open Google Assistant and allow the double-press and hold actions to summon non-Bixby apps. However, you’ll need to grant the app permission to use your private phone data, which is a concern.
How to turn off bixby voice wake-up
Despite its best intentions, Bixby has a reputation for being annoying. It can be triggered by accident while using the phone, and it doesn’t always respond to commands. This has led many people to ditch Bixby in favor of Google Assistant, which is compatible with a lot of other devices. This guide will show you how to disable Bixby on your Samsung device and replace it with Google Assistant.
The process will vary based on your device model and Android version, but the steps should be similar across most models. If you’re unsure how to do this, consult your user manual or perform an online search for instructions tailored to your specific phone model.
Some older Samsung phones still have a dedicated button that triggers Bixby Home. Fortunately, there’s an easy way to prevent this from happening by changing the settings for the button.
You’ll want to change the Wake-up Sensibility to Low, which will prevent the button from activating Bixby. This will also save your remote’s battery. Alternatively, you can use a third-party app like BixActions or BixRemap to remap the button so that it activates Google Assistant instead of Bixby Home. However, it’s worth noting that recent updates from Samsung have wreaked havoc on some of these apps.
How to turn off bixby key
Disable Bixby And Enable Google Assistant is Samsung’s virtual assistant that comes with a dedicated button and can be activated by voice. However, it can be a little annoying at times as it constantly pops up like a pushy salesman even when you aren’t looking for it. Luckily, the company’s latest phones have an easy way to disable it.
On the Galaxy S9 and Galaxy Note 9, you can disable Bixby Home, Bixby Vision, and Bixby Voice with one click on your settings. You can also change the button’s activation from a single tap to a double-tap to make it harder to activate by accident.
If you don’t want to disable Bixby, you can still remap the button to launch apps other than Google Assistant by visiting your phone’s Bixby settings menu and tapping the Use single press slider. This will allow you to use the button to launch most apps except for those that are voice-based.
For older phones, you can still disable the Bixby button entirely by changing the activation from a single tap to requiring a double-tap. You can also use an experimental app called bxActions to reprogram the button to launch Google Assistant instead, but you will have to give it permission to access your private data. That’s not ideal, but it does work. You can find the option to do this in the Bixby Settings menu by swiping in from the left side of the home screen.
How to turn off bixby home
If you aren’t a fan of Samsung’s Bixby assistant, there are some easy ways to disable it on your phone. One option is to simply swipe in from the left side of your home screen. This will open your home screen options, and you can then swipe right to see the settings menu. On this menu, you will find a button that allows you to turn off Bixby home. Another option is to remap the Bixby key on your device to launch Google Assistant instead of Samsung’s assistant. This can be done through your device’s home screen options, or by using an app that is designed to remap your devices’ Bixby key function.
On Samsung’s newest phones, the side key (formerly known as the Power button) is now a Bixby button by default, and can be configured to do something else if you’d like. The easiest way to do this is to open up the Side key settings, and ensure that “Open Bixby” isn’t toggled on under Press and hold.
You can also choose to pin some cards to the top of your Bixby home, such as your steps goal from Samsung Health or your calendar events for the day. This will make them easier to access when pressing the Bixby key, and will let you quickly get to your most important information without having to open up Bixby.
Conclusion:
In conclusion, disabling Bixby and enabling Google Assistant on your Samsung device involves navigating through various settings to turn off Bixby components and make Google Assistant your default voice assistant. Follow the steps outlined above carefully, and you’ll have a streamlined experience with Google Assistant on your Samsung device. Keep in mind that the steps may vary slightly depending on your device model and the Android version it is running.


