
How Do I Enable Cookies on Windows 11?
Enable Cookies On Windows 11 are small pieces of data that can track your activity on the web. This information can include your username, passwords and shopping cart items.
To enable cookies, click or slide the control to the “On” position. Note that some websites may not work properly if you block cookies.
Enable Cookies On Windows 11 is a straightforward process that involves adjusting settings in the default web browser. In this guide, we will focus on enabling cookies in Microsoft Edge, the default browser for Windows 11. Follow these steps to ensure that cookies are enabled.
Step 1: Open Microsoft Edge
- Click on the Microsoft Edge icon on your taskbar or search for it in the Start menu.
Step 2: Access Settings
- In Microsoft Edge, click on the three horizontal dots in the upper-right corner of the browser window. This opens the main menu.
- Scroll down and select “Settings” from the menu.
Step 3: Navigate to Privacy, Search, and Services
- In the Settings menu, locate and click on “Privacy, Search, and Services” in the left sidebar.
Step 4: Configure Cookies Settings
- Under the “Privacy” section, find the “Cookies and site permissions” option.
- Click on “Cookies and site permissions” to access the relevant settings.
Step 5: Enable Cookies
- Ensure that the toggle switch next to “Cookies” is turned on. This allows websites to save and read cookie data.
- Optionally, you may explore advanced settings such as “Block third-party cookies” and “Block all cookies.” Adjust these settings based on your preferences, but keep in mind that blocking all cookies may affect your browsing experience on some websites.
Step 6: Site-specific Cookie Settings
- To manage cookies on a site-by-site basis, scroll down to the “Sites that can always use cookies” section. Here, you can add specific websites and configure how they handle cookies.
- Click on “Add a site” to enter the URL of the website for which you want to customize cookie settings.
- Choose the appropriate cookie setting for the selected site, such as “Allow,” “Block,” or “Clear on exit.”
Step 7: Clearing Cookies
- If you want to clear cookies for all websites, you can scroll down to the “Clear browsing data” section.
- Click on “Choose what to clear” to specify the data you want to delete, including cookies.
- Select “Cookies and other site data” and click on the “Clear” button.
Step 8: Save Changes
- After configuring your cookie settings, make sure to click the “Save” button at the bottom of the page to apply the changes.
Step 9: Restart Microsoft Edge
- Close and reopen Microsoft Edge to ensure that the changes take effect.
Additional Tips:
- Check Browser Updates: Ensure that you are using the latest version of Microsoft Edge, as updates may include security enhancements and new features.
- Security Considerations: While cookies can enhance your browsing experience, they can also pose privacy and security risks. Be mindful of the websites you allow to use cookies and consider periodic clearing of your browsing data.
By following these steps, you should successfully enable cookies on Windows 11 using Microsoft Edge. Keep in mind that the process may vary slightly if you are using a different web browser.
1. Go to Settings
The new Windows 11 Settings interface is different from the old one in many ways. It is a much more organized way to control your computer and make changes. It is easy to open and use but there are some differences to know about.
First, the app is pinned to the Start menu by default and you can easily access it from there. It is also found in the Quick Link menu that houses shortcuts to system tools, utilities, and built-in programs. You can click or tap on the icon to open it. It is also available in the Action Center, which is a collection of icons that show your computer status. This includes the network, volume, and battery icons. You can click or tap on the gear icon to go directly to the Windows Settings app.
You can also right-click or press and hold on a free space on the taskbar to open a contextual menu that will give you the option of opening Settings. This method is particularly handy if you have the icon pinned to the taskbar.
Another way to open the Settings app is to use the Run command from the keyboard. To do so, press the Windows logo key and R on your keyboard at the same time to open a dialog box. Enter ms-settings: and then click or press the “OK” button. This will open the app in a new window.
2. Click on Privacy & Security
Although you’re prompted to examine several high-level privacy options during the Out of Box Experience (OOBE) when you set up Windows 11, there are many more settings available. You can examine and configure these at any time.
Microsoft uses the data it gathers about how you use its products to improve them. That’s why you can see a link to your personal dashboard in some of these settings. Clicking that will open the dashboard in a web browser and let you customize permissions for all of your Windows-related products, including Xbox and Office/Microsoft 365.
If you’re signed in to a Microsoft account, you can also sync these settings across all your devices running Windows 11. You’ll find options for this in the App Permissions section of the dashboard.
In this section you can control the hardware, capabilities, and features apps are given permission to access — location, camera, microphone, inking and typing diagnostic data, notification, and account information.
For example, if you want to stop Microsoft from sending diagnostic and performance data about how you use your PC to the cloud, move the slider right below “Improve inking and typing” to the left. Note that this may result in some Windows features not working as they should. You can clear diagnostic data that’s already been gathered by clicking the “Delete diagnostic data” button.
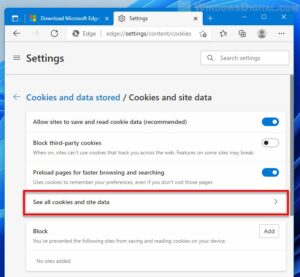
3. Click on Cookies & Site Permissions
Cookies are a necessary part of the modern web, and they help websites remember things like logins, shopping carts and settings. But they can also be a treasure trove of private information and a serious privacy risk.
To enable cookies in Edge, click the small button with three dots on it, found in the top right corner of the browser. That’s the “Settings and more” button, and it will open a large menu with many different options. In the menu, find one of the lower items called Cookies & site permissions, and click that to open the cookie settings.
This opens the Cookie Settings page, where you can change your preferences for both first-party and third-party cookies. The default is to allow all cookies, but you can select other options if you want.
Note that if you opt to allow all cookies, your browser will still download files, even if they aren’t strictly necessary. This is because it takes time to load all of the pages on some sites, so some of the functionality may not be available unless you enable all of the cookies. Alternatively, you can choose to block all cookies, or block third-party cookies only. If you decide to block all cookies, you’ll need to clear your browser data each time you close it.
4. Click on Manage Website Data
Cookies can make browsing the web a little easier by storing passwords and other information. They also help websites track how users use the website. This allows the sites to be able to offer you content that is more relevant to your interests.
You can adjust your Cookie preferences in the Settings panel. To do this, click the button with 3 dots in the top right corner of the browser, then select “Settings and more”. Then, in the large menu that just appeared, click on “Cookies and site data” to view the Cookie options.
In the Cookies and site data window, you can choose between Standard (allow all cookies), which keeps track of your browsing activity across all websites, and Strict (block all cookies). The Standard option is best for most people. However, if you find yourself having issues with some websites, the Strict option might be more helpful.
You can also customize the options by selecting a specific website. To do this, click the search field at the top of the window and type the name of the site whose cookies you want to change the settings for. Then, click the option you want to set. You can also remove all items that match your search by clicking the button labeled “Remove All Shown”. However, be aware that disabling cookies may cause some sites to stop working properly.
Leave a Reply