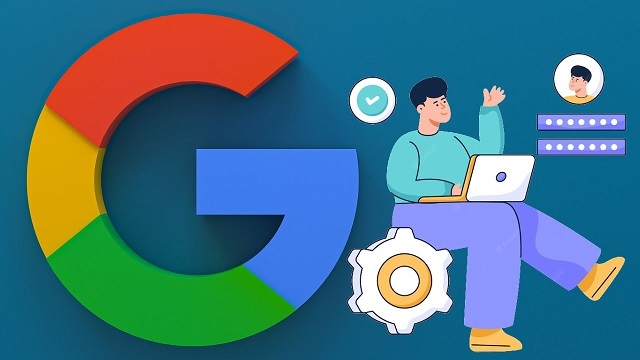
How Do I Enable Access in Chrome?
Google Chrome is one of the most popular browsers used worldwide. It offers several privacy features and is updated regularly with security patches Enable Access In Chrome.
It is a cross-platform browser that runs on Windows, Linux and Mac. I also provides a number of advanced features like Incognito Mode. This mode allows users to browse privately without logging their activity.
Enabling access in Chrome can refer to a variety of actions, so I’ll provide information on a few common scenarios. If you have a specific context or action in mind, please provide more details so I can offer more accurate guidance.
1. Allowing Pop-ups:
- Open Chrome.
- In the top right, click on the three vertical dots to open the menu.
- Go to “Settings.”
- Scroll down and click on “Privacy and security.”
- Under “Content,” click on “Pop-ups and redirects.”
- Toggle the switch to allow or block pop-ups.
2. Enabling Cookies:
- Open Chrome.
- Click on the three vertical dots in the top right.
- Go to “Settings.”
- Scroll down and click on “Privacy and security.”
- Under “Cookies and other site data,” make sure “Cookies and site data” is enabled.
3. Enabling JavaScript:
- Open Chrome.
- Click on the three vertical dots in the top right.
- Go to “Settings.”
- Scroll down and click on “Privacy and security.”
- Under “Content,” make sure “JavaScript” is allowed.
4. Allowing Location Access:
- Open Chrome.
- Click on the three vertical dots in the top right.
- Go to “Settings.”
- Scroll down and click on “Privacy and security.”
- Under “Location,” make sure that “Ask before accessing (recommended)” or “Blocked” is not selected.
5. Enabling Extensions:
- Open Chrome.
- Click on the three vertical dots in the top right.
- Go to “More tools” and then “Extensions.”
- Enable or disable individual extensions as needed.
6. Managing Site Permissions:
- Open Chrome.
- Click on the padlock icon in the address bar (left side).
- Adjust permissions for the specific site you are visiting.
7. Updating Chrome:
- Outdated versions of Chrome might have bugs or lack certain features. Ensure you’re using the latest version of the browser.
8. Proxy and Network Settings:
- If you are dealing with network-related access issues, check your proxy settings and ensure your network is configured correctly.
If you have a specific type of access or functionality you are trying to enable, please provide more details, and I can offer more targeted assistance.
Multiple Tabs
If you use Google Chrome, you’re probably a fan of tabs. They let you keep multiple websites open at the same time, allowing you to switch between them and work more quickly. However, when you have a lot of tabs, it can be hard to figure out which one is which. And, they can also slow down your computer Enable Access In Chrome.
You can search for tabs using the search bar (otherwise known as the omnibox) in the top right corner of your browser. When you do, the search results might show a star next to the tab’s name, which means it’s bookmarked.
The problem is, that’s only if you remember to do it. And, it doesn’t help you if your browser crashes unexpectedly and takes all of your tabs with it. Fortunately, there are several apps that can save and restore your tabs when you close them. One option is XTabs, which lets you set a maximum number of tabs and automatically close the ones that haven’t been used for an extended period of time. Google
Smart Search
Smart Search is a malicious software program that was created to deliver ads and promote products. It’s promoted via fake notification pop-ups and redirected pages. Once installed, this adware will impose changes on the browser’s home page, new tab, and search engine. It also ruins the web browsing experience by showing intrusive and unwelcome content.
This adware gathers information like IP addresses, geolocation, browser history and other valuable data for the schemer’s revenue purposes. It can even transmit this information to third parties for profit.
To remove this extension, you need to reset the browser settings. To do this, go to the address bar and type chrome://extensions. Once you see the list of extensions, delete Smart Search and any other suspicious entry. You may also want to delete the adware from other browser programs. If you want to fully remove this malware from your computer, you can use a free tool like MalwareBytes Anti-Malware (MBAM). The following guide is a step-by-step process that will help you get rid of Smart Search.
Faster Loading
Waiting for pages to load is the bane of many web users, and Chrome has an out-of-the-box feature that can take some of that pain away. This feature uses Google voodoo magic to predict which links you’re likely to click, and it preloads those pages in advance to cut down on loading times.
Enabling GPU Rasterization can also help speed up page rendering by offloading graphics processing to your computer’s GPU. This can help reduce sluggishness, especially on older machines. To enable this, go to the Chrome flags page, search for GPU Rasterization and select Enabled .
Keeping Chrome updated can also improve performance. Google regularly pushes updates that increase optimization and fix bugs. To get the latest version, open Chrome and look for an option that says Update. Click this, and the browser will automatically download and install the update. This can improve browsing speeds significantly Enable Access In Chrome.
Privacy
Whether you’re browsing the Internet or using Google products, your privacy is important. Chrome’s settings include many options to help you control data that goes to other apps, and it also offers an easy way to wipe your online footprint.
A lot of websites use cookies — small text files that record your visit — to track your online behavior. This information is used to deliver personalized advertisements. You can stop this from happening by visiting Chrome’s settings, selecting “Privacy and security,” then clicking the “Clear browsing history” button.
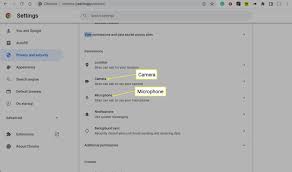
You can also decide to stay logged in to your Google account when using Chrome, which automatically syncs passwords and other browser data across devices. You’ll need to log in to Gmail or another Google service to do this, though. And you can prevent sites from syncing your location or device aspects like the camera and microphone. Most people grant these permissions without protest, but this could lead to security issues.
Leave a Reply