
How to Update to iOS 17
Update To iOS 17 with a host of new features. The update is compatible with any iPhone released in the past five years, including the XS and XR models.
However, if the update isn’t showing up on your device, it could be due to a number of reasons. Here are some tips on how to fix it.
As of my last knowledge update in January 2022, iOS 17 did not exist. However, I can provide you with general instructions on how to update your iOS device to the latest version based on the information available up to that point. Keep in mind that the details may have changed, and it’s always recommended to refer to the latest Apple documentation for the most accurate information.
Updating Your iOS Device Involves A Few Simple Steps:
- Check Compatibility: Before attempting to update your device, ensure that it is compatible with the latest iOS version. Apple typically provides a list of supported devices for each iOS release.
- Backup Your Data: It’s crucial to back up your device before any major update. You can use iCloud or iTunes to create a backup. This ensures that your data, settings, and apps are safe in case something goes wrong during the update.
- iCloud Backup:
- Connect your device to Wi-Fi.
- Go to “Settings” > [your name] > “iCloud.”
- Tap “iCloud Backup” and turn it on.
- Tap “Back Up Now.”
- iTunes Backup:
- Connect your device to your computer and open iTunes.
- Click on the device icon in the upper-left corner.
- Under the “Backups” section, choose “This computer” and click “Back Up Now.”
- iCloud Backup:
- Connect to Wi-Fi: Ensure that your device is connected to a Wi-Fi network. Software updates are typically large and are best downloaded over a stable Wi-Fi connection to avoid excessive data usage.
- Check Battery Level: Make sure your device has enough battery life to complete the update. If your battery is low, consider charging your device before starting the update.
- Update Over-the-Air (OTA): The most common way to update your iOS device is over the air.
- Go to “Settings” on your device.
- Scroll down and select “General.”
- Tap “Software Update.”
- If an update is available, tap “Download and Install.”
- Follow the on-screen instructions to complete the installation.
- Update Using iTunes (Optional): If you prefer, you can use iTunes on your computer to update your iOS device.
- Connect your device to your computer and open iTunes.
- Select your device in iTunes.
- In the Summary tab, click “Check for Update.”
- If an update is available, click “Download and Update.”
- Enter Passcode: During the update process, you may be required to enter your device passcode. Make sure you know the passcode to avoid any interruptions.
- Wait for Installation: Once the update process begins, it may take some time. Your device will restart, and you’ll see the Apple logo and progress bar. Be patient and avoid interrupting the process.
- Complete Setup: After the update is installed, your device may go through a brief setup process. Follow the on-screen instructions to complete the setup, including signing in with your Apple ID.
- Restore Data (if needed): If you backed up your data before the update, you can restore it during the setup process or later through iCloud or iTunes.
Remember that these steps are based on the iOS update process up to January 2022, and there might be changes or improvements in subsequent updates. Always refer to the latest Apple documentation for the most accurate and up-to-date information
1. Back up your device
Whenever a major software update rolls out, it’s always a good idea to back up your device beforehand. This protects against any unforeseen issues that may arise during the upgrade process, and ensures that you can restore your data if needed.
Fortunately, the iPhone makes this easy, as it offers a built-in feature that lets you backup your device to iCloud. You can also use a dedicated tool like Tenorshare iCareFone to create an archival copy of your device.
Before starting the update, make sure your device is charged and has enough free space to run it (at least 2GB). You’ll also want a stable Wi-Fi connection to avoid using cellular data during the update. This is also a good time to do a “app audit” and get rid of any apps you no longer use. You can also download a third-party app that will backup your phone for you. This is especially useful if your iCloud backup isn’t up to date.
2. Turn on automatic updates
Last month, Apple released iOS 17 for non-developers to test out its new features. Since then, the company has been pushing out fixes and fixing problems on a regular basis.
To make sure you’re always up to date, turn on automatic updates in the Settings app. This way, every time a new update is available for you to download, it’ll automatically install in the background when your iPhone or iPad isn’t being used.
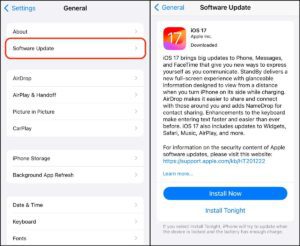
When you open the Settings app, tap General > Software Update. You’ll see a prompt that says “Update Now” or “Update Tonight.” Tap Update Tonight. Then, your device will start downloading and preparing the update at night. It may take a few minutes for the download and preparation to finish. Once the update is ready, your device will ask if you want to install it right away or if you’d like to wait until later. If you choose to wait, your iPhone will install the update at the next available opportunity.
3. Download the update
The first beta version of iOS 17 was released last month and is available to developers and non-developers alike. It’s easy enough to install it on your iPhone if you know how, and it comes with a variety of new features that you might want to take advantage of.
The most notable of these include a redesigned home screen with customizable widgets, new StandBy mode that turns your iPhone into a nightstand clock, and improved autocorrection, predictions and voice dictation. Other improvements include a Journal app that lets you document your mood, a new Contacts card that displays custom photos and details, live voicemail transcripts, and a Messages app redesign with simplified replies and animated stickers.
As soon as Apple releases an Update To iOS 17, millions of people start downloading it right away, which causes a strain on the company’s servers and can sometimes lead to errors. But if you follow this simple guide, you should be able to download and install iOS 17 with no problem.
4. Install the update
Unlike earlier iOS betas, which were only available to developers, the new public beta lets non-developers try out major features months before the finished software debuts this fall. Installing the beta is a simple process. Just visit Settings, then tap General and select the new Software Update option, which is now below Automatic Updates.
From there, your iPhone will check for the beta update and download it. Depending on your connection speed, the whole process could take several minutes. Once it’s ready to install, you’ll see a prompt. Tap Download and Install to apply the beta profile.
Once you’re running the latest beta, you’ll have a chance to experience the new features and report bugs. But remember that this is pre-release code, and you might run into some issues—including app compatibility problems or weird behavior—before the final version arrives later this year. For this reason, you should always back up your device before installing a beta.
Leave a Reply