How to Turn on Developer Mode on Chromebook
Developer mode unlocks the power of your chromebook. It gives you access to the Chrome OS prompt, which can enable you to install applications and features that are not approved by Google.
It also allows you to bypass security systems ordinarily built into Chrome OS. However, enabling it will void your warranty and erase all data stored locally on the device.
Before proceeding, understand that enabling developer mode wipes all local data on your Chromebook. Backup essential files to Google Drive or an external storage device. Additionally, entering developer mode might void your warranty, so proceed at your own risk.
Step 1: Understand Developer Mode:
Developer mode provides greater control over the Chromebook, enabling features like shell access, installing Linux-based environments, and more. However, it’s not meant for everyday use and can pose security risks.
Step 2: Prepare Your Chromebook:
Ensure your Chromebook is charged or connected to a power source throughout the process. Also, sign in with an account that has administrative privileges.
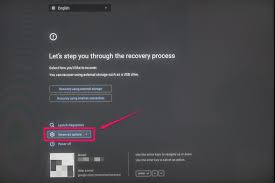
Step 3: Enter Recovery Mode:
- Turn off your Chromebook.
- Press and hold Esc + Refresh (F3) + Power simultaneously. On some models, the Refresh key might be labeled differently or absent.
- Release the keys when the Recovery screen appears.
Step 4: Enable Developer Mode:
- On the Recovery screen, press Ctrl + D.
- A prompt will appear, stating, “OS Verification is OFF.”
- Press Enter to proceed.
- Another prompt appears; press Enter again to confirm.
Step 5: Wait for Developer Mode to Enable:
Your Chromebook will display a message indicating it’s transitioning to Developer Mode. This process may take some time. The system might reboot and start verifying and enabling developer mode automatically.
Step 6: Set up Developer Mode:
Once the transition is complete, your Chromebook will reboot into Developer Mode.
- You’ll see a screen showing a warning about OS verification being off. This warning screen appears on each boot in Developer Mode.
- Wait for the system to start up. This might take a bit longer than usual.
Step 7: Accessing Developer Mode:
- Press Ctrl + D when the warning screen shows up to bypass it and boot into Developer Mode.
- You’ll land on the initial Chrome OS setup screen. Follow the instructions to set up your Chromebook as you did in normal mode.
Post-Developer Mode Setup:
Important Notes:
- Developer Mode Warning Screen: Each time you boot, a warning screen about OS verification being off will appear. To continue booting, press Ctrl + D.
- Returning to Normal Mode: If you want to revert to normal mode, press Spacebar when the OS verification is off screen, then press Enter to confirm. This will initiate a Powerwash, erasing all local data and restoring the device to factory settings.
Tips for Developer Mode:
- Linux Installation: In Developer Mode, you can install Linux applications and environments via the Linux (Beta) feature in Chrome OS settings.
- Shell Access: Access the Chrome OS shell by pressing Ctrl + Alt + T and entering the command
shell. - Troubleshooting: Developer Mode grants access to system files, but improper modifications might cause issues. Exercise caution and avoid altering critical files unless you’re confident in what you’re doing.
1. Boot into Recovery Mode
If you have been unable to enter Recovery Mode manually, try rebooting the device. This should reset the device and enable you to open it again. If you are still unable to access the Recovery Mode, you may need to perform a factory reset. This will wipe all data from the device and restore it to the default settings. It is a good idea to back up all of your accounts, apps, and files before performing a factory reset.
Enabling developer mode gives you a greater degree of control over your Chromebook, and can be useful for advanced users who want to make changes that are not possible with the normal setup. However, it also makes the device less secure and can potentially cause data loss.
To enable developer mode, start the device by pressing and holding the Esc + Refresh keys and then press the Power button. When the screen appears that says “Chrome OS is missing or damaged”, press Ctrl + D.
2. Press and Hold the Esc + Refresh Keys
You can enable developer mode on most Chromebooks by using a combination of keys. This will disable OS verification, allowing you to install Android apps and bypass security systems that are ordinarily built into the operating system.
To turn on developer mode, you’ll need to press and hold the Esc + Refresh keys. The refresh key looks like a circular arrow pointing in a clockwise direction, and it’s usually the fourth key from the left on the top row of your keyboard. Google
Keep in mind that this process will wipe all of your data, so you should only do it if you’re comfortable with the risks. Additionally, this process can void your warranty, so be sure to back up all of your data before proceeding. It is also possible to accidentally brick your device. Therefore, you should only use this method on a device that you’re comfortable working with. If you’re unsure about what to do, consider contacting Google support instead.
3. Press the Power Button
The Chromebook has a developer mode that gives you root access to the operating system. This mode disables certain security features that protect the device from malware. It also voids the warranty on most devices.
To access the developer mode, restart your laptop while holding the Esc and Refresh keys. When the screen says that the OS verification is OFF, press Ctl + D.
Once you are in the recovery screen, use the arrow keys to navigate to advanced options. Highlight Enable developer mode and press enter.
Using the keyboard to power on a Chromebook is a useful trick for troubleshooting and unlocking advanced settings. However, tinkering with the computer can have unexpected results and may damage it. It is important to back up all data before enabling developer mode. In addition, disabling the mode can cause data loss and can take a long time to boot back into regular Chrome OS. This makes it difficult to use the device regularly.
4. Press Ctrl + D
Developer mode on Chromebooks allows users to access the command-line interface, install Linux applications and make other advanced modifications to the device. However, it also voids the warranty and can cause data loss, so it should only be used by people who are familiar with the risks.
To enable developer mode, restart the Chromebook and press and hold the Esc + Refresh keys and the Power button. Wait for the screen to appear that says “Chrome OS is missing or damaged” – this is normal. Then, press Ctrl + D.
This will disable OS verification on the Chromebook and open up a lot of features that were previously locked out. It also wipes all locally stored data, including files in your personal download folder, so be sure to backup anything you might need before doing this. Once you’re done, you can restart the Chromebook and it will boot back into regular mode. To re-enable OS verification, just repeat the process of pressing esc+refresh+power+ctrl+d.
Conclusion:
Enabling developer mode on a Chromebook provides advanced functionalities but also comes with risks. It’s essential to back up your data and understand that this mode may void your warranty. Use it responsibly, and if you’re uncertain about a step or its consequences, consider seeking guidance or refrain from proceeding.
Leave a Reply