How To Re-Enable Microphone On Windows 10
If you have a microphone installed on your Windows 10 PC, you might be wondering how to re-enable it. Thankfully, there are several simple ways to do this without the help of third-party software.
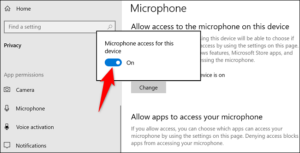
First, check the privacy settings for the mic on your computer. This will ensure that no app can access your microphone unless you give them permission to do so. The microphone is an important part of your remote work tools, so it’s best to stay on top of how you use it and keep it running properly with a few troubleshooting fixes for mic issues on Windows 10.
In the meantime, if you do want to disable your microphone or mute it while working in a specific app, there are a couple of easy ways to do this. You can also use a handy Windows 10 tool that lets you check the status of your audio drivers and fix any problems that are causing your microphone to malfunction. Google
First Step Is To Open The Control Panel:
The first step is to open the Control Panel. Right-click on your Start button and select “Control Panel.” Click “Hardware and Sound.” In the left pane, click “Sound.”
Next, scroll down to your sound devices, and you’ll see your in-built microphone among them. You can then click on the Disable icon to turn it off, or click on Enable to re-enable it.
You can also disable the microphone from within Windows itself, in the Sound Settings section of the settings window. This will stop your microphone from being used by Windows and any other apps that don’t recognize it. If you’re concerned about your privacy, you can also disable the mic for every app you use on your computer. However, this can be a bit annoying and isn’t practical for all users.
Enable Your Microphone On Windows 10:
Another way to disable your microphone is to change the settings for your hardware. This method works on all systems and can be done in a matter of seconds.
Second, check the microphone’s drivers to make sure they’re up to date and that the device isn’t physically damaged. This is especially true if you’re using an external microphone on your computer, such as a USB headset or a built-in headset.
Once you’ve checked your drivers, you can re-enable your microphone by updating them. To do this, you can update your drivers manually from the Control Panel or you can download a new driver from the Microsoft website and install it.
You can also try a third-party tool, such as Restoro, to scan your system and find any problems with the mic that could be causing it to malfunction. The tool will then automatically find and fix the problem, so you can resume normal mic functionality.
In addition, you can re-enable your mic by changing the default setting for it. This can be a useful option if you’re running Windows 10 in a VirtualBox or other similar application that doesn’t support the microphone.
Following Steps:
To re-enable the microphone on Windows 10, follow these steps:
- Click on the Windows icon in the bottom left corner of the screen to open the Start menu.
- Click on the Settings icon (gear-shaped) on the left-hand side of the Start menu.
- In the Settings menu, click on the “System” option.
- On the left-hand side of the System menu, click on the “Sound” option.
- Scroll down to the “Input” section and make sure that your microphone is selected as the default device.
- If the microphone is disabled, click on the “Device properties” link and then toggle the switch under “Disable” to the off position.
- If the microphone is still not working, click on the “Troubleshoot” button in the Input section to run the Windows Troubleshooter and follow the prompts.
- If the above steps do not work, you may need to update your microphone drivers or contact your device manufacturer for further assistance.
Leave a Reply