
How to Enable SSH on Steam Deck
Enable SSH On Steam Deck allows you to move games, mods, ROMs and more wirelessly from your computer to the Steam Deck. It also allows you to disable password login if desired.
It does this by encrypting all communication between the server and client. This makes it much harder for hackers to eavesdrop on your communications.
Enabling SSH (Secure Shell) on your Steam Deck allows you to remotely access the terminal and manage your system from another device. This can be helpful for various tasks, such as troubleshooting issues, installing software, or managing files. However, it’s important to understand the security implications before proceeding.
Before You Begin:
- Understand the risks: Enabling SSH exposes your Steam Deck to potential security risks if not configured correctly. Ensure you understand the risks associated with remote access and take necessary precautions to secure your connection.
- Have basic Linux knowledge: This guide assumes you have a basic understanding of Linux commands and navigation. If unfamiliar, consider familiarizing yourself with essential commands before proceeding.
Steps to Enable SSH:
-
Boot into Desktop Mode:
- Power on your Steam Deck and navigate to the Boot Device Selection screen by holding the Volume Down button while powering on.
- Select the EFI Boot option using the directional buttons and press Enter.
- Choose your SteamOS installation and press Enter again.
- Your Steam Deck will boot into Desktop Mode.
-
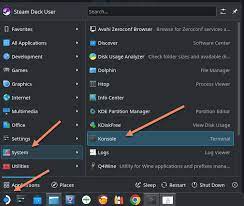
Open Konsole:
- Click on the Activities icon in the bottom left corner of the screen.
- Search for Konsole and launch the application.
-
Enable SSH service:
- In the Konsole window, type the following command and press Enter:
Bashsudo systemctl enable ssh- Enter your Steam Deck password when prompted.
-
Start the SSH service:
- Once enabled, start the SSH service with the following command:
Bashsudo systemctl start ssh -
Verify SSH is running:
- Check if the SSH service is running by typing:
Bashsudo systemctl status ssh- The output should indicate that the service is active (running).
Optional: Setting up SSH Key Authentication:
For enhanced security, it’s highly recommended to set up SSH key authentication instead of relying solely on password authentication. This method involves creating a key pair on your local machine and adding the public key to your Steam Deck’s authorized_keys file. Here’s a brief overview of the process:
-
Generate an SSH key pair on your local machine:
- Refer to online guides specific to your operating system for detailed instructions on generating a key pair.
- Typically, you’ll use the
ssh-keygencommand to create a key pair.
-
Copy the public key:
- Open the file containing your public key (usually named
id_rsa.pub). - Copy the contents of the file.
- Open the file containing your public key (usually named
-
Add the public key to your Steam Deck:
- In the Konsole window on your Steam Deck, type:
Bashnano ~/.ssh/authorized_keys- This opens the
authorized_keysfile in the Nano text editor. - Paste the copied public key into the file and press Ctrl+O to save, followed by Ctrl+X to exit.
-
Set file permissions:
- Ensure the
authorized_keysfile has appropriate permissions:
Bashchmod 600 ~/.ssh/authorized_keys - Ensure the
Connecting to your Steam Deck via SSH:
Once SSH is enabled and configured (if using key authentication), you can connect to your Steam Deck from another device using an SSH client. Here’s an example using the terminal on your local machine:
ssh username@steam_deck_ip_address
- Replace
usernamewith your Steam Deck username (default:deck). - Replace
steam_deck_ip_addresswith the IP address of your Steam Deck. You can find this by going to Settings > Network > Wi-Fi on your Steam Deck and looking for the IP address under the connected network.
Additional Notes:
-
Disabling SSH: If you no longer need remote access, you can disable the SSH service using:
Bashsudo systemctl disable ssh -
Security considerations: Remember to keep your Steam Deck software updated and use strong passwords or SSH key authentication to minimize security risks.
By following these steps, you can successfully enable SSH on your Steam Deck and establish secure remote access. However, exercise caution and prioritize security measures when implementing this functionality.
How to enable SSH on the Steam Deck?
SSH is a network protocol that allows you to remotely connect to a device and send commands, or copy files between two computers. It is one of the most common ways to manage servers and is also used to remote into personal computers.
Despite being a powerful tool, Valve decided to disable SSH on the Steam Deck by default because of security concerns. This is to prevent hackers from using SSH to login to the device and cause problems.
To enable SSH on the Steam Deck, first make sure that both the Deck and your computer are connected to the same Wi-Fi network. Next, run the following command on your PC:
Configure SSH
SSH (Secure Shell) is one of the go-to network protocols that creates a secure tunnel between two devices. The tunnel is encrypted, which prevents unauthorized access from outside of your home or office. It is also used as a primary method for managing servers remotely.
Whether you have media files you want to move onto your Deck for watching or games you want to copy into a folder on the Deck, SSH makes it possible without needing a USB or MicroSD card. The steps to do this are a little different depending on your operating system.
Ensure that the Steam Deck and the computer you are connecting from are on the same network. This will help avoid a situation where someone is able to SSH into your Steam Deck without you knowing about it. SSHD is configured by default to only allow logins from your local network, so this makes sense from a security perspective.
Install an SSH Client
If you’re looking to remotely manage your Steam Deck from your home computer, SSH is an excellent option. SSH creates a secure tunnel that allows you to send commands and transfer files between systems.
While this can be connivent, it does open up the Steam Deck to hacker attacks. In order to prevent this, Valve has disabled SSH by default.
To enable SSH on the Steam Deck, you will need to install an SSH Client on your computer. A few good options include Putty and MobaXTerm.
Once you have an SSH Client installed, you will need to enable the SSHD (Secure Shell Daemon) on your Steam Deck. This can be done by opening Settings, selecting System, and then choosing Optional Features.
Once you have enabled SSHD, you will need to change the firewall rules to allow inbound connections to port 22. You may also need to forward port 22 to your device’s IP address. This is especially important if you’re connecting from outside of your network.
Connect to the Deck
The Steam Deck is a great portable gaming console, but what if you want to use it as a PC? Fortunately, Valve has included a USB-C port for multiple purposes, including streaming games to your computer. Using this port, you can play any game on your PC through Steam’s Big Picture Mode and simultaneously stream it to the Steam Deck.
To connect to the Deck from your computer, you’ll need a USB-C to HDMI adapter and an SSH client such as PuTTY or OpenSSH. In the PuTTY window, enter “deck@steamdeck” into the host name text box and 22 into the port text box.
You’ll also need a private key on your computer and a public key on the Steam Deck. The private key stays on your computer and should never be shared, while the public key is added to the Deck so it can accept connections from any computer that has the key.
Leave a Reply