How To Enable Outlook Email Notifications
Are you tired of missing important emails in your Outlook inbox? Stay in the loop with our step-by-step guide to Enable Outlook Email Notifications. Whether you use Outlook for work or personal use, receiving timely notifications of new emails is crucial to staying organized and responsive. In this article, we will walk you through the process of setting up email notifications in Outlook, ensuring that you never miss an important message again.
Why enabling email notifications is important
Email has become an integral part of our lives, serving as a primary communication tool in both personal and professional settings. With the sheer volume of emails we receive on a daily basis, it’s easy to miss important messages buried deep in our inboxes. Enabling email notifications in Outlook provides a solution to this problem by alerting us whenever a new email arrives, ensuring that we stay informed and can respond promptly.
By Enable Outlook Email Notifications, you gain the ability to prioritize your communication effectively. You can instantly identify urgent emails and respond to them in a timely manner, while non-urgent emails can be addressed at a later time. This feature is particularly essential for professionals who rely on email for their work, as it allows them to stay on top of their commitments and maintain excellent communication with colleagues and clients.
Moreover, email notifications help prevent missed opportunities. Whether it’s a time-sensitive business proposal, an invitation to an important event, or an update on a project, receiving timely notifications ensures that you don’t overlook critical information. By enabling email notifications, you can seize these opportunities and take immediate action, enhancing your productivity and efficiency.
Step-by-step guide to enabling email notifications in Outlook
Now that we understand the importance of email notifications, let’s dive into the step-by-step process of enabling them in Outlook. Whether you’re using the desktop version or the mobile app, the process is straightforward and can be completed in just a few minutes.
Desktop version
- Open Outlook on your computer and navigate to the “File” tab at the top left corner of the screen.
- Click on “Options” in the dropdown menu. This will open the Outlook Options window.
- In the Outlook Options window, select “Mail” from the left-hand sidebar.
- Scroll down to the “Message arrival” section and click on the “Desktop Alert Settings” button.
- In the Desktop Alert Settings window, check the box that says “Display a Desktop Alert” and customize the duration and transparency of the alert if desired.
- Click “OK” to save the changes.
- Back in the Outlook Options window, click “OK” again to close it.
Congratulations! You have successfully enabled email notifications on the desktop version of Outlook. You will now receive a desktop alert whenever a new email arrives in your inbox.
Mobile app
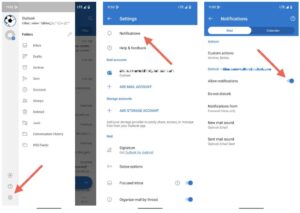
- Open the Outlook app on your mobile device and sign in to your account, if necessary.
- Tap on the menu icon (usually represented by three horizontal lines) in the top left corner of the screen.
- Scroll down and select “Settings” from the menu.
- In the Settings menu, tap on your email account to access its specific settings.
- Look for the “Notifications” or “Notifications and Sounds” option and tap on it.
- Toggle the switch to enable email notifications for this account.
- Customize the notification sound, vibration, and other settings according to your preferences.
- Exit the Settings menu and return to the main screen of the Outlook app.
Great job! You have successfully enabled email notifications on the Outlook mobile app. You will now receive notifications on your mobile device whenever a new email arrives in your inbox.
Customizing email notification settings
Now that you have Enable Outlook Email Notifications, let’s explore the various customization options available in Outlook. These settings allow you to tailor the notifications according to your preferences and make them work best for your workflow.
Desktop version
In the desktop version of Outlook, you can customize the email notification settings by following these steps:
- Open Outlook and navigate to the “File” tab.
- Click on “Options” and select “Mail” from the sidebar.
- Scroll down to the “Message arrival” section and click on the “Desktop Alert Settings” button.
- In the Desktop Alert Settings window, you can customize the following options:
- Display a Desktop Alert: You can choose to display or hide the desktop alert for new emails.
- Duration: Specify how long the desktop alert should remain visible on your screen.
- Transparency: Adjust the transparency level of the desktop alert.
- Preview: Check this box to see a preview of the desktop alert before applying the settings.
- Click “OK” to save the changes.
By customizing these settings, you can ensure that the email notifications align with your preferences and do not disrupt your workflow. For example, you may choose to display the desktop alert only for urgent emails or set a longer duration for important messages.
Mobile app
In the Outlook mobile app, you can customize the email notification settings by following these steps:
- Open the Outlook app on your mobile device and access the settings menu.
- Tap on your email account to access its specific settings.
- Look for the “Notifications” or “Notifications and Sounds” option and tap on it.
- Here, you can customize the following options:
- Notification Sound: Choose a specific sound for email notifications.
- Vibration: Enable or disable vibration for email notifications.
- Preview: Toggle this switch to see a preview of the notification style.
- Grouping: Choose whether to group email notifications or show them individually.
- Badge Count: Enable or disable the badge count on the app icon.
- Sync Notifications: Select the sync interval for receiving email notifications.
- Adjust these settings according to your preferences and exit the settings menu.
By customizing these settings, you can ensure that the email notifications on your mobile device are tailored to your liking. You can choose a notification sound that grabs your attention, enable vibration for an additional alert, and even control how the notifications are grouped or displayed.
Troubleshooting common issues with email notifications
While enabling email notifications in Outlook is generally a seamless process, you may encounter some issues along the way. Here are a few common problems and their solutions to help you troubleshoot any notification-related difficulties:
- No email notifications: If you’re not receiving any email notifications, check your device’s notification settings. Ensure that notifications are enabled for the Outlook app and that your email account is set up correctly.
- Delayed notifications: Sometimes, email notifications may be delayed due to network issues or app settings. Check your app settings to ensure that email notifications are set to arrive promptly.
- Missing desktop alerts: If you’re not seeing desktop alerts on your computer, make sure that the “Display a Desktop Alert” option is enabled in the Desktop Alert Settings of Outlook.
- Sound or vibration issues: If the notification sound or vibration is not working as expected, check your device’s sound and vibration settings. Also, ensure that the correct notification sound is selected in the Outlook app settings.
- Notifications going to the wrong folder: If email notifications are being sent to a different folder or are not appearing in your inbox, review your Outlook rules and filters. Make sure that the email notifications are not being automatically redirected or filtered into another folder.
If you’re still experiencing issues with Enable Outlook Email Notifications after troubleshooting, consider reaching out to your IT support or referring to the official Outlook documentation for further assistance. These resources can provide detailed troubleshooting steps specific to your device and version of Outlook.
Best practices for managing email notifications
While email notifications can be a valuable tool for staying informed and responsive, it’s essential to manage them effectively to avoid overwhelming distractions. Here are some best practices to help you make the most of email notifications:
- Prioritize your notifications: Customize your notification settings to receive alerts only for high-priority emails. This will prevent unnecessary interruptions and help you focus on the most important messages.
- Set specific notification sounds: Assign different notification sounds to different senders or email categories. This way, you can quickly identify the significance of an email based on the sound it produces.
- Establish email-checking routines: Instead of constantly reacting to email notifications as they arrive, designate specific times throughout the day to check and respond to emails. This allows you to maintain focus on your tasks without getting constantly distracted by incoming messages.
- Utilize email filtering and rules: Make use of Outlook’s filtering and rules features to automatically sort incoming emails into different folders. This can help reduce the number of notifications you receive and keep your inbox more organized.
- Disable notifications during specific times: If you need uninterrupted focus during certain periods, consider temporarily disabling email notifications. This can be particularly helpful during important meetings, deep work sessions, or personal time.
By implementing these best practices, you can strike a balance between staying informed and minimizing distractions. Email notifications should enhance your productivity rather than hinder it, and these strategies will help you achieve that balance.
Outlook email notification alternatives
While Outlook’s built-in email notification features are robust and effective, there are also alternative methods available for receiving email notifications. These alternatives can complement or replace Outlook’s notifications, depending on your preferences and specific needs.
Third-party email notification apps
Several third-party apps specialize in providing email notifications and alerts. These apps often offer more advanced customization options, allowing you to fine-tune your notification preferences. Some popular third-party apps for email notifications include:
- Boomerang: Boomerang is an email productivity tool that offers advanced features, including email reminders and snooze options. It also provides customizable email notification settings, allowing you to receive alerts for specific types of emails.
- Pushbullet: Pushbullet is a multi-platform notification service that can send email notifications directly to your mobile device or computer. It supports various email providers and offers features like notification mirroring and cross-device syncing.
- Spark: Spark is an email client that offers enhanced notification settings, including the ability to customize notifications for different email accounts or folders. It also provides intelligent email sorting and smart notifications based on your email usage patterns.
These third-party apps can be a great addition to your email workflow, providing additional features and customization options beyond what Outlook offers. Enable Outlook Email Notifications
Integrating other apps with Outlook for enhanced notifications
If you use other productivity or communication apps alongside Outlook, you can integrate them to receive enhanced email notifications. This allows you to consolidate your notifications and receive alerts within a single app or platform. Here are a couple of examples:
- Slack integration: Slack, a popular team communication platform, offers integration with Outlook. By connecting your Outlook account to Slack, you can receive email notifications directly within Slack channels, making it easier to stay updated and collaborate with your team.
- IFTTT: IFTTT (If This Then That) is a powerful automation tool that allows you to create custom workflows between different apps and services. With IFTTT, you can set up email notification triggers and actions, such as receiving a text message for important emails or saving email attachments to cloud storage.
Integrating other apps with Outlook can streamline your workflow and ensure that you receive notifications in the most convenient and efficient manner for you.
Outlook email notification etiquette
While email notifications are a useful tool for staying informed, it’s important to be mindful of email notification etiquette. Here are some best practices to follow when it comes to email notifications:
- Consider your recipients: When sending emails, be mindful of the impact your message might have on the recipient’s inbox. Avoid sending unnecessary or overly frequent emails that may contribute to notification overload.
- Use urgency appropriately: Reserve urgent email notifications for genuinely time-sensitive matters. Overusing urgent notifications can dilute their impact and cause recipients to ignore them.
- Respect others’ notification preferences: If you’re collaborating with others, be aware of their notification preferences and adjust your communication accordingly. Some people may prefer email notifications, while others might use alternative methods like chat apps or project management tools.
- Avoid excessive notifications: If you’re using Outlook’s notification features, be mindful of the number of alerts you enable. Excessive notifications can lead to distraction and reduced focus. Customize your settings to receive only the most essential alerts.
- Consider alternative communication methods: In some cases, email may not be the most effective or immediate communication channel. For urgent matters, consider using phone calls, instant messaging, or in-person conversations to ensure timely and efficient communication.
By following these etiquette guidelines, you can ensure that your use of email notifications is respectful and considerate of both your own and others’ productivity.
Conclusion
In today’s fast-paced digital world, staying on top of your emails is crucial for effective communication and productivity. With Outlook’s email notification features and our step-by-step guide, you can enable timely alerts for new emails and ensure that you never miss an important message again. From customizing notification settings to troubleshooting common issues, we’ve covered everything you need to know to make the most of Outlook’s email notification capabilities.
Remember to strike a balance between staying informed and minimizing distractions. Customize your notification settings to align with your preferences and workflow, and consider implementing best practices for managing email notifications. Additionally, explore alternative methods and integrations to enhance your email experience and consolidate your notifications.
By following the tips and techniques outlined in this guide, you’ll be well-equipped to stay in the loop and respond promptly to important emails, increasing your productivity and efficiency in both your personal and professional life. Don’t let important messages slip through the cracks – take control of your email notifications and make the most of Outlook’s powerful features.
Leave a Reply