How to Enable a Microphone in Windows 10
When you encounter the problem of not being able to hear anything, you may want to know how to enable microphone windows 10. There are two places where you can do this. In the Hardware and Sound option, click the Manage button. Select the Recording tab and then right-click the mic and select Enable. Then, click the Change button. Your Windows system will automatically recognize the device and turn it on or off. Alternatively, you can try to enable microphone by right-clicking the microphone on the screen.
In order to enable the microphone in Windows 10, first open up the device manager. To do this, press Win+I and then click on “Device Manager.” From there, click on the microphone icon. You should see green bars on the screen when you speak into it. If this is not the case, you might be using the wrong recording device. To fix this problem, you should go back to the BIOS settings and enable the microphone once again.

The next step in enabling microphone on Windows 10 is to go to the device manager. Click Start > My Computer. Now, right-click on the microphone and then select “Manage device.” In the device manager, you can see the microphone and click it to enable it. Then, check the settings and click OK to save the changes. Then, restart your computer. And that’s it! That’s all there is to it. If you want to use the microphone, you can enjoy the great sound quality that comes with Windows.
How To Enable Microphone On Chrome:
If you don’t want other applications to use your microphone, you can disable it in the control panel. To do this, click Start > Control Panel and then select “Device Manager” from the drop-down menu. Navigate to the Sound tab and find the Microphone icon. If you see green bars, you’ve successfully enabled your microphone on Windows 10. Otherwise, your programs may be listening to the wrong recording device.
Besides, the microphone icon can also be disabled if the device isn’t installed properly. You can also disable it by uninstalling the relevant driver. You can disable the microphone by uninstalling it. If you don’t want to remove it, you can install the latest version of the device drivers from the manufacturer. Ensure that you’re using the latest version of the Sound Control Manager. You must enable the microphone on your computer to make sure that you can hear and speak well.
How To Test Microphone Windows 10:
In Windows 10, there’s a button for enabling the microphone. In this window, click it. After the setup is complete, you can start recording. Now use the microphone to talk to other people. You can even record audio with the microphone. You can also use it to record video and music. By setting up a Windows 10 device, you can easily turn on the mic. Similarly, you can also enable the microphone.
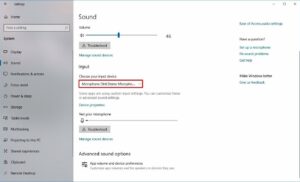
If the yellow mark appears on the microphone, it means that the sound controller driver is missing or damaged. To fix this issue, you can go to the Audio settings in the Windows 10 system tray and select Recording Devices. You can choose the option “Enable” or “Disable” to allow the microphone. This will allow the microphone to work in all applications. Aside from that, you can also control the volume of your recordings.
How To Enable Microphone Driver Windows 10:
You can also enable the microphone by checking the input device. The microphone will now be enabled. If the sound is not working, you can use a microphone-free headset to improve the sound quality. If you can’t use the microphone, you can try to use another audio input device. Then, you’ll have to wait for a few minutes for the audio to work again. Then, you can enable the microphone.
Microphone From Settings:
- Tap the Start button on the taskbar, and from the start menu, select Settings that is, the cogwheel button.
- Go to the Privacy Settings group.
- Select the microphone tab.
- When the microphone is off, click the Change button and turn it on.
- For best results, restart your PC.
If you have multiple microphones, you can disable all of them. This will disable the microphone for all the apps and the system. However, you can still troubleshoot the problem by using the Privacy settings and the troubleshooter tool. In the Privacy settings, you can choose whether or not to let other users decide whether or not to access the microphone. To allow other users to control the microphone, turn on the toggle switch next to “Enable” in the device.
Leave a Reply