How to Enable All CPU Cores in Windows 11
Enable All CUP Cores Windows 11 Modern processors have multiple cores to efficiently process different tasks. Activating all cores can greatly improve your PC’s performance and speed.
The simplest way to enable all cores is to use the msconfig command. You will need to restart your PC after this. Alternatively, you can also enable Hyper Threading from the BIOS. This is an Intel technology that splits one physical CPU core into two logical cores that each can handle different software threads.
While the desire to maximize your computer’s performance is understandable, enabling all CPU cores in Windows 11 isn’t always necessary or beneficial. This guide delves into the factors at play, explores alternative solutions for performance improvement, and provides the steps to check if all cores are already active.
Understanding CPU Cores and Windows Management:
Modern CPUs often have multiple cores, each acting like an independent processor. Windows 11 employs sophisticated power management strategies to optimize performance and conserve energy. These strategies may involve dynamically adjusting the number of active cores based on workload demands.
Common Misconceptions:
-
Disabled CPU Cores: It’s highly unlikely that Windows 11 would deliberately disable cores. Modern operating systems are designed to utilize all available cores efficiently.
-
Performance Boost by Enabling All Cores: While enabling all cores might seem like a straightforward way to enhance performance, it’s not always the case. Factors like application optimization, thermal throttling, and power limitations can influence the actual impact.
Alternative Solutions for Performance Improvement:
Before attempting to enable all cores, consider these alternatives:
-
Identify Bottlenecks: Use performance monitoring tools like Task Manager or Resource Monitor to pinpoint potential bottlenecks like RAM, storage, or specific hardware components. Addressing these bottlenecks can yield more significant performance gains.
-
Update Drivers: Ensure you have the latest drivers for your CPU, chipset, and other hardware components. Outdated drivers can sometimes limit performance.
-
Adjust Power Settings: Windows 11 offers various power plans, including “High performance” which prioritizes performance over battery life. Experiment with different plans to find the optimal balance for your needs.
-
Optimize Software Settings: Many applications, especially games, offer performance-related settings. Explore these options and adjust them based on your hardware and preferences.
Checking if All Cores are Active:
If you’re still concerned about core usage, follow these steps to verify:
-
Open Task Manager: Press Ctrl + Shift + Esc or right-click the taskbar and select “Task Manager.”
-
Click “More details” if needed to expand the view.
-
Go to the “Performance” tab.
-
Click “CPU.”
-
Under the graph, you’ll see the number of logical processors and their usage. If all cores are active, they will be listed and show varying degrees of utilization.
Steps to Enable All Cores (if necessary):
Important Note: Modifying these settings can potentially lead to unexpected behavior or stability issues. Proceed with caution and only if you’re confident about the potential benefits.
-
Open the “Power & sleep” settings. You can access this through the Start menu or search bar.
-
Click on “Additional power settings.”
-
Choose “Change plan settings” next to your current power plan.
-
Click on “Change advanced power settings.”
-
Expand “Processor power management.”
-
Click on “Minimum processor state.”
-
Set both settings (on battery and plugged in) to 100%.
-
Click “Apply” and “OK” to save the changes.
Remember: This approach might not always lead to performance improvements and could even have negative consequences like increased power consumption and heat generation.
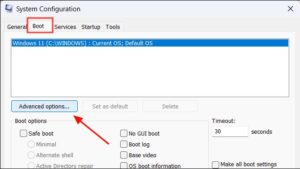
1. Go to System Configuration
Enable All CUP Cores Windows 11 Most modern central processing units (CPUs) come with multiple cores, which can help to improve performance and multitasking. Normally, the operating system manages these cores by default, using them when required to speed up tasks. However, you can enable all of the cores manually if you think your computer is running too slow.
To do so, you need to bring up the Run dialog box using the Windows + R shortcut keys. From there, you should enter msconfig into the text field and then click ‘OK’ to launch the System Configuration window.
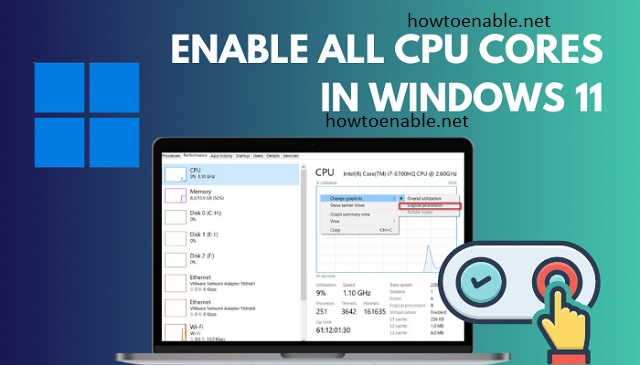
To find out how many physical and logical cores your processor has, you can use the task manager. To do this, press Ctrl + Shift + Esc to open the task manager, then select the CPU tab and look for ‘Cores’ and ‘Logical processors’. The former refers to the number of physical cores, while the latter is the total number of cores supported by your CPU using Hyper Threading technology.
2. Go to Advanced System Settings
Once you’ve enabled all the physical and logical cores, you should be able to experience improved CPU performance. This is because tasks will be divided among the various cores, allowing them to run faster and more efficiently.
Enable All CUP Cores Windows 11 Before proceeding to enable all the processor cores, you should ensure that Multi Core Support and Hyper Threading are activated in your BIOS/UEFI settings. To do this, restart your PC and continuously press the BIOS entry key (usually F2, Del, or Esc) until you get to the BIOS setup screen.
Once you’ve entered the BIOS, go to the Boot tab and click Advanced Options. Check the box next to Number of Processors and select the highest available option from the drop-down menu below it. Then, click Apply and OK from the System Configuration main window. Finally, restart your computer to take the changes into effect. You should now be able to see all the physical and logical processors in the Task Manager.
3. Go to Performance
Modern CPUs come with multiple cores to allow them to handle various tasks at once. These cores are also known as logical processors, and they help improve overall performance by distributing tasks more effectively. However, in many cases, the operating system only activates a small number of these cores. This can limit the speed and efficiency of a CPU, especially when working with resource-intensive programs.
To enable all the cores in your CPU, you need to start by opening the Run dialog box using the Windows + R keys. Then, type msconfig and press Enter to open the System Configuration window. Next, click the Boot tab and select Advanced options. Check the box beside ‘Number of processors’ and choose the highest number from the drop-down menu.
You can also enable Hyper Threading, which splits each physical CPU core into several virtual or logical processors and allows them to act independently. This will help maximize the performance of your CPU and increase the speed at which it can process data.
4. Go to CPU
There are a number of things that can affect the performance of your processor. One of them is the number of cores. You can enable all the physical and logical cores in Windows 11 to maximize the power of your device. This is useful if you are into gaming or heavy audio and video work.
The use of multiple cores on the CPU allows tasks to be divided and executed more effectively. However, certain demanding tasks might still push your system to the limit, even if all the cores are enabled. This is because not all the cores on your CPU might be activated. Fortunately, this can be fixed with a few simple steps. First, you will need to shut down your computer and reboot it. Then, you will need to open the Run dialog box by pressing the Windows + R keys. In the run dialog box, type msconfig and press Enter. Once you have done this, you will need to select the Boot tab and click on Advanced Options.
Conclusion:
While enabling all CPU cores might seem like a straightforward solution for performance enhancement, it’s crucial to understand the underlying factors and consider alternative approaches first. Focusing on identifying bottlenecks, updating drivers, and optimizing software settings often yield more significant and sustainable performance gains. If you’re unsure about modifying advanced power settings, consulting a qualified technician is recommended.
Leave a Reply