
How Do I Enable Test Signing on Windows?
If you’re wondering how to enable test signing on your computer, you’ve come to the right place. To enable test signing mode, you need to disable Secure Boot, which is enabled by default. You can do this in the Advanced Startup Options. Once you’ve disabled Secure Boot, you can enable test signing in Advanced Startup Options.
To disable driver signature enforcement on Windows, you must first restart your computer. Next, go to the Advanced startup options. Select the “Troubleshooting” option. Here, you can disable driver signature enforcement. This will let you install unsigned drivers without facing any problems. Note that this is a temporary fix Google.
Before you begin, make sure you backup all the drivers on your PC. This will ensure you won’t lose any important files. After this, restart your computer and press the F7 key. This will disable driver signature enforcement and allow you to install unsigned drivers again. However, this is only a temporary fix, and you may end up damaging your PC.
How To Disable Driver Signature Enforcement:
You can also disable driver signature enforcement when testing signing by disabling Secure Boot. This feature is available on computers with UEFI firmware. To disable it, start by accessing the Command Prompt with administrator privileges. Type cmd in the search box and choose Run as administrator.
To permanently disable driver signature enforcement, you can click the Power User or Admin menu. Then, click the Restart option. After the restart, the Advanced Options menu will open. Select the Advanced tab. Next, select the Troubleshoot tile.
How To Remove Test Mode Watermark:
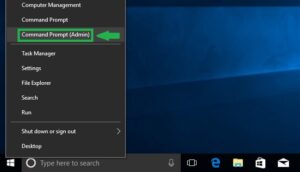
To remove the Test Mode watermark from your Windows 10 computer, you can follow a few simple steps. First of all, you must open a command prompt as an administrator. To do this, go to the Start menu and type cmd. Then, right-click on the command prompt entry and choose “Run as administrator.” You should then click “Y” in the User Account Control screen. Next, restart your PC and you will no longer see the test mode watermark.
Alternatively, you can use the Universal Watermark Disabler to remove the watermark from your Windows 10 desktop. This is available for download online, and it can be double-clicked. However, if you choose to use this method, be sure to sign out of Windows and save the changes before exiting the program.
How To Enable Test Signing Windows 10:
Another option is to uninstall the test-mode application. Many Windows 10 users have reported that it is irritating. This way, you can safely remove the watermark from your computer. The process is simple. The Windows icon on your desktop will open a command prompt. You should run the command as an administrator.
If you don’t want to enable Test Mode, you can disable it from Windows by uninstalling it, updating your driver, and rebooting your computer. But, if you want to use it to install unsigned drivers, you need to disable it manually. Thankfully, there are many tools out there to help you disable the test mode watermark.
How To Install Unsigned Drivers:
There are a few ways to install unsigned drivers on Windows machines. First, you need to disable driver signature enforcement. To do this, go to the Troubleshooting menu and select Advanced Options. From here, you can choose a variety of boot modes. Pressing F7 will enable the Disable driver signature enforcement option. This will allow you to install unsigned drivers after your system boots.
Alternatively, you can disable driver signature enforcement on Windows 10 by right-clicking the Start button or by pressing the ‘Administrator’ key on your keyboard. This will cause Windows 10 to reboot and disable driver signature enforcement. Make sure to disable the Secure Boot Policy as well.
How To Enable Test Mode Windows 10:
Once this is complete, your Windows system will reboot into the Advanced Boot Menu. From there, you can access the Start Menu to boot into various modes. If you didn’t install the unsigned driver earlier, it will be prompted to do so at the next restart. If you can’t, you can manually turn off Test Mode by selecting it from the Advanced Boot Menu or the Command Prompt (Admin) option. You can then proceed to install the unsigned drivers. The system will display a watermark if the driver is unsigned.
Go To Settings Menu:
- By default, Windows does not load kernel-mode drivers with a test signature.
- To change this behavior and enable loading of test-signed drivers,
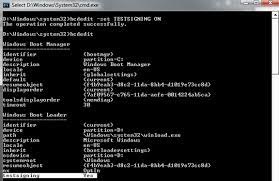
- Use the startup configuration data editor BCDEdit.exe to enable or disable the TESTSIGNING startup configuration option.
- You must have administrator rights to enable this option.
If you have a 64-bit Windows system, you can disable the driver signature enforcement by disabling the “Test Signing Mode” option. Once you do this, a “Test Mode” watermark will appear near the clock. If you’re not using the Driver Signature Enforcement feature, you should disable it. However, this is not a permanent solution, and you should avoid using this option unless you’re confident you’re safe.
Leave a Reply