
How Do I Enable or Disable Fast Boot?
Fast boot is an option that allows Windows to boot faster. While this may be advantageous for users of older systems, it also has some disadvantages. This article will discuss how to enable it and how to disable it. The information in this article is intended for the PC user who is interested in enabling or disabling fast boot on their PC. Enable Fast Boot.
Fast Boot speeds up your startup time, but it also causes a lot of power consumption. It opens background programs while your phone is off, and these programs cannot be closed even after restarting. That can cause your phone to run extremely slowly. To avoid that problem, avoid using the Fast Boot Google.
Fast boot can also cause problems with Windows updates, as it repeatedly loads the same kernel session. This increases the chance of mismatches between the actual and cached software components, which can cause errors and prevent hardware peripherals from working properly. In addition, Fast Startup may lock access to your Windows drive if you are using a multi-boot configuration. It also causes issues when trying to make changes to your system partitions, which can result in data corruption when switching operating systems.
How To Disadvantages Of Fast Boot:
Fast boot is enabled by default on most computers, including those with Windows 10. But if you’re on a budget, consider turning it off when starting your system for the first time. It will save you valuable time.
Windows 10 has a feature called Fast Boot, which is similar to Fast Startup in Windows 11. The idea behind the feature is to shorten the time it takes to boot up a computer by launching the active boot option using the minimum set of devices. It is based on the new UEFI firmware, which has replaced the BIOS firmware. It is aimed at increasing software interoperability and addresses some of the problems that BIOS had.
How Do I Enable Fast Boot In Windows 11:
Before enabling fast boot, you need to edit the power button behavior. You can accomplish this in two ways. First, you can edit the power button’s behavior in Windows Settings by selecting the option “Edit power button behavior.” Second, you can modify the setting through the Power Options dialog box. Third, you can disable hibernation. This option helps your system saves space.
Fast boot is a useful feature to shorten boot time. It was introduced in Windows 8 and is turned on by default in Windows 10. This feature allows your computer to start up more quickly after shutting down. Unlike normal boot times, fast boot also saves system data and resumes with it after you restart.
How To Disadvantages Of Disabling:
Fast boot is one of the built-in features of Windows. Its purpose is to speed up the computer’s boot up time when it is shut down. But it can also cause compatibility problems with devices that do not support sleep mode or hibernation. Disabling it may prevent this.
However, disabling it will result in more boot time. As it will load the same kernel session multiple times, there’s a high risk of mismatches between the actual and cached software components. Mismatches will cause startup errors and could even prevent hardware peripherals from working. It can also cause problems with Windows updates. Moreover, it may lock the Windows drive when you switch operating systems.
How To Getting Into BIOS/UEFI Settings To Enable:
To disable Fast Startup, go to the Control Panel, System, Security, and Startup. Select the option “Disable fast startup”. Once disabled, restart the PC. To enable fast boot on your Windows computer, you first need to get into the BIOS/UEFI settings. You can do this by pressing the “F10” key or by choosing the appropriate menu option. After entering these settings, you will need to restart your PC in UEFI mode.
The interface for the BIOS/UEFI settings can differ from computer to computer. In some cases, you may have to choose between Legacy and Advanced Modes. Legacy mode is accessible only with the Arrow Keys or Enter Key. Advanced Mode is located at the bottom-right corner of the screen. To enter Advanced Mode, you need to press the F7 hotkey or hover the cursor over the Advanced Mode menu. In the Advanced Mode, you will see the Boot tab. Enable Fast boot as per your requirement. To exit, press the F10 hotkey or select “Save & Exit Setup”, and then click “OK”.
Go To Settings Menu:
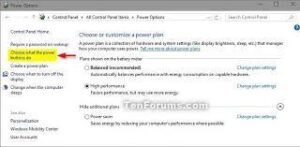
- First, open the Windows Control Panel.
- Next, go to the Power Options screen.
- Once there, select Choose what the power button does.
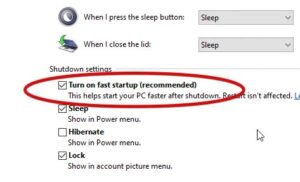
- Finally, check the Turn on fast startup box and press Save.
If you’ve enabled fast boot, you can also enable “boot override.” This feature allows you to boot from an optical drive once and install an operating system. This is useful if you’re trying to install a new operating system, or are testing a Linux live disc.
Leave a Reply