How to Disable and Enable YouTube Comments
Enable YouTube Comments section can be a great place to engage your audience and continue the conversation. However, it can also be a source of negativity.
A positive comment from a loyal viewer can make a video creator’s day, but a negative one can quickly turn into a nightmare. Fortunately, there are a few things you can try to fix the problem.
YouTube comments play a crucial role in fostering community engagement and interaction around your videos. Enabling comments is a straightforward process, but it requires navigating through the platform’s settings. In this guide, we will walk you through the steps to enable YouTube comments on your videos.
Step 1: Sign in to Your YouTube Account
Before you can make any changes to your video settings, ensure that you are signed in to your YouTube account. If you don’t have an account, you’ll need to create one.
Step 2: Access YouTube Studio
Once signed in, navigate to YouTube Studio. You can find this by clicking on your profile icon in the top right corner and selecting “YouTube Studio” from the dropdown menu.
Step 3: Select Videos
In YouTube Studio, locate and click on the “Videos” tab on the left-hand sidebar. This will display a list of all your uploaded videos.
Step 4: Choose the Video
Identify the specific video for which you want to enable comments and click on its title. This will take you to the video details page.
Step 5: Navigate to Video Details
Within the video details page, look for the “Details” tab in the left-hand menu. Click on it to access the video’s settings.
Step 6: Verify Your Video’s Category
Make sure that your video is categorized correctly. Some categories may have restrictions on comments. For instance, videos marked as “Made for Kids” might have limited comment functionality due to privacy concerns.
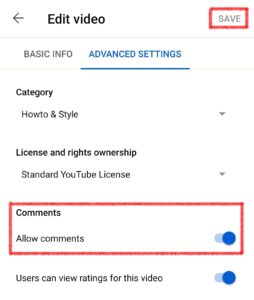
Step 7: Scroll Down to Advanced Settings
Scroll down the video details page until you find the “Advanced settings” section.
Step 8: Check the Comments Option
In the “Advanced settings” section, you’ll see an option labeled “Allow comments.” Ensure that the checkbox next to this option is ticked. This indicates that comments are enabled for your video.
Step 9: Save Changes
After checking the “Allow comments” option, scroll down to the bottom of the page and click on the “Save” button. This action confirms your changes and ensures that comments are enabled for the selected video.
Step 10: Verify Community Guidelines Compliance
YouTube has community guidelines in place to maintain a positive and safe environment. Ensure that your video complies with these guidelines to prevent any issues related to comments. Videos violating community guidelines may have certain features, including comments, restricted.
Step 11: Manage Comments Settings Globally
If you want to manage comments settings across all your videos, you can do this globally. To access the global settings, go back to YouTube Studio and click on “Settings” in the left-hand sidebar.
Step 12: Select Community
Within the “Settings” menu, choose the “Community” option. Here, you can set default comment settings for all your videos.
Step 13: Adjust Default Settings
In the “Community” settings, review and adjust the default settings for comments. You can control whether comments are allowed, held for review, or automatically approved. Make sure your preferences align with your content and moderation capabilities.
Step 14: Save Changes
Once you’ve adjusted the default settings, click on the “Save” button to apply the changes globally.
Step 15: Moderate Comments
Enabling comments also means you should be prepared to moderate them. YouTube provides tools to help you manage and moderate comments effectively. Regularly check your video’s comment section and use the moderation features to filter and respond to comments appropriately.
How to enable comments
Interacting with viewers in the comments can help you grow your audience and build a community. It can also improve the search ranking of your videos on YouTube. It’s worth the effort to enable comments for your videos. However, it’s important to monitor your comments to prevent spam, bullying or harassment.
Enable YouTube Comments threads can get hostile, and when you’re a brand it can feel like an overwhelming and uncontrollable task to monitor them. Whether it’s an angry comment or a spam attack, it’s important to respond quickly and efficiently. Otherwise, your message can be missed, and your audience may feel disconnected from you as a creator.
It’s also important to keep in mind that comments on YouTube are public, and any comment made by you from your account is associated with your channel. This means that if you’re representing a business, a negative comment can impact the reputation of your entire channel. If you’re worried about this, it’s a good idea to create multiple channels for your brand and use the Default channel feature to disable comments for all videos on your main channel.
You can enable or disable comments on your YouTube videos from the Upload Defaults settings page in YouTube Studio. You can also enable or disable comments on individual videos by selecting them and choosing Allow or Disable from the Comment Visibility dropdown menu. However, you can’t bulk disable or automatically enable comments for new uploads from a mobile device. You must use a desktop computer to do this.
Disable comments
Having comments on your YouTube videos can help you build a relationship with your viewers, but they can also be a source of negativity. If the comments section gets seized by spammers who use it to promote their services, it can dilute the message you want to convey to your audience and interfere with the quality of your videos.
If you are tired of seeing negative YouTube comments, you can disable them on individual videos or the entire channel. This option can be found in YouTube studio settings under Comment visibility. To disable comments on a video, click Content in the left panel of the dashboard and then select the pencil icon next to the video thumbnail. You will be able to edit the comments and ratings settings for each video.
However, it’s important to remember that if you disable comments on your videos, your viewership may decrease. Some viewers will be frustrated by this, and your videos may not rank as well in search and suggestions. Additionally, censoring comments can prevent positive messages from being shared and can alienate loyal fans. To avoid these issues, it’s recommended to set a “hold all comments for review” setting on your channel. You can do this in YouTube studio on desktop. This will allow you to moderate the content before it goes live.
Restore comments
YouTube comments can be a great way to build community and continue the conversation around your videos. However, they can also be a source of negativity. It’s important to know how to manage the comments section of your videos to keep it positive. In this article, we’ll cover how to disable and enable comments on a video, as well as how to restore them.
While most people don’t think twice about what they write in a comment, sometimes things can go wrong. If you’ve made a mistake in your comment, it’s easy to edit it. You can do this by hovering over the top right of your comment. A pop-up will appear with the option to Edit. You can then make any necessary changes to your comment.
Another way to recover a deleted YouTube comment is to use the YouTube Comment History tool. This is a feature that lets you see all your old comments in chronological order. It also lets you find any comments that were marked as highlighted or highlighted reply.
This is a useful tool if you’ve posted a comment that you’re no longer happy with, or if someone else has replied to it and added to the conversation. Depending on how embarrassing the comment is, it may be worth trying to recover it.
Hold all comments for review
While comments on YouTube are a great way to foster a dialogue between content creators and viewers, they can also be a breeding ground for hate speech and other negative behavior. While YouTube’s system is designed to find potentially inappropriate comments, it is not foolproof. Therefore, you may want to use a tool like Hold all comments for review to ensure that no nasty or hateful comments make it onto your videos.
This feature allows content creators to view all comments before they are published, even if they are not logged in. This is a great way to prevent trolls from ruining the video experience for other users. However, it is important to remember that if you allow all comments to be visible on your videos, you must respond to them promptly and professionally.
In addition, you can disable comments on your videos to prevent users from leaving offensive or inappropriate comments. You can do this in the settings menu of your YouTube account or by using the YouTube studio app. This will not affect existing comments, but will prevent users from commenting on your future uploads.
You can also set a Blocked Words List to filter out any words or phrases that are commonly used by trolls. This will prevent them from being able to post offensive comments on your videos and will help you save time and effort.
Conclusion
Enabling YouTube comments is a crucial step in fostering community engagement and interaction with your content. By following these steps, you can ensure that your videos are open to comments, allowing your audience to share their thoughts and feedback. Additionally, understanding the global comment settings lets you tailor the commenting experience across all your videos, maintaining a positive and interactive community on your channel.
Leave a Reply