How to Enable Voice to Text on Mac
Enable Voice To Text On Mac Apple’s built-in voice-to-text on macOS is one of the best in the industry. But you need to enable it via system preferences, decide on a keyboard shortcut and choose a language.
Once you do, select text and press your shortcut (defaults to Option-Esc) to have macOS read it aloud. This feature is surprisingly helpful.
Enabling voice-to-text functionality on a Mac can be a convenient feature for those who prefer or need to use spoken words instead of typing. The Mac operating system, macOS, provides built-in support for this through the Dictation feature, which converts spoken words into text. Here’s a step-by-step guide on how to enable voice-to-text on your Mac.
Here’s A Step-By-Step Guide
1. Check System Requirements: Before proceeding, ensure that your Mac meets the necessary system requirements for Dictation. Generally, Dictation requires an internet connection and macOS 10.9 or later.
2. Connect to the Internet: Dictation on macOS relies on cloud-based processing, so make sure your Mac is connected to the internet.
3. Open System Preferences: Click on the Apple logo in the top-left corner of your screen and select “System Preferences” from the dropdown menu.
4. Access Keyboard Settings: Within System Preferences, locate and click on “Keyboard.”
5. Navigate to Dictation: In the Keyboard preferences, click on the “Dictation” tab. Here, you’ll find options related to Dictation settings.
6. Enable Dictation: Toggle the Dictation switch to the ON position. You may be prompted to download additional files, as Dictation relies on cloud-based services.
7. Choose Language: Below the Dictation switch, select your preferred language for dictation. Ensure that the chosen language is one that macOS supports for voice recognition.
Here’s a step-by-step guide
8. Set Shortcut: Choose a keyboard shortcut to activate dictation quickly. By default, pressing the “fn” (function) key twice activates Dictation. You can customize this shortcut based on your preference.
9. Enable Enhanced Dictation (Optional): Enhanced Dictation allows for offline voice-to-text conversion and is useful if you want to use Dictation without an internet connection. To enable Enhanced Dictation, click the “Dictation” tab in the left sidebar and check the “Use Enhanced Dictation” option.
10. Configure Microphone: Dictation requires access to your Mac’s microphone. Ensure that your microphone is properly connected and configured. You can test your microphone in the “Sound” preferences within “System Preferences.”
11. Test Dictation: Open a text document or any application where text input is possible. Activate Dictation using the chosen keyboard shortcut and start speaking. Your spoken words should be transcribed into text.
12. Edit Dictation Settings: Fine-tune Dictation settings by clicking the “Dictation Commands” button. Here, you can customize voice commands for actions such as formatting, editing, and navigating text.
13. Use Dictation Anywhere: Dictation works not only in text documents but also in various applications that support text input. You can use it in email clients, web browsers, and other software.
14. Troubleshooting: If Dictation doesn’t work as expected, ensure that your internet connection is stable, your microphone is functioning correctly, and your chosen language is supported. You may also need to check for software updates.
15. Privacy Considerations: Recognize that Dictation involves sending your voice data to Apple’s servers for processing. Apple has privacy measures in place, but it’s essential to be aware of how your data is handled. You can review and manage privacy settings in the “Privacy” tab of “Security & Privacy” within “System Preferences.”
In conclusion, enabling voice-to-text on a Mac is a straightforward process through the built-in Dictation feature. By following these steps, you can take advantage of this convenient and efficient way to input text using your voice.
Dictation
Once you’ve set up Dictation with the settings you want, you can use it in any app. Open the app and press your dictation shortcut (explained above; the Fn key or Control key) or choose Edit > Start Dictation in the menu bar. You’ll see a small microphone icon appear on the screen and it will fluctuate as you speak, indicating volume. You’ll also see text populate in the app where the cursor is placed. You can dictate for as long as you want, but Apple recommends dictating no more than 40 seconds at a time for best results.
Enable Voice To Text On Mac You can use a number of commands while dictating for formatting, punctuation, capitalization, and special characters, such as a question mark or comma. For more information on dictation commands, see Apple’s documentation.
If you enable multiple languages in Dictation’s settings, you can switch between them as you speak. To do this, click the language indicator in the feedback window below the microphone icon.
Dictation is a convenient, hands-free way to create text, and it’s far more accurate than any speech-to-text software I’ve tried. Plus, it’s integrated into macOS so there’s no need to keep track of a separate app. Just be aware that by enabling Dictation, you’re agreeing to let Apple listen to your voice and use the data it collects to improve its products and services.
Languages
Dictation is the built-in speech to text feature that turns your voice into readable text. It’s a handy tool to have if you need to jot something down quickly without using the keyboard. While this feature was full of glitches in years past, it’s now fairly reliable and useful.
In Dictation settings, you can set the microphone your Mac uses for dictation and specify the language to use. You can also change the default text to speech voice and adjust its speaking rate.
If you’re not satisfied with the default voice, choose Customize from the System Voice pop-up menu in Dictation & Speech preferences to add a new one. Then select a voice from the list and click Play to audition it. If you like it, click OK to download it. The new voice appears in the System Voice menu when it’s finished downloading.
You can also disable Dictation’s Auto-punctuation, which inserts punctuation for you as you dictate. If you’re concerned about your privacy, you can choose not to have Dictation transmit your utterances to Apple and Microsoft for processing. However, this can make the feature less responsive. There are a few alternatives for voice to text that are more privacy-friendly. One such alternative is Notta, which provides a free trial and doesn’t share any of your information with third parties.
Shortcuts
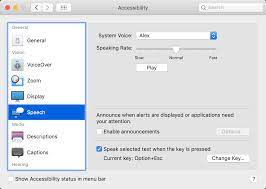
If you have trouble reading text on-screen or simply prefer the soothing sound of your computer’s voice, macOS has text-to-speech capabilities that are among the best you’ll find in any operating system. Open the Accessibility preferences pane and check the Speech menu item to enable it. You can also set a keyboard shortcut to activate it (Option + Esc is the default) and choose a voice from the pop-up menu. Some apps, like Postbox and iBooks, include a command to read selected text, but if you select an entire message, it will speak all of the selected text, including ads, sidebars, and non-essential details.
Privacy
While there’s a lot of focus, rightly so, on mobile privacy and security, desktop computers also need to be secured. And while macOS does have some great privacy features, it’s worth checking your settings regularly to make sure you’re maximizing online privacy and cybersecurity.
Apple makes it easy for you to limit access to your computer by creating different user accounts that have their own passwords and permissions. It’s a great way to prevent data theft and ensure you’re protected in case your computer is lost or stolen. You can create new user accounts by heading to System Preferences > Users & Groups, clicking on the lock icon and entering your Mac password. You can even create a Sharing Only account, which is the most secure and only allows a person to view files you’ve shared with them.
By default, your Mac shares information about how you use it with Apple and with app developers to improve Siri and Spotlight. You can disable this by going to System Preferences > Security & Privacy, opening the Privacy tab and unchecking the box next to “Share Analytics with Apple and App Developers.”
Leave a Reply