How to Dictate on Mac Word
Dictate On Mac Word is a voice-to-text feature that allows you to create and edit text on your Mac using your voice. You can enable Dictation in the menu bar at the top of your screen or with a keyboard shortcut of your choice.
To turn on Dictation, open System Preferences, click Keyboard, and then select the Dictation tab.
To dictate text in Microsoft Word on a Mac, you can use the built-in dictation feature of macOS. Here’s a step-by-step guide.
- Make sure Dictation is enabled:
- Open System Preferences on your Mac (you can find it in the Apple menu or by searching Spotlight).
- Click on “Keyboard.”
- Go to the “Dictation” tab.
- Turn on Dictation and choose your preferred language.
- Activate Dictation in Microsoft Word:
- Open Microsoft Word on your Mac.
- Create a new document or open an existing one.
- Start Dictating:
- Position the text cursor where you want the dictated text to appear.
- On your keyboard, press the fn (function) key twice or press the fn key and the right Command key together to start the dictation.
- Speak Clearly and Punctuate:
- Begin speaking after you hear a beep.
- Speak clearly and at a moderate pace.
- Use voice commands for punctuation (e.g., “period,” “comma,” “new line,” etc.).
- Stop Dictating:
- To stop dictating, press the fn key again or simply click the Done button that appears on the screen.
- Edit as Needed:
- After dictating, review the text for accuracy.
- Make any necessary corrections or edits using the keyboard or mouse.
- Save Your Document:
- Save your Word document regularly as you work to avoid losing any dictated content.
- Check Word Count:
- Word count is usually displayed at the bottom of the Word window. Ensure you stay within your desired word limit.
Remember that while dictation is a powerful tool, it may not always be 100% accurate, and you might need to make corrections. Additionally, your Mac must be connected to the internet, as the dictation feature relies on online speech recognition services.
Lastly, the instructions might slightly vary depending on your macOS version and the version of Microsoft Word you are using, but the general steps should be similar.
1. Go to the Tools menu
Dictation is a built-in feature on your Mac that allows you to create text by speaking. It’s a handy tool that can save you time and effort, especially if you have difficulty typing or physical limitations.
You can enable dictation in System Preferences (click the Apple icon in the Dock or the menu bar, then select System Preferences). Click Keyboard. Select the Dictation tab, then choose On.
The more you use dictation, the better it understands you. It learns the characteristics of your voice and adapts to your accent. It also lets you use dictation commands, such as “new line” or “new paragraph.”
When you turn on Dictation, your spoken words and certain other data are sent to Apple to be converted into text. Apple uses this information solely for the purpose of providing you with a more accurate dictation experience.
In Keyboard settings, the microphone source tells you which device your Mac is currently using to listen for Dictation. You can change the shortcut to start Dictation, and you can also customize it.
2. Select Dictation
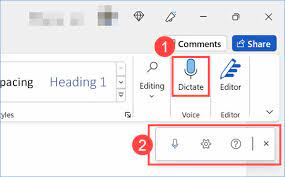
When you use Dictation, your Mac converts what you say into text. You can also use dictation commands to add formatting and punctuation. To begin dictating, click the microphone icon in Word or another app, or select Dictation in Edit menu. Position the insertion point where you want your text to appear, and then click Done below the microphone icon or press the keyboard shortcut.
Using Server-based Dictation means that Apple uses the speech recognition services of its servers to convert your words into text. This data is used only for the purpose of providing Dictation and other voice-to-text services. You can share your speech recordings with Apple only if you enable them.
In Keyboard settings, the Microphone source tells you which device your Mac is using to listen for Dictation. You can change the default dictation shortcut in Keyboard settings. Choose the Dictation tab on the right, click the drop-down menu next to Shortcut, and then choose a keyboard shortcut to start Dictation. You can also select Customize, and then press the keys you want to use to make a shortcut that isn’t on the list.
3. Select the type of dictation you want to perform
Dictate On Mac Word lets you create documents, emails, text messages, and more by speaking rather than typing. It’s a convenient built-in feature that works with any app, and you can adjust your settings to customize it to your needs. You can also enable a keyboard shortcut to start dictation, choose the language you want to use, and turn on Auto punctuation.
Dictate from the menu bar or with a keyboard shortcut (the keyboard shortcut varies by Mac model). Select the Microphone source in Keyboard settings to change the device your Mac listens to for dictation. In supported languages, you can also insert emoji and other special characters by saying their name when you start dictating.
For best results, speak clearly and enunciate your words so the system can understand what you’re saying. Ambiguous text is underlined in blue—for example, you might get the result “flour” when you intended to say “flower.” If you see underlined text that you don’t want, click it and select an alternative. You can also select the Dictation toolbar to change settings and access a variety of commands, including those for formatting, capitalization, and punctuation.
4. Select the file you want to dictate to
Dictation is a great way to increase your productivity and write faster. It’s also a great tool for people with disabilities. However, there are a few things you should keep in mind when using this feature. For example, you should make sure that you have a good microphone and that the audio is clear. You should also be aware of the privacy implications of dictating to your computer. For more information, see the Apple Dictation and Microphones support page.
To start dictating, place the cursor where you want to type and select Dictation. A microphone icon appears above or below the insertion point when Dictation is active. You can also choose a keyboard shortcut to start Dictation. To customize a shortcut, go to the Dictation tab on the right, click the drop-down menu next to Shortcut, and select a shortcut.
Dictation uses voice recognition technology to convert your words into text. It works by recording your voice and sending it to Microsoft’s servers for processing. The accuracy of the feature varies depending on your accent and vocabulary.
5. Start dictating
You can use Word’s built-in dictation feature to dictate directly into documents. To start, select the microphone icon in the toolbar and begin speaking. Word will automatically convert your voice into text in the document where you have the cursor. You can also configure the dictation settings (language, microphone device, volume, auto-punctuation, and filter sensitive phrases).
In addition to Word, you can use Apple’s built-in speech recognition in any Mac app that supports it, including native text editors, email, messages, notes, presentations, and more. To enable dictation on your Mac, go to System Preferences > Keyboard and click the Dictation tab. Then, select On next to Dictation. After selecting On, you’ll see a pop-up warning about privacy.
The more you use dictation, the better it will understand your voice and accent. You can also use Enhanced Dictation, which allows you to dictate without sending your words to Apple’s servers. This option does require a stable Internet connection, and your words might not convert to text as quickly. In addition, you can only speak for up to 40 seconds at a time.
Leave a Reply