
How to enable Virtualization (VT) on Windows 7
If you’re wondering how to enable Virtualization on Windows 7, you’ve come to the right place. This article will cover both Intel VT-x and AMD-V, and explain how to enable them on your PC. In addition, you’ll learn how to remove unnecessary Windows features from your computer. Let’s get started! Read on to learn how to remove unnecessary Windows features! How to Remove Unneeded Windows Features
If you’re having problems running your PC, you may wonder if you should enable Intel VT-x virtualization on your PC. There are several different ways to do this, depending on your motherboard and processor. To enable this feature on your PC, the first step is to go to your BIOS settings. If you’re not familiar with BIOS settings, you can find them by searching for “hardware virtualization Google.”
To enable Intel VT-X virtualization on your Windows 7 machine, go to the BIOS or UEFI settings of your computer. If you don’t see the option, you’ll need to enable it manually. However, some motherboards and laptop manufacturers do not provide this option by default. If you’re lucky, they might release an updated BIOS version that includes the option.
How To Enable Virtualization In Windows 7 Without BIOS:
Alternatively, you can run a program called CPU-Z to check if your processor supports this technology. To enable this feature, you’ll need to enable virtualization in your BIOS settings, or in the UEFI menu, where you’ll find a toggle switch. AMD and Intel CPUs are different types, and they require specific software and hardware to be supported. If your system doesn’t support this, it’s best to purchase a new processor.
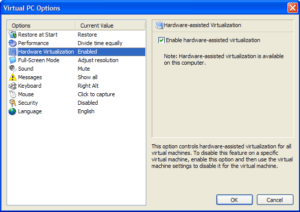
Open your BIOS settings by opening the Task Manager. There, you’ll see a tab titled “Performance.” Look for Virtualization and select it. If the option is disabled, click Disable. Once enabled, you can run compatible programs that use the virtualization capabilities of your CPU.
How To Enable VT In Windows 7 LD Player:
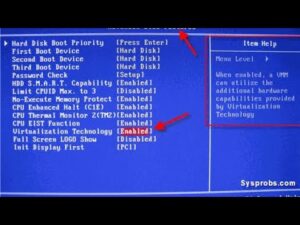
You may find that the VT-x feature is disabled by default in your BIOS. To enable it, look for Virtualization Technology, or Hardware virtualization support. Then press F2 or F12, or press Del to enter the BIOS setup. The BIOS settings may differ depending on the model of your system. You can also look for AMD-V or Virtualization Technology in the System Configurations tab.
AMD and Intel both have hardware virtualization technologies, called AMD-V and VT-x, that can make your PC run in a virtual environment. You may wonder whether your computer supports hardware virtualization, and you can find out by pressing the Windows logo key plus the X. It will tell you whether your processor supports virtualization, and if so, how to enable it. If it does, you can start virtualizing your PC in no time.
How To Enable Virtualization In Windows 7 HP:
First, you’ll need to install the SecurAble utility. The utility can be downloaded and installed from the AMD or Intel website. It will show you whether your processor supports AMD-V virtualization, as well as other virtualization technologies. Then, you need to run the tool that comes with the processor. AMD and Intel both provide utilities for you to install. Once you’ve done that, you can go ahead and enable AMD-V virtualization.
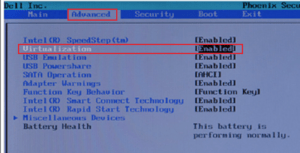
After installing the driver, go into your BIOS and select the AMD-V or Intel (r) VT-d hardware virtualization extension. Depending on your system model, you may need to change the settings to enable AMD-V or Intel(R) Virtualization Technology. Typically, these settings will be in the CPU or System Configurations menus. Select the Security tab to enable AMD-V.
How To Check If Virtualization Is Enabled Windows 7:
To find the specific key to enable AMD-V, run a Google search for the manufacturer’s website and find out which version of the BIOS your computer has. You can usually find the latest BIOS versions there. If you can’t find it, you can try restarting the computer, and follow the instructions that come with it.
Follow These Steps To Virtualization:
- Restart your computer and press the BIOS key. …
- Find the CPU configuration category. …
- Get Virtualization Settings. …
- Select the Virtualization Enable Option. …
- Save Changes. …
- Exit your BIOS and restart your computer.
In addition to the BIOS settings, you may also need to disable AMD-V technology on your PC. AMD recommends upgrading your CPU to enable AMD-V virtualization, and if it isn’t, you may need to upgrade the motherboard. A decent modern PC should support this functionality. You’ll need to run AMD-V drivers before you can enable AMD-V virtualization on Windows 7.
Leave a Reply