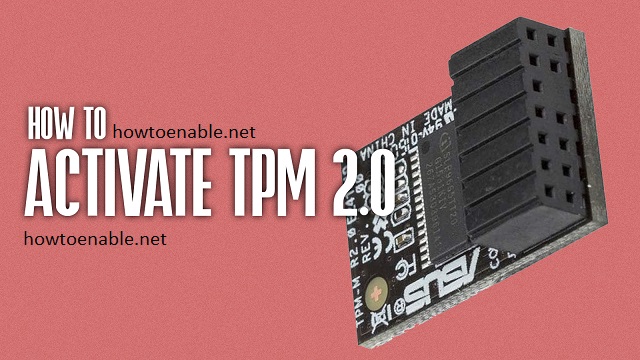
How to Enable TPM 2.0 For BitLocker
One of the requirements to run Windows 11 is that your computer has a Enable TPM 2.0 chip enabled. This is easily checked in the UEFI (formally known as the BIOS).
TPM is a requirement for a few different reasons, and it’s important to ensure you have it enabled before installing Windows 11. Read on for how to enable tpm 2.0.
Enabling TPM 2.0 (Trusted Platform Module) involves a series of steps to ensure that your system is configured to use this hardware-based security feature. TPM is commonly used to enhance the security of systems by providing a secure enclave for storing sensitive information such as encryption keys. Here’s a comprehensive guide in approximately 900 words.
Trusted Platform Module (TPM) is a hardware-based security feature that provides a secure environment for cryptographic operations. TPM 2.0 is the latest version, offering improved security over its predecessor. Enabling TPM 2.0 on your system involves a combination of hardware verification and software configuration.
Hardware Check:
- Check System Compatibility: Before enabling TPM 2.0, ensure that your system supports this version. Check your computer’s specifications or refer to the motherboard manual to confirm TPM 2.0 compatibility.
- Access BIOS/UEFI: Restart your computer and access the BIOS/UEFI firmware settings. You can usually do this by pressing a specific key during the boot process, such as F2, Del, or Esc, depending on your motherboard or device manufacturer.
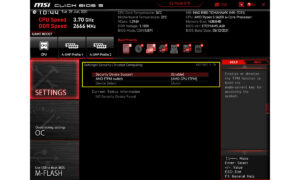
- Locate TPM Settings: Navigate to the “Advanced” or “Security” tab in the BIOS/UEFI settings. Look for a section related to TPM, which may be labeled as “Trusted Computing,” “Security,” or something similar.
- Enable TPM: If TPM is not already enabled, locate the option to enable it. Save the changes and exit the BIOS/UEFI settings. The system will restart, and the TPM hardware will be active.
Software Configuration:
- Check TPM in Windows: After restarting, log in to your Windows operating system. Press
Win + Rto open the Run dialog, typetpm.msc, and press Enter. This opens the TPM Management Console. - Update Device Drivers: Ensure that your device drivers, especially the motherboard chipset drivers, are up to date. Visit the manufacturer’s website to download and install the latest drivers to ensure optimal TPM functionality.
TPM Firmware Update:
- Check TPM Firmware Version: Open the TPM Management Console again (
tpm.msc) and check the firmware version. If an update is available, it’s essential to install it to ensure the TPM functions correctly. - Visit Manufacturer’s Website: Visit the website of your device or motherboard manufacturer to download the latest TPM firmware update. Follow the provided instructions to install the update, which may involve running an executable or using a specific tool.
TPM Activation in Windows:
- Check Windows Version: Ensure that you are running a version of Windows that supports TPM 2.0. Windows 10 and Windows 11 are examples of operating systems compatible with TPM 2.0.
- Enable TPM in Group Policy: Press
Win + R, typegpedit.msc, and press Enter to open the Local Group Policy Editor. Navigate toComputer Configuration -> Administrative Templates -> System -> Trusted Platform Module Services. Double-click on “Turn on TPM backup to Active Directory” and set it to “Enabled.” This ensures that TPM information is backed up. - Enable BitLocker: If you intend to use BitLocker for drive encryption, ensure it’s enabled. Open the Control Panel, navigate to “System and Security -> BitLocker Drive Encryption,” and follow the prompts to enable BitLocker on your system drive.
Verify TPM Status:
- Use PowerShell: Open PowerShell as an administrator. Run the following command to verify the TPM status:
powershell
Get-WmiObject -Namespace "Root\CIMv2\Security\MicrosoftTpm" -ClassName Win32_Tpm
Ensure that the “SpecVersion” is 2.0 and that other properties indicate the TPM is enabled.
- Device Manager: Open Device Manager (
Win + Xand select “Device Manager”). Expand the “Security devices” category.
Final Steps:
- Restart and Test: Restart your computer to apply all changes. After restarting, perform a final check using the TPM Management Console and PowerShell commands to ensure that TPM 2.0 is active and functioning correctly.
- Backup TPM Information: If required, back up TPM information to Active Directory by running the command:
powershell
Backup-WinSystemVolume -DirectoryPath <BackupPath>
Replace
<BackupPath>with the desired directory for backup.
Congratulations! You have successfully enabled TPM 2.0 on your system, enhancing its security features. Remember that the exact steps may vary slightly based on your system and motherboard, so always refer to the manufacturer’s documentation for the most accurate instructions.
1. Go to the BIOS
A Trusted Platform Module is a specialized chip designed to secure hardware by integrating cryptographic keys into devices. Often installed on the motherboard, it is used for safeguarding digital identities, authentication, data protection and more. To enable tpm 2.0, you will need to access your laptop’s BIOS and enter the settings. This is a straightforward process, but it will vary from model to model. In most cases, you will need to continuously press the F2 key while you are powering up your device and entering the BIOS.
Once you are in the BIOS, navigate to the advanced or security setting menu. Once there, you should find a submenu labelled TPM or trusted computing. From here, you can select the option to enable tpm 2.0.
The TPM can help protect your computer from malware attacks by encrypting your data, passwords, and encryption keys. It can also provide a level of hardware-based authentication that is difficult to replicate or crack. Additionally, a TPM can create an owner password to help prevent unauthorized users from accessing your device.
While enabling tpm 2.0 can help prevent malware attacks, it is important to keep in mind that malicious software may be able to bypass the TPM. For this reason, it is important to always use a strong password and update antivirus software regularly.
2. Select Security
If you want to upgrade your Windows 10 PC to Windows 11, it is recommended that you enable TPM 2.0. This hardware chip is used for key protection, preventing malware from running in memory or on the hard drive, and ensuring that the OS only starts on genuine, valid code. It also has a number of properties that software-only CNG solutions can’t provide, such as data execution prevention and secure boot.
The process for this varies depending on the manufacturer’s UEFI/BIOS, but most modern computers with a UEFI-based BIOS use a similar procedure. During the startup sequence, select the System Utilities option and then the Security tab. From here you can see the status of your TPM. The server will reboot a second time without user input, and this is when the TPM setting becomes effective.
You can also check TPM availability in Windows 10. In the Command Prompt, type msinfo32 to open the System Information window, then look for the TPM line under Security Device Support.
3. Select Trusted Platform Module
TPM 2.0 is newer than TPM 1.2 and provides stronger encryption, better security and support for more algorithms. The easiest way to verify that your computer has a TPM 2.0 is to check in the BIOS. If you see a TPM option in the BIOS, select it and check the Specification Version to be sure that it is 2.0.
If you are unsure whether your computer has a TPM or not, you can also check the manufacturer’s website for instructions specific to your device. You may be able to add a hardware TPM chip to your computer, but this is not recommended as it could increase the likelihood of system failure due to overheating or power surges.
During the server startup sequence, press F9 to access the System Utilities screen and select System Configuration > BIOS/Platform Configuration (RBSU) > Server Security > Trusted Platform Module Options. Select Enabled to enable the TPM and BIOS secure startup. After you make this change, the server reboots and the TPM setting becomes effective.
4. Select Enabled
The TPM is a security chip that handles encryption for your fingerprint and other biometric data, as well as things like Windows BitLocker. It’s usually turned on and found on newer hardware, but it isn’t always enabled when you get a computer. If you’re getting a message that your hardware isn’t compatible with Windows 11 and the TPM isn’t active, you can easily enable it through the UEFI settings directly from the PC itself.
You can do this by navigating to your UEFI/BIOS using the entrance key for the motherboard and finding the TPM settings menu. Depending on your manufacturer, it might be a tab labeled Security, Advanced Security, or Trusted Computing. If you can’t find it, you may need to enter the UEFI or BIOS again and look for it in another submenu.
From here, you can select Enabled to enable the TPM and keep it enabled. This should help prevent any malware from running on your laptop and causing irreversible damage to it. The TPM also allows for shorter authorization values for things like passwords, which makes it harder for hackers to guess or crack your password. It’s worth keeping this feature activated to ensure the safety of your sensitive data and privacy.
Leave a Reply