How to Enable a Trusted Platform Module (TPM) to Enable Windows 11 on Your Laptop
Before you can use a Enable TMP to help secure Windows 11 on your laptop, you must initialize and take ownership of it in the system BIOS. Getting to the right menu can be tricky depending on your PC manufacturer’s setup.
The layout of BIOS/UEFI settings can vary, but you generally navigate using arrow keys and enter to select options. The menus can be arranged as tabs, lists, and graphical icons.
Enable TMP the Trusted Platform Module (TPM) on a computer involves both hardware and software considerations. TPM is a specialized microcontroller that provides a secure foundation for various security features, such as disk encryption and secure boot. The process for enabling TPM may vary depending on the computer’s manufacturer and model, as well as the operating system. Covering the steps to enable TPM.
Introduction to TPM:
Trusted Platform Module (TPM) is a hardware-based security feature that enhances the overall security of a computer by providing a secure area for cryptographic operations and storage of sensitive information. TPM is crucial for various security functionalities, including BitLocker encryption, secure boot, and device health attestation.
Pre-Requisites:
- Check Hardware Compatibility: Before attempting to enable TPM, ensure that your computer’s motherboard supports TPM. Check the system specifications or visit the manufacturer’s website for information on TPM compatibility.
- Access BIOS/UEFI: Access the computer’s Basic Input/Output System (BIOS) or Unified Extensible Firmware Interface (UEFI). The method to access this interface varies; typically, it involves pressing a specific key during the system’s startup, such as Del, F2, or Esc.
Enabling TPM in BIOS/UEFI:
- Locate TPM Settings: Once in the BIOS/UEFI interface, navigate to the security or advanced settings section. Look for an option related to TPM. The exact wording and location can vary, so consult the motherboard or system manual for guidance.
- Enable TPM: Change the TPM setting to “Enabled.” Save the changes and exit the BIOS/UEFI. The system will likely prompt you to confirm the changes and restart.
Windows Operating System Configuration:
- Check TPM Status in Windows: After restarting the computer, log in to Windows. Press
Win + Rto open the Run dialog, typetpm.msc, and press Enter. This opens the TPM Management Console, where you can check the TPM status. - Initialize TPM: If the TPM is not initialized, right-click on it in the TPM Management Console and select “Initialize TPM.” Follow the on-screen instructions to complete the initialization process.
- Create TPM Owner Password: During the initialization, you may be prompted to create a TPM owner password. This password is crucial for certain TPM operations, so choose a secure password and keep it in a safe place.
- Check BitLocker Compatibility: If you plan to use BitLocker for drive encryption, ensure that your version of Windows supports BitLocker and that your edition (e.g., Windows 10 Pro) includes BitLocker functionality.
BitLocker Encryption:
- Open BitLocker Settings: Press
Win + S, type “BitLocker,” and select “BitLocker Settings” from the search results. Alternatively, you can find BitLocker settings in the Control Panel. - Turn on BitLocker: Select the drive you want to encrypt and click “Turn on BitLocker.” Follow the on-screen instructions, and choose to use the TPM for added security.
Troubleshooting:
- Check for TPM Firmware Updates: Occasionally, it’s beneficial to check if there are firmware updates for the TPM. Visit the computer or motherboard manufacturer’s website for any available updates.
- Clear TPM: In rare cases, you may encounter issues that require clearing the TPM. You can do this from the TPM Management Console in Windows. Right-click on the TPM and select “Clear TPM.” Be cautious, as this operation may have implications for certain security features.
How to Enable TPM in BIOS/UEFI
A Enable TMP (Trusted Platform Module) is a chip — or a function built into more modern CPU chips and graphics cards — installed in the motherboards of computers. It performs functions like storing and creating the cryptographic keys that generate device signatures, which help to prevent attacks by ransomware and other threats.
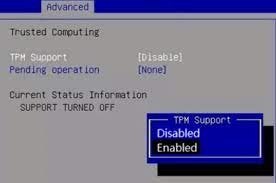
You can enable TPM in the BIOS/UEFI, a software that controls your computer’s hardware and provides an interface to the operating system. Depending on the BIOS/UEFI program, it may give you options for TPM settings like Disable, Enable, or Auto. It may also offer other settings that control your computer’s security, such as Supervisor Password and Admin Password.
To check whether your PC has a TPM, open the Device Manager and look for “TPM (Trusted Platform Module) 2.0.” If it does, you’ll need to enable it in BIOS/UEFI to use Windows features and applications that require TPM, including BitLocker, Measured Boot, and more.
To do this, enter the UEFI/BIOS setup through your laptop’s manufacturer’s entrance key. Look for a setting that’s labeled TPM or Trusted Platform Module, which is usually listed in a Security or Advanced tab. You may need to navigate through several levels of menus or go into a sub-menu for the option, which may be named differently by your motherboard manufacturer or AMD processor. For example, an Asus motherboard may list the feature as PCH-FW Configuration or fTPM (firmware-based TPM 2.0), while an Intel-based computer might label it as Platform Trust Technology.
TPM 1.2
Enable TMP 1.2 is a security chip that is built into the motherboard of your computer. It works as a secondary computing device that executes specific operations independent of the main processor. It communicates with the main processor over a low pin count (LPC) or Serial Peripheral Interface1 (SPI) interface. The key stored in the TPM cannot leave the chip unless specifically written to by the processor, ensuring that data can’t be stolen or used maliciously.
Enable TMP 2.0 is the latest generation of this technology, offering improved encryption algorithms and more features than previous versions. It also uses different memory types to store the information securely, making it harder for attackers to access the information. TPM 2.0 is an integral part of any modern computer and can be used to prevent attacks against the system and protect sensitive data.
If your computer doesn’t have a TPM 2.0 chip, you may have trouble installing Windows 11. You can use a tool to check whether the hardware meets the minimum requirements.
In order to enable TPM 2.0, you need to enter the UEFI/BIOS settings and look for a specific menu. Usually, this is under Advanced or Security. Once you find the menu, select it and make sure it’s set to “on.” You can then save your changes and restart your computer.
TPM 1.3
The Trusted Platform Module (TPM) is a microprocessor that stores cryptographic keys and performs various other security functions. It is a critical part of the security infrastructure of the operating system, hardware and other components. If your PC has a TPM, you should enable it to ensure the integrity of your computer and your data. This process is easy and usually takes less than five minutes. It is important to note that not all systems support the TPM 1.3 standard. Some only use TPM 2.0, while others require 1.2.
To enable TPM 1.3, first make sure the hardware Physical Presence jumper on the system board is asserted. Then, run the TPM Initialization Wizard (Figure 1). This will set up an owner account for the TPM and create a backup of the TPM information. Once this is complete, restart the server.
During the server startup sequence, press the F2 key to enter System Setup. Then, select the Security group and navigate to the TPM Security section using the F2> key. Select TPM Activation and change the setting to Enabled. Press F4> to save the settings and exit the System Setup Utility.
TPM 1.4
The TPM is a security chip built into the processor of your computer. It is an essential component of your laptop, and it helps to protect your data from theft. It also provides protection against unauthorized software or hardware changes. To enable the TPM, you must access your BIOS menu and follow the instructions to change the settings. You can find these instructions in the manual or online. Alternatively, you can use the HP website to download a TPM firmware update. This will restore the original TPM settings and enable your laptop to run Windows 11.
The TCG defines an API (Application Programming Interface) for developers to write programs that interact with the TPM. These applications provide a richer layer of interaction with the TPM than the basic System API. This API is called the Enhanced System API or ESAPI and enables more control over TPM operations.
A TPM can be used to secure e-mail, encrypt files, and create a personal secure drive. It can also store a fingerprint to authenticate the user. However, a TPM is not completely secure. Hackers can crack a TPM with simple tools such as dictionary attacks. To prevent this, you should clear your TPM regularly and make sure that the password is not saved in Keychain.
If you’re moving a VM from one Mac to another, it’s important to know that Parallels Desktop can’t move a TPM storage key from the host to the target Mac. You can find more information at KB 114118.
Conclusion:
Enable TMP involves a combination of hardware configuration in the BIOS/UEFI and software configuration in the operating system. The exact steps can vary, so it’s essential to refer to the specific documentation provided by the computer or motherboard manufacturer. Once TPM is enabled, it enhances the security posture of the system and enables features like BitLocker for robust data protection. Always exercise caution when making changes to BIOS/UEFI settings, and follow best practices for password management to ensure the security of TPM operations.
Leave a Reply