
Enable Secure Boot without BIOS Settings
If you’re having trouble starting up your PC, you may be wondering how to enable Secure Boot without the BIOS menu. If you’re unfamiliar with the BIOS menu, you can access it by pressing the F1 or F2 keys during bootup. This should launch the Advanced Startup menu. From here, select the Security and Authentication tab. In the Advanced Startup menu, look for the Secure option.
If you’re using an Acer laptop, you may not have an option to disable secure boot. To avoid this, you can disable the supervisor password. However, if you’re using a Windows laptop, make sure to save the supervisor password in a secure location. To prevent losing the password, you can use a password manager, email draft, or a cloud service. Once you’ve disabled secure boot, you can clear the supervisor password. Google
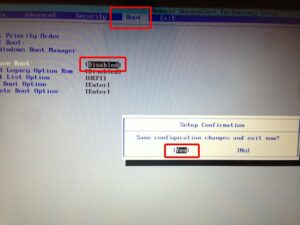
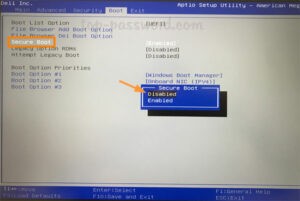
After you’ve deleted the PK file, press the F2 key to enter BIOS. In the next window, press the arrow keys to select Boot and Secure Boot. Click Disabled and confirm. If you don’t see that option, try pressing the down arrow key to enter the Supervisor Password. Then, press the Enter key to save your settings. You’ll need the Supervisor Password to log into the BIOS and then boot up your PC.
You Can Follow These Steps:
If you’re running an AMD-based PC, you can also enable Secure Boot. This is usually done through the UEFI, which means that it’s not necessary to change the BIOS. To enable Secure Boot, you’ll need to restart the system after it’s been rebooted. While you’re in Advanced Mode, switch to Advanced Mode. You’ll need to switch to Advanced Mode after this. In the Advanced Mode, select the Security tab, and then set CSM to Disable. In the UEFI, the boot type toggles between Enabled and Disabled.
If you’re running a Windows PC, you’ll need to make some changes to the BIOS. The first step is to install UEFI. This means that your system will be able to use UEFI security and support for more advanced features, like the Secure Boot feature. When this is installed, you’ll need to follow the manufacturer’s instructions to install the driver on the computer. The installer is a file that contains all the required software to enable Secure Boot.
Enable The Security Settings:
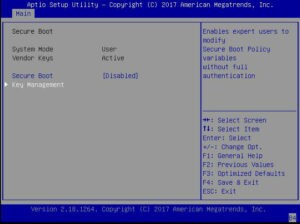
After enabling Secure Boot, you’ll need to enable the security settings in the BIOS. In Windows, you can enable Secure Boot by holding down the shift key while you choose the Restart option in the Start Menu. Once the system restarts, the Advanced Startup menu will appear. It will have options to troubleshoot your PC’s security settings. You can choose to disable Secure-Boot as well as the MBR partition style, but the latter might result in OS booting problems.
The last step is to enable Secure Boot in the BIOS. In Windows, you can do this by holding down the shift key and selecting Restart from the Start Menu. After restarting, you’ll see a list of options, including the Secure Boot setting. You can change the option by pressing the arrows on the security tab. Once you’ve chosen Secure-Boot, press the F10 button to confirm the changes.
If you don’t see this option in the BIOS, try to reboot your PC and select the boot option in the Advanced Startup menu. Then, select the UEFI Firmware settings. After selecting the UEFI Firmware settings, click Disable CSM. In Windows 7, you can also choose Secure Boot in the Advanced Startup menu. You can enable Secure Boot in the Advanced Startup menu by selecting the “Safe Mode” tab and “Enable CSM” at the same time.
After enabling Secure Boot in the BIOS, you can reboot the system. You can also enter the BIOS by holding the “Shift” key while you’re in the Advanced Startup menu. After the restart, you’ll see the Advanced Startup menu, which includes Troubleshoot and UEFI Firmware settings. After clicking the Troubleshoot option, you’ll see the Secure Boot option in the Advanced Startup menu.
Leave a Reply