
How to Enable Ping in Windows 10
In recent enable ping in Windows 10 Operating systems, you might have noticed that pinging is disabled by default. You’ll find that the default firewall policy disables replying to ICMP echo requests (ping requests). So, when you run a ‘ping’ command on your Windows 10 or Windows 7 PC, you’ll get the message ‘Request Timed Out’. To enable incoming and outgoing ICMP requests, follow these steps:
To enable ping, start by using the search bar and type “ping” in the search bar. You’ll be prompted to enter the administrator password. After you have entered the password, click OK. Then, click on the command line and select “netsh”. In the next window, you should see the new command prompt. After you have entered the required credentials, click OK. The netsh command will enable ping requests on Windows Google.
After you’ve entered the password, click the ‘ping’ button. Once you’ve done that, click OK. Once you’ve entered the correct password, press the Enter key to confirm. The ping command should now work. Once you’ve entered the correct credentials, click OK. You should now see the ping dialog box. This dialog box will ask you to restart your computer. The process should be the same as for Windows 7, but with Windows 10.
Why Can’t I Ping My Windows 10 Computer:
To enable ping in Windows 10, type “ping” into the search box. Now, choose the type of ping you want to use and press Enter. This command will enable pinging on your computer and your internet connection. To turn off pinging, type netsh in the search box. Once this is done, click OK and restart your computer. You should now be able to ‘ping’ your network.
Using ping is essential to ensure that your computer is reachable. To do this, you should be able to use the “ping” command in your operating system’s settings. Then, you can click the “ping” button and wait for the response to appear. After a few seconds, you’ll be able to test whether your PC is reachable or not. The ‘ping’ command will let you see if your PC is reachable or not.
Enable Ping Windows 10 Power Shell:
To enable ping in Windows 10, you’ll need to configure your firewall. If you’re connected to a public network, the firewall will allow the ping request. If your network location is private, you’ll have to disable it manually. You can disable it on all networks in your computer, but if you’re connected to a public network or shared network, you should use a ping rule.
There are several different ways to enable ping in Windows 10. You should first enable the firewall rule for ping. Then, you should select the option “allow ping” and enable it. Alternatively, you should enable the firewall rule for ICMP. This will allow the ICMP request from your computer to be sent to the remote network. This will allow you to ‘ping’ your PC with a wireless connection.
How To Enable Ping In Windows 10:
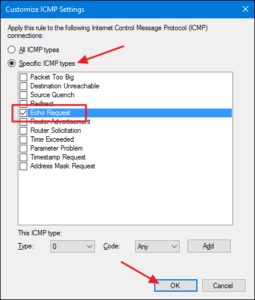
You can enable ping in Windows 10 by modifying the Firewall. To enable ping, you need to open the Security tab in your Firewall. To do this, you need to click on “Inbound” and then “IPv6” in the right pane. Now, a ping is enabled from the Firewall. This is a common way to enable ping. In case your Firewall has been configured to block ping, you’ll need to uncheck the corresponding rules and re-enable it.
If you are worried that your computer is blocking ping requests, you can disable it by changing the rules. Then, you can click on “Inbound” and enable ping.” Then, click on the “Ping” rule. After enabling the rule, you can check and confirm whether pings are enabled or not. When you’re done, go ahead and install the update. If you’re satisfied with the results, then you can delete the rule.
Firewall Settings:
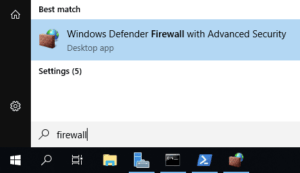
- Search for Windows Firewall, then click to open it.
- Click Advanced Settings on the left.
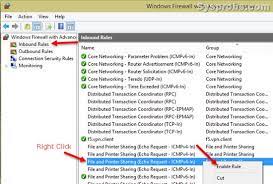
- In the left pane of the resulting window, click Incoming Rules.
- In the right pane, find the rules for File and Printer Sharing (Echo Request – ICMPv4-In).
- Right-click each rule and select Enable Rule.
You can also disable the ping service in Windows 10. This is useful if you are trying to communicate with a remote computer. But, it can’t be done with a remote PC. You need to enable ping to connect to a server and see if it can be accessed remotely. To enable ping on your Windows 10 PC, you must first select “network” in the settings list.
Leave a Reply