
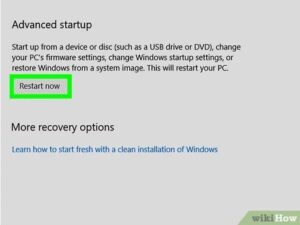
How to Enable Intel Turbo Boost in Windows 10
So you want to enable Intel Turbo Boost in Windows 10. But what exactly is it and why do you need to do this? The short answer is that it is a feature that is built into your CPU. It allows your processor to run at higher frequency and prevents it from overheating. Here are a few examples of situations where you would want to use this feature. Read on to discover more…. and more!
The Intel Turbo Boost feature automatically increases the clock speed of all cores of the processor. It is available on Intel I5 and I7 Cores that use the socket 1156. A Core i5 750 starts at 2.66 GHz, when all 4 cores are enabled. When only 2 cores are required, the processor shifts to 3.2 GHz, and so on. This complies with the requirements of both frequencies. Many new games now use the Quad Core and the PhysX particle management system Google.
The Turbo Boost feature increases the clock speed of all cores in a Windows 10 computer. It can be used in various situations to optimize CPU speeds. For example, you can use it to boost your computer’s performance. You can use Task Manager to determine which core is being utilized at any given time. This feature can increase the clock speed of a processor by up to 15%. This technology is available for Intel processors and AMD processors.
How To Prevents The CPU From Overheating:
While the main factor in preventing your CPU from overheating is the amount of load you place on it, you can use the settings of Intel Turbo Boost to prevent your computer from overheating. While it will run at the maximum amount of Turbo Boost available in your BIOS settings, you should step it back if the CPU is already too hot. The amount of Turbo Boost available in your BIOS settings will depend on the amount of workload you’re using your machine with.
By default, CPUs from Intel have low base frequencies. But you can set your processor’s Turbo Boost to turn on when you’re doing intensive work, or you can turn off the turbo boost feature completely. This option will help you to limit power spikes while using your computer, but will also increase the CPU’s overall usage. Disabling Turbo will ensure that your processor does not overheat during heavy workloads.
How To Enable Intel Turbo Boost Windows 11:
Some Intel processors have the ability to automatically increase their clock speeds under certain conditions. These programs are known as Turbo Boost, and they can temporarily improve your PC’s performance. MiniTool Partition Wizard offers the ability to use Turbo Boost. Using Turbo Boost helps you segment programs by their CPU, RAM, or GPU intensity. High frequency usage can cause your CPU to consume more power and heat than it can handle. As a result, it can shorten its lifespan.
Although Turbo Boost allows the processor to run at a higher speed under certain conditions, it does not significantly increase performance. While Intel’s processors are able to mark their products with a higher clock speed, AMD is limited to applying this feature to the Core i9-K and i9-KF processors in its latest generation of desktops. AMD’s floating turbo is also likely to increase the power draw. Additionally, Intel limits its frequency jumps to 100 MHz, while AMD can do smaller steps of 25 MHz. This may mean that Intel can only cross the frequency boundary if it can maintain it for a fixed amount of time.
How to Enabled By The Processor Itself:
When your CPU supports Intel turbo boost technology, it will be automatically enabled. However, you can disable it using a BIOS switch. Turbo Boost speed is determined by the CPU’s core clock speed. There is no way to set a user-controlled limit on turbo Boost speeds, but you can monitor them with third-party software and fans. Intel recommends that you keep Turbo Boost disabled for most cases.
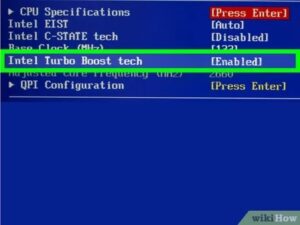
Enable Intel Turbo Boost Technology:
- On the System Utilities screen,
- Select System Configuration > BIOS/Platform Configuration (RBSU) > Performance Options > Intel (R)
- Turbo Boost Technology and press Enter.
- Select a setting and press Enter. …
- Press F10.
When you enable Intel turbo boost on your computer, the processor will tell the OS what speeds it can achieve. This list starts at the highest non-turbo speed and goes up to that. As long as you do not exceed the non-turbo limit, the processor will stay in Turbo mode. Otherwise, it will switch back to “Auto”.
Leave a Reply