How to Enable Find My iPhone on iPad
Enable Find My iPhone On iPad sends a location signal that only Apple devices can detect. Each device emits a unique location signal that changes constantly and is encrypted so only Apple knows where it is located.
On a map, your iPad and any other products associated with it appear as green dots. Click a device to see a custom message and display directions to its location.
Enable Find My iPhone On iPad is a crucial step in ensuring the security and location tracking of your device. This feature not only helps you locate your iPad if it’s lost or stolen but also allows you to remotely lock or erase it to protect your personal information.

Follow These Steps
1. Update iOS:
Before enabling Find My iPhone, it’s essential to ensure that your iPad is running the latest version of iOS. Apple regularly releases updates with security improvements and new features. To check for updates, go to “Settings” on your iPad, tap on “General,” and then select “Software Update.” If there’s an available update, follow the on-screen instructions to install it.
2. Sign in with Apple ID:
Find My iPhone is linked to your Apple ID, so the first step is to sign in or create an Apple ID if you haven’t already. To sign in, go to “Settings,” tap on your Apple ID at the top of the screen, and enter your Apple ID credentials. If you don’t have an Apple ID, you can create one by selecting “Sign in to your iPad” and then choosing “Don’t have an Apple ID or forgot it?” Follow the prompts to set up a new Apple ID.
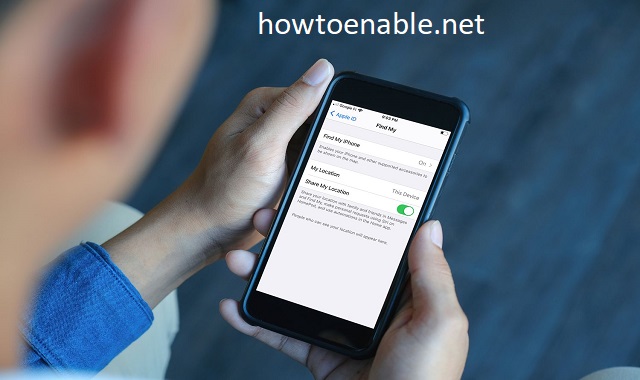
3. Enable iCloud:
Find My iPhone relies on iCloud for its functionality. Ensure that iCloud is enabled on your iPad. In the “Settings” app, tap on your Apple ID at the top of the screen, select “iCloud,” and toggle the switch to the ON position. You may be prompted to choose which iCloud features you want to enable; make sure “Find My iPad” is switched on.
4. Enable Find My iPad:
After enabling iCloud, locate the “Find My iPad” option within the iCloud settings. Toggle the switch next to “Find My iPad” to the ON position. This action activates the Find My iPhone feature for your iPad. Additionally, you can enable “Send Last Location,” which sends your iPad’s last known location to Apple when the battery is critically low.
5. Location Services:
Go to “Settings,” select “Privacy,” and tap on “Location Services.” Ensure that the main switch at the top of the screen is turned on. Scroll down to find “Find My iPad” in the list of apps, and make sure it’s set to “While Using the App” or “Always.” Enabling location services is crucial for accurate location tracking.
6. Wi-Fi and Cellular Data:
For Find My iPad to work effectively, your device needs an active internet connection. Connect to a Wi-Fi network by going to “Settings” > “Wi-Fi” and selecting an available network. If you have a cellular-enabled iPad, ensure that cellular data is turned on in “Settings” > “Cellular” or “Mobile Data.”
7. Familiarize Yourself with Find My iPhone App:
To track your iPad, you can use the Find My iPhone app on another iOS device or through iCloud.com on a web browser. Download the Find My iPhone app from the App Store if you don’t have it already. Alternatively, you can use a web browser on a computer and go to iCloud.com. Sign in with your Apple ID to access the Find My iPhone features.
8. Locate Your iPad:
Now that you’ve set up Find My iPad, you can use the app or iCloud.com to locate your device. Open the Find My iPhone app, select your iPad from the list of devices, and a map will display its last known location. If your iPad is nearby, you can use the “Play Sound” option to make it play a sound, helping you locate it. If your iPad is not within earshot, you can use other options like “Lost Mode” or “Erase” to protect your data.
9. Use Lost Mode:
If your iPad is lost, enabling Lost Mode can help you remotely lock the device with a passcode and display a custom message on the lock screen. This message can include your contact information, encouraging anyone who finds the iPad to return it to you. To activate Lost Mode, select your iPad in the Find My iPhone app, tap on “Actions,” and choose “Lost Mode.” Follow the prompts to set a passcode and enter a contact phone number.
10. Erase Your iPad Remotely:
To do this, select your iPad in the Find My iPhone app, tap on “Actions,” and choose “Erase.” Confirm the action, and the erase process will begin.
Find My
Sign in to the iCloud website with your Apple ID. Click Find My (the app that looks like a green radar). If your iPad is online and turned on, a map displays its location. If it is offline, you see its last known location.
From the map, you can click the device name to view the current status and a contact number that will display on the screen of your iPad. This is useful if your device has fallen into the wrong hands.
If you want to prevent someone from activating and using your iPad, click Lost Mode. The device enters Lost Mode, and a message appears on the screen asking whoever finds it to call the displayed phone number or visit an Apple Store to recover it. In addition, a feature called Send Last Location automatically transmits the location of your iPad when its battery power runs low. You can also use the Erase This Device feature, which factory resets your tablet and removes all content and settings, including eSIM configuration and data plan information (if Wi-Fi + Cellular). You need to have an active data plan and an Apple ID to recover your iPad.
Activation Lock
Next, open the Find My app and select your device. A map will display the location of your iPad. You can also choose to play a sound, see step-by-step directions to the iPad’s location, or mark it as lost. If you’re concerned about someone stealing your iPad, you can even erase the device.
It’s important to follow the steps to remove a device from iCloud before you sell or give it away, or ensure that those steps are taken if you receive one from a friend or family member. You can also bypass the Activation Lock by using a reliable iOS iCloud Removal tool such as AnyUnlock.
Lost Mode
If you have more sensitive information saved on your iPad and back up your device regularly, you may want to enable Lost Mode. When you activate this feature, your iPad locks with a passcode and displays a message on the screen with your contact number.
To activate Lost Mode, sign in to the Microsoft Intune admin center and select Devices. Click a device to view its location on a map. You can also choose to play a sound from the device or send its location via email.
You can also activate Lost Mode by navigating to All Devices and selecting your iPad. On the next page, enter a message to display and a phone number to show on the lock screen, then click Activate. You’ll receive a confirmation email, and your iPad will enter Lost Mode.
Anyone who finds your iPhone or iPad will be able to contact you by calling the number that you entered as the message and phone number. You can change this number on the Find My website.
Erase Device
You can permanently remove all content and settings from your iPad by erasing it. This is useful if you’re selling your iPad or giving it to someone else. You can erase your iPad from the Settings app or by connecting it to a computer and using Finder or iTunes.
You must have a backup of the data on your iPad to restore it after you erase it. If you use iCloud Backup, the latest backup of your iPad is available in your iCloud account on other Apple devices.
You can also factory reset your iPad without a password by connecting it to iTunes on a computer that you used to sync it with.
Conclusion
Enabling Find My iPhone on your iPad is a vital step in securing your device and ensuring that you can locate it in case it goes missing. By following the steps outlined above, you can set up and utilize this feature effectively to protect your iPad and the data it contains.
Leave a Reply