
How to Enable Ajax in Chrome
How to enable ajax in Chrome will allow you to view each and every ajax request. To do so, go to the Developer Tools menu in Chrome and select the Current Page Control > Developer. In the Network tab, enable Always or session. Then, you can see headers and return content. Alternatively, you can use the Network tab in Firefox. Once you have enabled Always mode, click on the Network button in Chrome and select a browser.
It can be difficult to tell whether jQuery is enabling Ajax in Chrome by looking at the browser’s debug console, but monitoring Ajax requests is helpful for web applications. You can see what type of data is being sent in a given Ajax request by looking in the Network tab in the developer toolbar. You can also view the headers of the requests by going to the Post tab Google.
To enable Ajax in your browser, first make sure your code supports JavaScript. Next, open the Developer Tools and check the Network tab. Click on the method, Content-Type, and data being sent. Firebug will show this data in its Post tab. Check the HTTP status code, too. A request that shows a red HTTP status code means it is not compatible with Chrome.
How To See API Calls In chrome:
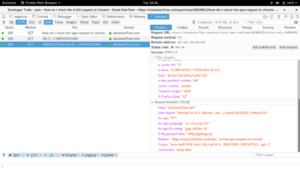
If you are using Google Chrome, you can check the details of your Ajax requests and debug them easily. First, open the Developer tools console by going to the three-dot menu, click More tools, and then select Developer tools. Go to the Network tab, and click the XHR button. Here you can see what the ajax request was and what the return content was.

When using.post() for ajax in Chrome, you must make sure that the request has the appropriate Content-Type header. You can also use jQuery to make this request. Most modern browsers support the fetch API. This method comes in handy in various circumstances. The following are some reasons why you should use it:
How To Check Ajax Request In Console:
RTCIce Transport ajak support provides access to ICE transport layer information. This information is particularly useful when dealing with connections in which the ICE component is either RTP or RTSP. It also helps you determine the state of the connection, such as gathering, complete, and controlling. This event is available through the onstatechange property. You can use this information to get a list of candidates.
Google Chrome Browser:
- Use CTRL+SHIFT+I (or navigate to Current Page Control > Developer > Developer Tools.
- In the newer versions of Chrome, click the Wrench icon > Tools > Developer Tools.
- Enable the Developer Tools.
- From within the developer tools click the Network button. …
- Click the “XHR” button below.
- Start AJAX call.
- You will see items begin to appear in the left column under “Resources”.
- Click the app and there are 2 tabs that display titles and restore content.
To identify which chrome API you are using, use the developer tools. First, open a console window and enable Firebug. This will allow you to view each ajax request. Then, use ajax to browse the list of candidates. Once you have this information, you can use it in your html and CSS. If you want to inspect the RTCIceTransport API for your web application, you can use the WebDAV community. The community has more than 778k members.
Leave a Reply