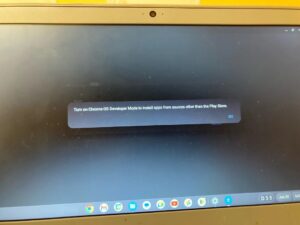
How Do You Turn on Developer Mode on Chrome OS?
Turn On Developer Mode On Chrome OS are known for their quick start-up speed, but they also have a hidden feature that can enable advanced functionality. This feature is called Developer Mode, and it offers a number of benefits for tech-savvy users.
Among other things, this mode allows you to install Linux and access the command line interface. However, transitioning to and from this mode can cause hardware or software problems and void the warranty.
Enabling Developer Mode on Chrome OS involves a series of steps that allow users to access advanced features, install custom firmware, and gain more control over their Chromebook. It’s important to note that enabling Developer Mode will wipe all local data on your device, so make sure to back up any important information before proceeding. The steps outlined below provide a comprehensive guide on how to turn on Developer Mode on Chrome OS.
Introduction to Developer Mode:
Developer Mode on Chrome OS is designed for users who want to explore advanced features, install custom firmware, and have more control over their Chromebooks. It allows users to access the Chrome OS shell and install third-party applications. Enabling Developer Mode, however, requires a series of steps and comes with the caveat of wiping local data.

Before You Begin:
- Backup Data:
- Before starting the process, ensure all important data is backed up. Enabling Developer Mode will erase all local data on your Chromebook.
- Understand the Risks:
- Enabling Developer Mode can expose your device to potential security risks, and it may void the warranty. Make sure you understand the implications before proceeding.
Enabling Developer Mode:
- Power Off the Chromebook:
- Ensure your Chromebook is powered off.
- Enter Recovery Mode:
- Press and hold the ‘Esc’ and ‘Refresh’ keys simultaneously, then press the ‘Power’ button.
- Enter Developer Mode:
- When the Chromebook displays a recovery screen, press ‘Ctrl + D’ to enter Developer Mode.
- Confirmation Screen:
- A confirmation screen will appear. Press ‘Enter’ to confirm the switch to Developer Mode.
- Wait for the Process:
- The Chromebook will begin transitioning to Developer Mode. This process may take several minutes. The device will reboot automatically when the transition is complete.
Accessing Developer Mode:
- Reboot into Developer Mode:
- After the device reboots, you’ll see a warning screen. Press ‘Ctrl + D’ to enter Developer Mode each time you start the Chromebook.
- Bypass OS Verification:
- On the warning screen, press ‘Ctrl + D’ again to bypass OS verification. This step is required every time the Chromebook boots.
Optional: Enabling Legacy Boot Mode (for older Chromebooks):
- Access Chrome OS Shell:
- Press ‘Ctrl + Alt + T’ to open the Chrome OS shell.
- Enter Developer Mode Again:
- Type
shellin the command prompt and press ‘Enter.’ Then, typesudo crossystem dev_boot_legacy=1and press ‘Enter’ to enable Legacy Boot Mode.
- Type
- Reboot:
- Reboot your Chromebook. You can now install alternative operating systems.
Disabling Developer Mode:
- Power Off:
- Power off the Chromebook.
- Enter Recovery Mode:
- Press and hold ‘Esc’ and ‘Refresh,’ then press the ‘Power’ button.
- Remove OS Verification:
- Press ‘Ctrl + D’ on the recovery screen. The Chromebook will transition back to normal mode.
- Factory Reset:
- To fully disable Developer Mode, perform a factory reset. Press ‘Space’ on the recovery screen, then follow the on-screen instructions.
1. Power off your device
Activating Developer Mode on your Chromebook allows you to explore the device in new ways. It opens the device up to advanced features, including a command line interface and the ability to install Linux applications. However, it is important to remember that the devices are vulnerable in this state and should be treated with care. It is recommended that you back up your data before starting this process.
Activation of Developer Mode removes many of the built-in security features on your Chromebook and gives you significant control over the system. This is similar to jailbreaking an iPhone or rooting an Android device, and it has significant risks. In addition, it will wipe your device and void the warranty.
To enable Developer Mode, power off your device and press and hold the Esc + Refresh keys or the Power button. When the “Chrome OS is missing or damaged” screen appears, select the option to turn off OS verification and then continue to reboot the device. Once the device has rebooted, it will show the message “You are in Developer Mode.” This will appear every time the device is restarted.
2. Press and hold the Esc + Refresh keys
Developer mode allows advanced users and developers to access additional features and functionality on their Chromebook. This includes access to the command line interface (CLI), which can help you troubleshoot problems and perform advanced tasks on your device. Additionally, it enables you to create custom scripts that can automate tasks and speed up your workflow. Developer mode also enables you to install Linux applications on your Chromebook, which can provide more flexibility and customization options for your device.
However, you should be aware that enabling Developer Mode can potentially cause issues with your device. In addition, it can void your warranty, and you may lose any local data that you have on your device. As a result, it is important to back up your device before beginning the process. Additionally, it is recommended that you disable Developer Mode if you no longer need it, as this will factory reset your device and restore its original configuration. The process for disabling Developer Mode varies by device, so be sure to follow the instructions on your screen.
3. Press the Power button
If you’re a programmer or want to do some serious tinkering with your Chromebook, you may be interested in turning on developer mode. This will give you access to a variety of advanced features, including the ability to install Linux applications and use the command line interface. It can also help you modify system files and customize the Chromebook to your liking. However, it’s important to remember that developer mode can also make your device less secure and cause data loss.
To enable developer mode, first power off your device. Then, press and hold the Esc + Refresh keys. When you see the message “OS verification is off,” press the Power button. This will trigger a factory reset and enable developer mode. Be sure to backup your data before proceeding, as any changes you make in developer mode will be erased. This process can also void your warranty. Also, be aware that any modifications you make to your device in developer mode are not supported by Google and could cause hardware, software, or security issues.
4. Press the Ctrl + D keys
Developer Mode on Chrome OS allows advanced users and developers to access the underlying system files of their devices and make changes to the software. This includes sideloading applications and installing programs that are not approved by Google. However, it also increases the risk of security vulnerabilities and may cause hardware or software issues on your device.
If you’re a developer or an advanced user who wants to experiment with your device, you can enable Developer Mode on Chrome OS by opening a screw panel and flipping a switch. This will allow you to access more advanced features, such as installing Linux applications and accessing the command line interface. This mode is not recommended for normal use, as it removes some of the protections that normally prevent malicious software from running on your device. It is also important to note that this mode will disable your device warranty, so it’s best to back up all of your data before beginning.
5. Press Enter
Chromebooks have gained a reputation for being exceptionally secure and consolidated against malware. They use Verified Boot to instantly scan themselves while powering up, which is a huge win against viruses and ransomware. However, there is a developer mode that gives advanced users and developers access to additional features and functionality. This can be useful for creating custom scripts, installing Linux applications, and more.
This is a dangerous feature and should only be enabled by experienced users. It can cause damage to the operating system, and voids the warranty. Additionally, it can make the device less secure, which can lead to data loss.
To disable developer mode, press and hold the Esc + Refresh keys and the power button. Once the device reboots, press Ctrl + D. A confirmation screen will appear, indicating that disabling developer mode will erase all local data. Press Enter to continue. The device will then reboot into normal mode. The “OS verification is OFF” screen will display on every subsequent reboot. It will be easy to turn off developer mode if you need to do so for any reason, such as selling the device.
Conclusion:
Enabling Developer Mode on Chrome OS provides users with additional control and customization options. However, it’s crucial to understand the associated risks, such as data loss and potential security vulnerabilities. Follow the steps carefully, and always back up your data before proceeding. Developer Mode is a powerful tool for those who want to explore the full capabilities of their Chromebook, but it should be approached with caution and awareness of the implications.

Leave a Reply