How to Turn on Microsoft Defender Antivirus on Windows 10
Microsoft defender is an antivirus program included with Windows 10. It can help protect your computer from viruses, malware, and other threats.
It can be turned on using the Windows Security menu. you can also be enabled through Group Policy. However, if it’s not available at all, there may be another cause.
Sure, to turn on Microsoft Defender Antivirus on a Windows computer, you can follow these steps:

- Click on the Start menu and open “Settings” (you can also use the shortcut Windows key + I).
- In the Settings window, select “Update & Security.”
- From the left-hand menu, click on “Windows Security.”
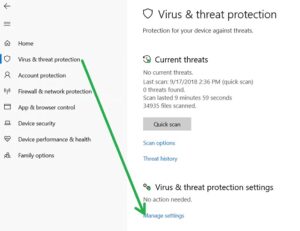
- In the Windows Security section, select “Virus & threat protection.”
- Here, you’ll see the status of Microsoft Defender Antivirus. If it’s off, you’ll have the option to turn it on. Click on “Manage settings.”
- Toggle the “Real-time protection” switch to the “On” position.
Once you’ve done this, Microsoft Defender Antivirus should be active and protecting your system in real-time.
Keep in mind that in some cases, if you have another antivirus program installed, it might turn off Windows Defender automatically as a way to avoid conflicts between different security software. If you prefer to use Microsoft Defender, you might need to uninstall the other antivirus program or check its settings to enable Defender.
Disabled
Microsoft Defender is a security program included with Windows 10. Its features include anti-malware, machine learning, and cloud-based protection. It works with other Windows security programs, such as SmartScreen and Windows Firewall, to provide a layered defense against cyber threats.
In recent independent tests, Defender has earned top scores for its protection against real-world malware threats. It is a recommended antivirus program for Windows computers. However, some users may want to disable it for a variety of reasons.
There are several ways to disable Microsoft Defender, including using a registry key and Local Group Policy. The latter solution is more permanent, but it can be more difficult to execute than the registry method. Another option is to install a third-party antivirus program. These programs typically turn off Microsoft’s built-in antivirus to avoid incompatibilities and resource usage issues. This can be a faster and easier solution for some. However, it doesn’t offer the same level of protection as Microsoft Defender.
Uninstalled
If you’re using Microsoft’s antivirus program, there may be times when you need to disable it. For example, if you’re installing apps or making changes to your system that would conflict with the antivirus. Fortunately, there’s a way to disable the software without losing your files or data.
To do this, open the Windows Security app and select Virus & threat protection settings. Then, scroll down to the Manage settings section and click the switch under Real-time protection and Cloud-delivered protection. Google
This will enable you to use your computer without worrying about malware or viruses. However, this method is only recommended if you know what you’re doing and can back up your files. If you don’t want to risk losing your information, you should install another antivirus program. For a more permanent solution, you can also use the Group Policy method to disable Defender. This solution is only available on Pro, Enterprise and Education editions of Windows 10 and 11. It’s a little more complicated but more reliable than the registry method.
Reinstalled
If you want to protect your device against malware and other threats, then Microsoft Defender Antivirus is a good choice. This is a built-in program that comes with Windows, and it can detect and remove different types of malware, including viruses, worms, Trojans, and spyware.
It can also protect your device from ransomware and other threats. It has a number of features, including real-time protection, cloud-delivered protection, automatic sample submission, and controlled folder access. Important to keep your antivirus up-to-date to ensure that it can detect and protect your computer from the latest threats.
If your Windows Defender is disabled, you can turn it back on by following the steps below. To do this, open the Windows Security app and select Virus & threat protection. Then, click the Manage settings link. This will allow you to toggle the Real-time protection switch on. Once this is done, you can restart your computer and check whether Windows Defender is working as it should.
Group Policy
If you’re a Windows 10 user and your Group Policy has turned off Microsoft Defender, there are some steps you can take to turn it back on. First, press the Windows key and type “group policy.” Click “Edit group policy” from the results to open the local Group Policy Editor. Then, navigate to Computer Configuration > Administrative Templates > Windows Components > Windows Defender Antivirus and select the “Turn off Windows Defender” setting. Select “Not Configured” and click “OK.”
Some attackers disable Microsoft Defender as part of their attack plan, so you should be aware of this issue. It’s also a common issue for people working remotely. To prevent this, you can set up a shortcut to the Group Policy Editor and change the settings for Windows Defender. This is a quick and easy solution for this problem. Then, you can restart your computer and re-enable the antivirus. You can also use a command prompt shortcut to disable Defender temporarily, which is a good option for users who need to install apps or make system changes without worrying about potential conflicts.

Leave a Reply