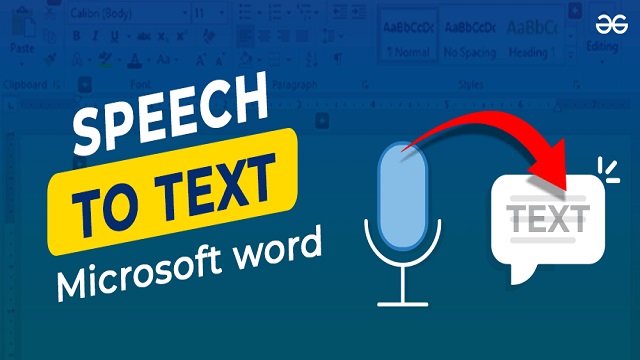
How to Enable Voice to Text on Word
Enable Voice To Text On Word Speech recognition software is useful for many reasons, including improving productivity and reducing errors. It also helps those with limited mobility or hearing impairments.
To use voice to text, make sure that your microphone is working correctly and that the dictation button on the home menu is enabled. When you’re ready to begin dictating, speak clearly and enunciate each word.
Enabling voice-to-text functionality in Microsoft Word can greatly enhance your productivity by allowing you to dictate text instead of typing it manually. Follow these steps to enable voice-to-text in Word.
Follow These Steps:
1. Ensure You Have the Necessary Hardware: Before getting started, make sure your computer has a functional microphone. This can be an external microphone or the built-in microphone on your device.
2. Update Microsoft Word: Ensure that your Microsoft Word application is up to date. Updates often include improvements and new features, so having the latest version is beneficial.
3. Open Microsoft Word: Launch Microsoft Word on your computer. If you don’t have Word installed, you’ll need to install it as part of the Microsoft Office suite.
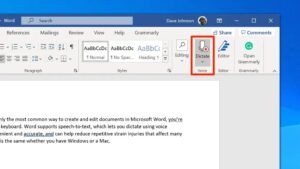
4. Navigate to the Ribbon: Look for the ribbon at the top of the Word window. This is where you’ll find various tabs, including “Home,” “Insert,” “Page Layout,” etc.
5. Go to the “Home” Tab: Click on the “Home” tab in the ribbon. This is where you’ll find basic formatting options.
6. Locate the “Dictate” Button: In the “Home” tab, you should see a “Dictate” button. This button may also be located in the “Home” tab under the “Dictation” or “Speech” category.
Follow these steps
7. Click on “Dictate”: Click on the “Dictate” button to start the voice-to-text feature.
8. Set Your Language (if prompted): Depending on your Word version, you might be prompted to choose your language for dictation. Select your preferred language from the options provided.
9. Start Dictating: Once you’ve clicked on “Dictate,” start speaking clearly and at a moderate pace. Word should transcribe your speech into text in real-time.
10. Edit and Format as Needed: After dictating your text, review and edit it as necessary. Voice-to-text technology is advanced but may not be perfect, so it’s a good idea to proofread and make any necessary corrections.
11. Save Your Document: Once you’ve completed your document, save it to ensure your work is preserved.
12. Explore Advanced Dictation Features: Some versions of Word offer advanced dictation features, such as voice commands for formatting and editing. Explore your software’s documentation or online resources to learn about any additional functionalities.
13. Troubleshooting: If you encounter issues with dictation, check your microphone settings, ensure your internet connection is stable (if using cloud-based dictation services), and consult Microsoft’s support resources for assistance.
In conclusion, enabling voice-to-text in Word is a straightforward process that can significantly improve your workflow. Follow these steps, and you’ll be dictating documents in Microsoft Word in no time.
How to enable voice to text on word?
Word’s dictation feature allows users to create documents by simply voicing their thoughts. It turns the spoken words into written text, allowing for fast and accurate document creation. This feature not only saves time and effort but also benefits people with disabilities and those who prefer dictation to manual typing.
In order to use this feature, you will need to have a microphone attached to your computer and a stable internet connection. This is because speech recognition processes your spoken words on external servers with powerful processors and advanced neural networks.
To activate the voice to text function, click on the ‘Dictate’ button in the Home menu bar at the top of your Word document. This will open a floating dictation toolbar with a microphone icon. Make sure your microphone is plugged in and click the ‘Dictation Settings’ cog to select your speaking language. Once ready, click the ‘Start dictation’ button and begin speaking. You can also use voice commands to navigate and edit your document quickly. For example, you can say commands like “New line” and “Delete last sentence”. This feature is a great way to write faster and more efficiently.
1. Go to Control Panel
After years of technological advancement and data collection speech recognition has finally made its way into the Microsoft Office suite. Dictate, as the feature is known, is available to anyone with an active Microsoft 365 subscription and the latest version of Word (2019 onwards). To activate Dictate you will need to have a microphone connected to your computer. This can be a built-in mic, such as the one on a laptop, or a separate microphone that is plugged into a USB or audio jack. Ideally, the mic should be a headset as it will not have to compete with ambient noise as much.
Once you have the microphone configured open the app or window in which you wish to use speech recognition. Place your cursor where you want the text to appear and press the Windows key + H. Now simply begin speaking, and the text that is transcribed will automatically appear on-screen.
It may take a while to get used to the speech recognition software, and you will need to practise until you have a good feel for how it works. It is important to speak clearly and enunciate each word. You can also use a range of voice commands to format your document. It is recommended that you familiarise yourself with the list of commands before you start using Dictate.
2. Click on Speech Recognition
Speech recognition is a form of artificial intelligence that converts spoken words into written text. It’s a convenient and surprisingly accurate tool that can help anyone who has difficulty typing with a traditional keyboard. It can also be helpful for people who are visually impaired or have a physical disability.
To use voice recognition, you’ll need a microphone and a computer that has an internet connection. Once you have both of these things, click on the microphone icon in the control bar and then start speaking. Your words will appear as text on the screen, just like magic!
If you want to pause speech recognition, click on the microphone again or press the keyboard shortcut Win + H. If you’re using a headset, make sure to speak clearly and enunciate each word so it can understand what you’re saying. It may take some time to get used to the speech recognition feature, but with a little practice, you can start creating documents and notes just by talking!
Speech recognition technology is constantly improving. It can now transcribe text in many different languages and even include punctuation! You can also customize the voice recognition to match your preferences and habits. It’s a great tool to have for productivity and inclusivity. It allows everyone to create content in a way that is comfortable for them.
3. Click on Turn on Voice Recognition
Microsoft Word comes with an amazing speech recognition software that allows users to dictate their words into the program by simply using their voice. This is a great feature for anyone that has difficulty typing or just wants to be more efficient.
Once enabled, you will be able to use your voice to do almost everything in the program. From navigating to different parts of the document, putting in formatting, and even changing settings, voice commands make it possible to write without having to type anything at all. It’s also helpful for those with disabilities that don’t have the ability to move a mouse or keyboard.
Another great feature about speech-to-text is that it can be used in any program or window that accepts text input, including web browsers and search fields. You just have to click the microphone icon to start speaking and the software will convert your spoken words into text in real-time.
One of the best things about Word’s speech-to-text feature is that it’s constantly improving and becoming more accurate. If you run into any problems, there are a few simple steps you can take to troubleshoot them. For example, making sure your microphone is plugged in correctly and that you’re not using any other programs that may interfere with the software can help improve accuracy. Also, making sure you speak clearly and enunciate each word can help as well.
Leave a Reply