
How to Enable Start My Dell Update
Enable Start My Dell Update is software that runs on your computer and checks for BIOS, firmware and drivers updates. When it finds any, it installs them for you. It also helps you keep your computer up to date by running regular updates.
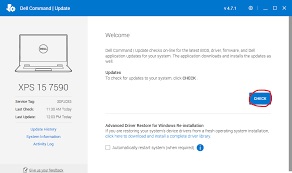
Dell Command | Update is a stand-alone application that simplifies the BIOS, firmware, driver and application update experience for Dell commercial client hardware. You can download it from the Dell Drivers & Downloads website.
Enabling and running Dell Update on your Dell computer is a straightforward process that ensures your system stays up-to-date with the latest drivers, firmware, and software updates. Dell Update is a utility provided by Dell to simplify the task of keeping your system optimized and secure. In this guide, I will take you through the step-by-step process to enable and use Dell Update on your Dell computer.
1: Download and Install Dell Update
- Visit the Dell Support website: Go to the official Dell Support website at https://www.dell.com/support.
- Enter your Service Tag or Detect Product: Use your Dell computer’s Service Tag or let the website automatically detect your product. This ensures that you get the most accurate updates tailored to your specific system.
- Navigate to Drivers & Downloads: Once your product is identified, navigate to the “Drivers & Downloads” section. Here, you will find a list of available updates for your system.
- Download Dell Update: Look for the Dell Update application in the list of available downloads. Download the latest version of Dell Update by clicking on the corresponding link.
- Install Dell Update: After the download is complete, run the installer to install the Dell Update application on your computer. Follow the on-screen instructions to complete the installation process.
2: Configure Dell Update Settings
- Launch Dell Update: After installation, launch the Dell Update application. You can find it in the Start menu or by searching for it in the Windows search bar.
- Check for Updates: Once Dell Update is open, click on the “Check for updates” button. This will initiate a scan of your system to identify any available updates.
- Configure Update Settings: Explore the settings within Dell Update to configure how updates are handled. You can typically find options to enable automatic updates, schedule update checks, and choose whether to install updates automatically or manually.
- Review and Apply Changes: After configuring your update settings, review them to ensure they align with your preferences. Click on the “Apply” or “Save” button to apply the changes.
3: Enable Dell Update in Dell Support Assist
- Install Dell SupportAssist (Optional): Dell SupportAssist is another tool that can help manage system updates. If you don’t have it installed, you can download it from the Dell Support website.
- Open Dell SupportAssist: Launch Dell SupportAssist on your computer. You can find it in the Start menu or by searching for it in the Windows search bar.
- Navigate to the Updates Section: Within Dell SupportAssist, navigate to the “Updates” section. This is where you can manage and view available updates for your system.
- Enable Dell Update Integration: Look for an option to integrate Dell Update with Dell SupportAssist. This integration streamlines the update process and ensures that both tools work together seamlessly.
- Save Changes: If you make any changes to the integration settings, be sure to save them. This may involve clicking on a “Save” or “Apply” button within the Dell Support Assist interface.
4: Regularly Check for Updates
- Automatic Updates: If you’ve configured Dell Update to install updates automatically, your system will receive updates in the background. You can check the update history within Dell Update to verify that the latest updates have been applied.
- Manual Updates: If you prefer to have more control, you can manually check for updates within Dell Update at any time. Open the application and click on the “Check for updates” button to initiate a manual scan.
- Review Update Notifications: Keep an eye on notifications from Dell Update. If there are important updates available, the application will typically notify you, allowing you to review and install them.
By following these steps, you can enable and use Dell Update on your Dell computer, ensuring that your system remains optimized and secure with the latest updates. Regularly checking for updates is crucial for maintaining the performance and stability of your Dell device.
1. Go to the Dell website
The Dell website is where you can find drivers and download updates for your Dell computer. It is also where you can get support for your Dell products. You can find drivers for Dell laptops, desktops, all-in-one computers, printers, monitors, and many other devices. You can also download updates for your Dell operating system.
The latest version of the Dell Command | Update utility is v2.4.0. You can download it from the Drivers & Downloads section of the Dell Technologies website. The utility is available for most Dell desktops and laptops, including Inspiron, OptiPlex, Latitude, Precision, and Vostro models. It automatically scans your Dell system for driver and software utility updates and installs them. It also displays notifications in the systray when new updates are available.
Enable Start My Dell Update, which only applies updates to the operating system, the Dell Command | Update utility will apply updates to the BIOS, firmware, and drivers. It will also allow you to deploy Dell System Software Update Packages (DUP) to multiple systems at once.
The tool can help you save time and money by automating your system maintenance tasks. It can also provide a more accurate diagnosis of problems and recommend the most suitable fixes. It can even send issue details to Dell technical support agents on your behalf. In addition, it will detect the latest drivers and install them for you. It can even update your BIOS and UEFI, which will improve system stability and performance.
2. Click on Updates
Dell releases important software updates that can keep your computer running smoothly and protected online. These updates include security patches and device driver updates. However, you must enable start my Dell update before you can install these updates. If you don’t, your Dell PC could stop working or may even experience a blank screen. To enable this feature, you can use the Dell Command | Update utility. This utility is available in Windows, but some versions of the application are titled Dell Command Update or Dell Admin Utility.
Enable Start My Dell Update allows you to scan your computer and notify you of available updates for your Dell PC. It also lets you manually check for updates and download them to your computer. You can choose which updates to download and install, but it is best to leave everything checked unless you have a reason not to. You can also check whether you want the program to automatically restart your computer when the updates are installed.
In addition to being able to check for and download system fixes, Dell Command | Update can automatically scan your computer for and apply driver updates. This can help prevent your drivers from becoming outdated, which can cause serious problems with your computer’s performance. However, you should not install driver updates from third-party sources. Using unofficial drivers can cause the BIOS to become corrupt and may result in your computer not being able to complete POST or boot into your operating system.
3. Click on Check for Updates
Whether you’re using a Dell laptop or desktop computer, keeping the software up to date is essential for optimal performance. One way to do this is by running Dell Command Update, a utility that helps Dell users manage some of the most important updates. It can also help ensure that your Dell device drivers are updated, which can optimize performance and keep you secure online.
You can enable Dell Command | Update to automatically check for updates and install them when available. To do this, click the Start button on the Dell Update Application window and follow the on-screen instructions.
Once you’ve enabled this feature, a small Dell Command | Update window will appear on your computer when updates are available. The window will give you a list of available updates that are recommended for your Dell computer. Once you’ve selected the updates that you want to install, click Install.
Performing system updates manually is a fairly simple process, but it can be time-consuming and requires knowledge of the backend of Windows. It’s also important to be aware of potential issues with installing these types of updates. For example, BIOS updates can cause issues if your Dell computer loses power while the update is being installed. To avoid this, be sure to save your work and connect your computer to a power supply before you perform any system or driver updates. Alternatively, you can use a driver update program like Driver Support to automate this process and ensure that your Dell device drivers are always up to date.
4. Click on Install
Dell updates are important to keep your computer working properly and safe online. Dell releases software updates that can improve your system’s performance and protect it from viruses and malware. Dell updates can also update your device drivers automatically. If you’re using a Dell laptop or desktop, it’s a good idea to keep it up to date with the latest driver versions.
When updates are available, a small Dell Command Update dialog box will appear in the task tray. It will indicate whether a reboot is required and will ask if you want to install the updates. If you do not want to install the updates, you can click Remind Later or close the dialog box. It’s recommended that you install the updates within a week of being notified.
If you want to disable Dell updates, you can do so in the Dell Update Options dialog box. You can also change the default location of the Dell Update folder in the Options dialog box. You can also choose a default program to run when you start the Dell Update Utility.
If you have a Dell laptop or desktop, you may need to use Dell Update to install driver, firmware, and BIOS updates for your hardware. This application is free and is a great way to ensure your Dell equipment is up to date with the latest software.
Leave a Reply