
How to Enable Screen Recording on Mac
Enable Screen Recording On Mac operating system, you can use the built-in screen recording feature to capture everything on your screen or just record a selected portion. You can open this menu by clicking File in QuickTime Player or using keyboard shortcuts.
This article will explore how to enable screen recording on mac, using both the built-in tool and a third-party application.
Enabling screen recording on a Mac is a straightforward process that allows you to capture your screen activities for various purposes, such as creating tutorials, documenting software issues, or sharing presentations. In this guide, I will walk you through the steps to enable screen recording on your Mac, covering both built-in tools and third-party applications.
Using Built-in Tools:
1. Open QuickTime Player:
QuickTime Player comes pre-installed on your Mac and includes a screen recording feature.
- Launch QuickTime Player from your Applications folder or search for it using Spotlight (Cmd + Space, then type QuickTime Player).
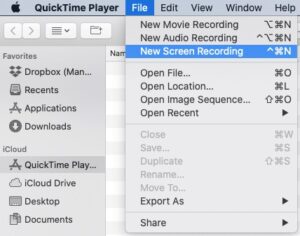
2. Start New Screen Recording:
- In the QuickTime Player menu, click on “File” and select “New Screen Recording.”
3. Configure Settings:
- Click the red record button.
- Customize your recording settings by selecting the microphone and whether to show mouse clicks in the recording.
4. Start Recording:
- Click anywhere on the screen to start recording the entire screen, or drag to select a specific portion.
- To stop recording, click the stop button in the menu bar or press “Control + Command + Esc.”
5. Save Recording:
- After stopping the recording, QuickTime Player will open the recorded video.
- Save the recording to your desired location.
Using Third-Party Applications:
1. Install a Screen Recording App:
If you require additional features or a more user-friendly interface, consider using third-party applications like Screen Flow, Camtasia, or OBS Studio.
- Visit the official website of the chosen application.
- Download and install the application following the provided instructions.
2. Launch the Application:
- Open the installed screen recording application.
3. Configure Recording Settings:
- Adjust recording settings such as video quality, audio input, and capture area.
4. Start Recording:
- Click the record button within the application.
5. Stop and Save Recording:
- Stop the recording when finished.
- Save the recording to your preferred location.
Troubleshooting Tips:
1. Permissions:
- Ensure that the application or QuickTime Player has the necessary permissions to access your screen and microphone. Go to System Preferences > Security & Privacy > Privacy, and grant access if needed.
2. Storage Space:
- Check your available storage space before recording, as video files can consume a significant amount of storage.
3. Performance Considerations:
- Screen recording may impact system performance. Close unnecessary applications and consider adjusting recording settings for smoother performance.
4. Update Software:
- Keep your Mac operating system and screen recording applications up to date to benefit from the latest features and bug fixes.
5. File Formats:
- Different applications may save recordings in various file formats. Ensure compatibility with your intended use or convert the file if necessary.
Screenshot toolbar
When you use the Screenshot toolbar, a miniature thumbnail preview appears for a short period of time in the bottom-right corner of your screen. This feature is a great way to keep your screenshots organized and accessible, and it also allows you to edit the images without having to open a separate window or app. You can even resize the thumbnail preview by dragging it with your mouse or trackpad.
To take a screenshot, press Command + Shift + 5. A toolbar will appear on your screen, offering various capture options. You can choose to capture an entire screen, a specific window or a custom-drawn portion of your screen. In addition, you can choose to record your voice and the activities happening on your screen, as well as customize your capture settings.
If you want to record audio with your screen recording, QuickTime Player is a convenient and free option for Mac users. It’s pre-installed on your computer, and it allows you to record a video with sound from your computer’s microphone or external devices. It also allows you to select an audio source and adjust its volume. Once you’re done recording, you can save the file or share it.
QuickTime Player
The QuickTime player on mac is a great tool for recording your screen. You can use it to record your entire screen or a specific window. You can also choose to include mouse clicks in your recordings, which makes it easier for viewers to see where you are clicking. This feature is especially useful if you’re creating tutorials or walk-throughs.
To enable screen recording on a mac, open the QuickTime app and select “File,” then “New Screen Recording.” A window will appear with several tools. From here, you can designate what to record and where to save your recording. You can also choose whether to record the built-in microphone or a connected microphone.
Once you’ve configured the recording settings, click “Record.” The video will then start recording in a dark gray window. When you’re done recording, click the stop icon in the menu bar or press Command + Shift + E.
In addition to the built-in tools for screen recording on mac, there are many third-party options available. Snagit, for example, is a user-friendly screen recorder that offers basic editing capabilities. It’s important to note that screen recording requires a good amount of free space on your hard drive. You should always make sure that your computer has enough space to record, and if you’re not, consider deleting old files or performing a disk cleanup.
Third-party apps
Although Apple restricts its own screen recording tool, third-party tools offer more features and are available on the App Store. However, third-party apps can cause performance issues and may pose security and privacy risks (yes, Macs can get viruses). If you want to use a third-party tool, review the permissions it asks for. If the app is not a system extension, it should be reviewed in your system preferences, under Accessibility settings.
Some of the best third-party screen recorders include OBS Studio for professional clips, Snagit for instructional recordings, and Loom for asynchronous communication. These tools can also provide additional benefits, such as detailed video analytics and fun stylistic edits. They can also help you stay connected with remote or hybrid teams, which is especially important in the modern workplace.
To enable screen recording on a mac, navigate to System Preferences > Security & Privacy and click the padlock icon in the lower left corner of the window. This will unlock the setting and allow you to permit apps that can record your screen. Then, select the app you want to use. If you see a checkmark beside the app, it means that it has been granted the necessary permissions to record your screen. To enable microphone recording, select the Microphone option in the menu bar. You can also add a custom background to your screen recording by clicking the Options menu and selecting “Custom background”. Lastly, you can set the default playback resolution for your recordings by choosing from the drop-down list in the File Format menu.
Audio
Whether you’re recording a presentation, webinar, or video chat, audio recording is an essential feature. However, Apple’s built-in tools aren’t the best for every scenario. The Screenshot toolbar and QuickTime Player offer straightforward solutions, but they also have some drawbacks.
To start a recording, click the “Record” icon in the screenshot toolbar or press Command + Shift + 5. A menu will appear where you can set preferences for the recording, including which monitor to record, whether to show mouse clicks, and more. You can even choose the resolution of your final recording.
While you can record without sound on a Mac, if you want to include your voice or music in the recording, you’ll need to connect an external microphone to your computer. You can also use a device like an iPhone to record audio and a screen simultaneously.
Before recording, make sure your Mac is in good working order and has enough disk space to save the file. It’s also important to keep in mind that the quality of your recording will depend on the bitrate. For example, a video at 480p will require 500 Kbps, while 720p needs 1 Mbps, and 1080p requires at least 5 Mbps. Lastly, remember to check your Mac’s security status and perform regular system cleanups to avoid malware and viruses.
Conclusion:
Enabling screen recording on your Mac is a versatile and powerful tool for capturing and sharing visual content. Whether using built-in tools like QuickTime Player or third-party applications, follow these steps to create high-quality recordings for your specific needs. Be mindful of settings, permissions, and troubleshooting tips to ensure a seamless screen recording experience on your Mac.
Leave a Reply