
How to Enable RDP on Windows Server 2019
Enable RDP On Windows Server 2019 is a great way to offer support to your customers or access files and apps on your VPS. However, RDP has some security risks. Fortunately, most of these security issues have been addressed by patch releases.
If you want to enable rdp on windows server 2019, you can do so using the Server Manager GUI, Powershell, or Command Prompt.
Enabling Remote Desktop Protocol (RDP) on a Windows Server 2019 involves several steps. Here’s a step-by-step guide, broken down into key sections. Note that you should have administrative privileges to perform these tasks.
Section 1: Accessing the Server
- Log in to the Server:
- Use the administrator account or an account with administrative privileges to log in to the Windows Server 2019.
2: Checking RDP Configuration
- Verify RDP is Installed:
- RDP is usually installed by default on Windows Server. Confirm its presence by checking in the “System Properties” window. Right-click on the “Start” button, select “System,” and look for the “Remote Desktop” section.
- Check Firewall Settings:
- Ensure that the firewall allows RDP traffic. Navigate to “Control Panel” > “System and Security” > “Windows Defender Firewall.” Click on “Allow an app or feature through Windows Defender Firewall” and make sure “Remote Desktop” is enabled.
3: Enabling RDP
- Enable Remote Desktop:
- To enable RDP, right-click on the “Start” button and select “System.” Click on “Remote settings” on the left side. In the “System Properties” window, under the “Remote” tab, select “Allow remote connections to this computer.”
- Configure Network Level Authentication (NLA):
- For enhanced security, enable Network Level Authentication. In the same “Remote” tab, check the box that says “Allow connections only from computers running Remote Desktop with Network Level Authentication.”
4: User Permissions
- Grant User Access:
- Click on the “Select Users” button in the “Remote” tab to specify which users can connect remotely. Add the relevant users or groups to grant them access.
5: Group Policy Settings
- Configure Group Policy (Optional):
- If needed, you can use Group Policy to further control RDP settings. Open the Group Policy Editor by pressing
Win + R, typinggpedit.msc, and hitting Enter. Navigate to “Computer Configuration” > “Administrative Templates” > “Windows Components” > “Remote Desktop Services” > “Remote Desktop Session Host” > “Connections.” Double-click on “Allow users to connect remotely using Remote Desktop Services” and set it to “Enabled.”
- If needed, you can use Group Policy to further control RDP settings. Open the Group Policy Editor by pressing
6: Restart Services
- Restart Remote Desktop Services:
- Open the “Services” application by pressing
Win + R, typingservices.msc, and hitting Enter. Locate “Remote Desktop Services” in the list, right-click, and select “Restart.”
- Open the “Services” application by pressing
7: Testing the Connection
- Connect to the Server:
- On a remote computer, open the Remote Desktop Connection application (
mstscin the Run dialog). Enter the IP address or hostname of the Windows Server 2019. If prompted, provide the administrator credentials.
- On a remote computer, open the Remote Desktop Connection application (
- Verify Connection:
- Once connected, ensure that you can access the server desktop remotely without any issues.
Server Manager
You can enable RDP on windows server 2019 through a variety of methods, including the Server Manager, Powershell, and Command Prompt. However, you should remember that this method is not foolproof. It is important to use best practices in terms of passwords, authentication and firewall settings.
Once you have enabled the Remote Desktop feature, you should make sure that your router is configured to allow incoming RDP connections. If you don’t, a black screen will appear during the connection and this can be very frustrating.
If you are using an Active Directory domain, you can also configure Windows Defender Firewall to allow RDP traffic via Group Policy. To do so, click the “Allow inbound remote desktop exceptions” rule in the Domain Profile. Then, select the checkbox next to “Allow connections only with network level authentication”. NLA allows users to authenticate themselves before connecting to your computer, which can improve security and reduce the risk of denial-of-service attacks.
Powershell
RDP is a popular protocol that provides users with full access to the graphical desktop environment of a remote computer. It is a convenient tool for those who need to access their work from home or other locations. However, it is important to note that it is only compatible with Windows computers. Therefore, you should use a different tool if you have a Mac or Linux machine.
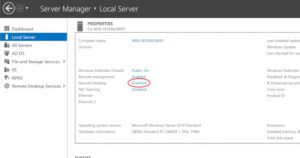
To enable RDP on a server, you must first log in as an administrator. You can do this using the GUI or command line. Once you have logged in, you can click on the “Local Server” link on the left side of the server manager dashboard.
If the status is “Disabled”, you must select it to open System Properties. On the Remote tab, you must select ‘Allow remote desktop connections to this computer’. You can also search for this option through a command prompt or PowerShell terminal. Click ‘OK’ to apply the changes.
Command Prompt
There are a few different ways to reboot a server. Some of them are more foolproof than others. One of the most foolproof methods is to use the command prompt. This method gives you the ability to double-check that you are rebooting the correct system.
Another way to reboot a server is to use the RDP feature in Windows Server 2019. This method allows you to log into the server and perform tasks such as computer troubleshooting, ID protection setting, printer set-up, software installation, and more. This option is particularly useful for those who need to access their servers from remote locations.
To enable RDP on your Windows Server 2019, you must first login as a local administrator. Then, open the Server Manager. Click the local server on the left side of the window. In the System Properties window, select the “Allow remote connections to this computer” option. A warning message will appear advising that exceptions have been made in the Windows firewall, select “OK”. The RDP status will now be displayed as enabled.
Any Viewer
Any Viewer is a remote software application with a simple interface. You can easily access a Windows server 2019 VPS computer with it. The app also provides a chat box that allows text communication between the two devices. It offers a secure connection with Network Level Authentication (NLA).
To enable RDP on Windows server 2019, you must first make sure that your router is configured to allow incoming connections from the remote desktop port. You can do this by opening the System Properties window and selecting the option Allow remote desktop connections to this computer. After this, you must add the new port to your firewall rules.
To get started, download Any Viewer and install it on the computer you want to connect to. Then, open the app on the device that you wish to control and log in with the same account. Then, click One-click control and achieve unattended remote access to the device. You can also use the app to assign multiple devices to a single account.
Leave a Reply