How to Enable Motherboard HDMI
To enable motherboard HDMI, you must open BIOS, the system software that runs your computer. Although every motherboard looks slightly different, there are a few general steps you can follow to enable it. The first step is to find the settings for “motherboard HDMI” and change them to “enabled.” After enabling it, you must save and confirm your changes. Once you’ve done this, wait for your computer to boot fully.
Many laptops and gaming machines use an integrated graphics card. Unlike a dedicated graphics card, which is built into the laptop’s CPU, integrated graphics have no memory of their own. Instead, they use the system’s memory. Generally, these machines are adequate for most users, although more powerful users may prefer a separate dedicated card. For gaming enthusiasts and other people who use graphics-intensive applications, an integrated graphics card may be the best choice Google.
Integrated graphics cards are a cheaper option than a dedicated graphics card. While they can provide better performance, shared graphics are not as efficient. They share memory with the system’s CPU and RAM. An integrated GPU typically uses between one percent and five percent of a computer’s memory. While this may not sound like a big deal, it can make your system run slower if you play graphics-intensive games or programs.
You Need To Enable The HDMI Port On Your Motherboard To Connect Multiple Monitors:
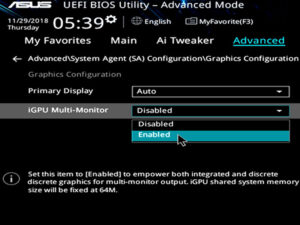
If you want to connect multiple monitors to your PC, you need to enable the HDMI port on your motherboard. To do this, you should open BIOS and navigate to the section where “IGPU Multi-Monitor” is listed. Make sure that you save your settings and reboot your computer to complete the process. You should also update your integrated graphics drivers to get the most recent version. Once you’ve completed these steps, you can connect your monitors.
Before you can connect multiple monitors to your PC, you need to enable the HDMI port on your motherboard. This process may be more complicated than you think, but you’ll need to follow step-by-step instructions to complete it. There are a few different steps involved, but once you have finished, the process is straightforward. If you don’t have a lot of experience in enabling and configuring the HDMI port on your motherboard, the instructions should walk you through the entire process.
You Need To Check Your Graphics Card Before Enabling The HDMI Port:
Before you enable your motherboard HDMI port, you need to check the driver of your graphics card. You may need to update your graphics card drivers if you are facing a problem connecting your monitor to the port. You can download the latest drivers for your graphics card from the official website of your graphics card manufacturer or use the automatic update feature of your system. To connect your monitor to the HDMI port, you must use an HDMI cable. Connect the cable to both the PC and the monitor.
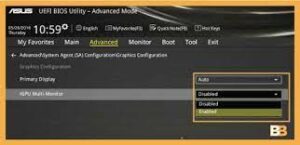
To check your graphics card, open the device manager and click on the display adaptors section. Look for the “Intel HD Graphics” section. If you don’t see an option for this, your motherboard might have disabled the onboard graphics. To enable it, go to the BIOS settings. There, click on Advanced Settings. You should find the option for IGPU and Multiple Display.
You Need To Check Your Graphics Card Before Enabling The HDMI Port On Your Motherboard:
Firstly, you must verify whether your motherboard has an HDMI port. Check your BIOS for the phrase “IGPU multi-monitor” and enable the feature. Once enabled, restart your computer and connect your monitors. After that, install the latest integrated graphics drivers. After installing these drivers, enable the HDMI port. It is important to note that HDMI is only compatible with motherboards with integrated graphics.
Enable Motherboard HDMI:
- Make sure Your CPU Has Photos Combined. …
- Use BIOS UEFI to enable Integrated Graphics. …
- Connect your display device. …
- Update Integrated Photo Drivers.
You can use the HDMI port on your motherboard to connect an extra display device, such as a second monitor or a Blu-ray player. Most motherboards come with an HDMI port, but you may want to make sure you have this enabled before connecting a device to it. You might also want to connect a projector or dual monitors. If your motherboard has two HDMI ports, you can use one for video playback and the other for audio. You can also connect a soundbar or a gaming console. Finally, you can connect your Blu-ray player to your monitor. Before you can connect any display device to the HDMI port, you must enable it first.
Leave a Reply