
How to Enable Google Lens on Your Phone
Enable Google Lens is available for Android phones only. In order to use the feature, your phone must be rooted. Then, you can use Magisk Manager to flash a zip file that is system less. After the download is complete, launch the application and select the “Lens” option. Your camera should appear on the bottom of the screen, along with a search bar. Click the lens icon and point the camera at the image. The app will highlight the important aspects of the photo and will show you relevant results.
After enabling the Lens, you can start using it on any image. All you have to do is tap on the dot next to the object. You can then swipe up to reveal details about the object. Then, you can swipe left to select the text. The highlighter will be blue. Then, you can click the highlighted text and drag your finger to start copying it to your device. You can also delete the history by selecting the option “Delete all my Lens data” Google.
In order to use the Google Lens feature, you need to have a Google account. You can use the Google Photos application to do this. To access the service, you need to visit the Google Photos website. You can add pictures and videos to Google Photos for free. Once you’ve uploaded the photos, you can view them in your browser. After uploading the images, you can access them using the Lens feature. This way, you can search them later.
How To Activate Google Lens On Android:
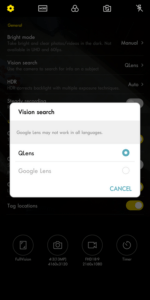
The Google Lens feature is available on Google Chrome. To enable it on your phone, open the Chrome browser and go to the Chrome://flags search bar. Then, click on the Lens icon to search for the image. Once you’ve done that, you’ll see a window that shows you the Google Lens settings. To change the settings, you can select the location of the image and then select the search field from the menu on the left. Once you’ve finished the process, restart the Android device to see the changes.
To enable Google Lens on your phone, go to your Google Photos app and press the menu button. You can also go to the Settings tab and select the Google Assistant. By default, the Google Lens is enabled on Android devices. To enable the feature on your phone, you’ll need to select the “Lens” tab in Google Assistant. This will launch the camera. You can select other objects and input text. Once you’ve done this, the lens will be automatically displayed in your browser.
How To Enable Google Lens Camera:
In order to enable Google Lens on your phone, you must be rooted. This means that your phone must be running a custom recovery. You’ll also need to update your Google Photos app. To install Google Lens, you’ll need to install a zip file on your sdcard. Then, you’ll need to reboot into twrp recovery to activate the feature. In order to enable the camera, you must place the installer zip file on the sdcard.
After enabling the Google Lens, you can launch the camera and analyze objects in your photo. After the download is complete, you can open the Google Photos app and begin using Google Lens. To enable Google Lens on non-Pixel devices, press the menu button. Touch the Google lens icon to launch the camera. To use the camera, simply point the camera at the object you want to analyze. It will then offer you detailed information about the object.
How To Enable Google Lens In Chrome:
Once you’ve enabled Google Lens on your smartphone, you need to open your Google Photos app. Then, you need to open the Google Lens app in your phone. The app will scan your photo and display information about it. Then, you can copy the text to your computer or email to others. It will then be possible to access the information on the item. It is easy to use. Once you’ve downloaded the app, you can continue scanning.
Using The Google Lens App:
- Open the Google Play Photo Store Androidgoogleplay.png on your Android.
- Look for the multi-colored triangle icon on your home screen, or search for “play store” in your app menu. Tap the app to open it.
- Search Google Lens. Tap on the search bar and type in “google lens”.
- Tap on the app. Make sure it is the “Google” app below. This opens its profile page.
- Tap Install. It is in the upper right corner. The application will start downloading in the background.
- Introducing the Google Lens.
- Look for the icon with the colorful camera frame on your home screen or in your app menu. Tap the app to open it.
- Accept Google’s permissions to access your photos.
- If you have already given permission, you will not be notified at this time.
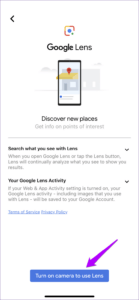
Depending on your phone model, you can also use Google Lens with the Google app and with Google Photos. You can open the Lens app by long-pressing the home button on your phone and saying “Hey, Google”. You can then open the camera by selecting the compass icon on your screen or saying “Hey, Google!” On Android, you can use the camera by enabling the feature on your smartphone. It can be used on desktop computers as well as on mobiles.
Leave a Reply