
How to Enable Find My iPhone in Settings
Enable Find My iPhone In Settings There’s a good chance your iPhone will go missing at one time or another. Thankfully, Apple’s Find My feature makes it easy to recover lost devices.
When you’re signed in to iCloud, a map shows the location of your associated iPhone, iPad, iPod touch, Mac, Apple Watch, supported Air Pods, or iOS Wallet with MagSafe. You can also play a sound, turn on Lost Mode, and display a message for someone who finds your device.
Enabling Find My iPhone is a crucial step in ensuring the security and location tracking of your Apple device. This feature not only helps you locate your device in case it’s lost or stolen but also allows you to remotely lock or erase it to protect your data. To enable Find My iPhone, follow the detailed steps below.
Step 1: Unlock Your iPhone
Ensure your iPhone is unlocked and on the home screen.
Step 2: Open Settings
Locate the “Settings” app on your home screen. The app icon looks like gears and is usually found on the first page of your apps.
Step 3: Tap on Your Apple ID
Scroll down until you find and tap on the section with your name and Apple ID at the top of the Settings menu. This takes you to the Apple ID settings.
Step 4: Access iCloud Settings
Inside your Apple ID settings, you’ll see various options. Look for and tap on “iCloud.” This is where you’ll find settings related to cloud services.
Step 5: Find and Select Find My iPhone
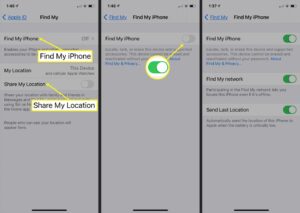
Scroll down the iCloud settings until you find “Find My iPhone” (or “Find My” on newer iOS versions). Tap on it to access the Find My iPhone settings.
Step 6: Toggle Find My iPhone On
In the Find My iPhone settings, you’ll see a switch next to “Find My iPhone.” Toggle it to the ON position. You may be prompted to enter your Apple ID password to confirm the action.
Step 7: Enable Send Last Location
While you are in the Find My iPhone settings, it’s a good idea to enable “Send Last Location.” This option will send the last known location of your device to Apple when the battery is critically low, helping you find it even if the battery dies shortly after.
Step 8: Back to iCloud Settings
Once you’ve turned on Find My iPhone, go back to the main iCloud settings page. You can do this by tapping on “iCloud” at the top of the screen.
Step 9: Check Find My iPhone Status
Confirm that Find My iPhone now shows as “On” on the iCloud settings page. This indicates that the feature is active for your device.
Step 10: Verify Location Services
To ensure accurate location tracking, go back to the main Settings menu and select “Privacy.” Tap on “Location Services” and make sure it is toggled on. Scroll down to find the “Find My iPhone” option and ensure it is set to “While Using the App” or “Always” for optimal functionality.
Step 11: Set Up Family Sharing (Optional)
If you want to enable Family Sharing, allowing your family members to help locate your device, go back to the main Settings menu and select “Screen Time” or “Family Sharing,” depending on your iOS version. Follow the on-screen instructions to set up Family Sharing.
Step 12: Test Find My iPhone
To ensure everything is set up correctly, open the Find My app on another iOS device or visit iCloud.com and sign in with your Apple ID. You should see your device listed, and you can use the app or website to locate, play a sound, remotely lock, or erase your iPhone.
Congratulations! You have successfully enabled Find My iPhone on your device. This feature provides an added layer of security and peace of mind, allowing you to track and manage your device, even in unfortunate situations such as loss or theft. Regularly check and update your Find My iPhone settings to ensure optimal functionality and security.
1. Go to Settings
Even with a password, Touch ID or Face ID enabled, there’s always the chance that your iPhone might go missing. If you lose it, though, you can use the Find My feature to remotely lock the device, make it play a sound and turn on Lost Mode. In Lost Mode, the phone will display a message on the lock screen asking whoever finds it to contact you and possibly return it. Additionally, it will pause any credit and debit cards added to Apple Pay and suspend student IDs and transit cards stored in Wallet. Enable Find My iPhone In Settings
To access Find My, first sign in to your iCloud account on the website or app that’s linked to the lost device. Then click All Devices at the top of the page and select the iPhone to see its location on a map. (The device may need to be on and active to show up on the map.) You can also use the button to play a sound, activate Lost Mode or remotely erase the device.
Another helpful setting to enable is Activation Lock, which locks your iPhone to you when it’s offline. That way, if thieves happen to wipe the device before it’s returned, they won’t be able to activate it for use without your iCloud credentials.
2. Tap Passcode & Face ID & Passcode
You can use Face ID or Touch ID to unlock your iPhone, and you can also use it to sign in to apps, websites, and books that offer iCloud Drive autofill. You can also supply medical information and emergency contacts in a Medical ID that first responders and others can view on your locked iPhone.
To make your iPhone more secure, you can require a passcode to unlock it or set a six-digit lock code. You can also enable Activation Lock, which requires your Apple ID and password to activate the iPhone in the future if it’s lost or stolen.
If you turn on Activation Lock, you’ll be able to see the last location of your iPhone on a map in Find My, even if it’s turned off or in airplane mode. You can also play a sound from the iPhone to help you find it. You can also remotely reset your iPhone or iPad by clicking Erase This Device. You’ll need to have a backup or a restore point available. If you don’t have a backup, you may lose data on your iPhone or iPad.
3. Tap Find My
If you have Family Sharing set up, the other devices that are linked to your Apple ID will also show up on Find My, meaning you can get a good idea of where they’re located (though they won’t be able to use the iPhone in the event it goes offline).
Tap the device that you want to locate. You’ll see a map, with the iPhone’s location indicated by a green dot. You can also click Play Sound to ring the iPhone, and Directions if you want to see Apple Maps’ directions to the phone.
If the iPhone is offline, you can click Lost Mode to lock it (it will display a message that asks whoever finds it to contact you) and disable sounds, messages, notifications, and Apple Pay. It’ll also prompt you to create a passcode to unlock the iPhone when you sign in with your iCloud account. You can also click Erase to remotely wipe the device, though Apple warns that doing so may reduce your chances of recovering the device. This feature is also useful for preventing someone else from using your old device when you sell or trade it in.
4. Turn on Activation Lock
With Activation Lock enabled, the Find My feature will prevent anyone from using your iPhone or iPad unless they know the Apple ID and password that was used to set it up. This is a powerful theft deterrent.
If you need to get back your device, use the All Devices drop-down menu and select the iPhone/iPad you want to locate. If it’s offline, click Erase iPhone. The remote erasure process begins, and you will receive an email when it’s finished. If you have iOS backups, restoring them will restore the content that was on your lost device before it was erased.
You can enable Activation Lock through a security policy on a group, or with a command in Profile Manager. Enabling Activation Lock prompts MobileIron Core to acquire the bypass code for supervised devices. Enable Find My iPhone In Settings
If you’re purchasing an iPhone or iPad from a secondhand store or another user, ask the previous owner to clear Activation Lock before you take possession. They’ll need to sign in to their iCloud account with the Apple ID that was used for Activation Lock, and enter a password to do so.
5. Turn on Send Last Location
This feature automatically sends your iPhone’s location to Apple when its battery level reaches critically low, usually 5%. It might not save a stolen phone from an untimely couch-death, but it could give you enough time to find it before it shuts down entirely.
Once you enable this, a green dot will show on the map whenever an associated iOS device or Mac is online. Clicking on the dot will offer options such as playing a sound, erasing the device or placing it in Lost Mode.
You can also use the same method to locate any of your iCloud-enabled Apple devices, including your Mac or Apple Watch. Just sign in to iCloud and select All Devices from the top menu. Then select the iPhone you want to see on the map and you’ll get its last known location. You can even play a sound to help you locate it in a room, or you can mark it as lost, which disables Apple Pay and sounds, among other features. Then you can enter a message that will display on the screen for anyone who finds it.
Leave a Reply