
Enabling DNS Over HTTPS in Windows 10 and Windows 11
Enable DNS over HTTPS on Windows 10 and Windows 11 enhances your security and privacy by encrypting your DNS queries. This protects you from eavesdropping and data manipulation by untrustworthy entities.
This article will explain how to enable DNS over HTTPS on your machine, and why you should do it. This will ensure your privacy by ensuring nobody can spy on your browsing habits.
DNS over HTTPS (DoH) is a protocol that encrypts the communication between your device and the DNS server, enhancing your online privacy and security. By encrypting DNS requests, DoH prevents third parties from eavesdropping on your browsing activity and potentially manipulating your DNS traffic. This guide will walk you through the process of enabling DoH on Windows 11 in detail, providing clear instructions and addressing potential issues.
Prerequisites:
- Windows 11 operating system (version 21H2 or later)
- An internet connection
- Knowledge of your preferred DNS server addresses (optional)
Steps:
-
Open the Settings app: Click on the Start menu and select “Settings” or press the Windows key + I.
-
Navigate to Network & Internet: In the Settings window, locate and click on “Network & internet.”
-
Access Wi-Fi or Ethernet properties: Depending on your active connection, choose either “Wi-Fi” or “Ethernet.” Click on the network you want to enable DoH for.
-
Open Hardware properties: Click on “Advanced options” and then select “Hardware properties.”
-
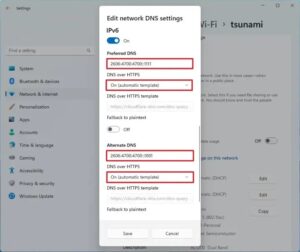
Edit DNS settings: Under “DNS server assignment,” click on “Edit.”
-
Choose preferred DNS server: You can either:
- Use the automatic DNS server assignment: If you’re comfortable with your current provider’s DNS server, leave the settings as they are and proceed to step 7.
- Manually enter preferred and alternate DNS servers: If you want to use a specific DNS provider, enter their primary and secondary server addresses in the “Preferred DNS” and “Alternate DNS” fields, respectively. Popular options include:
- Google: 8.8.8.8 and 8.8.4.4
- Cloudflare: 1.1.1.1 and 1.0.0.1
- Quad9: 9.9.9.9 and 149.112.112.112
-
Enable DoH: Under the “DNS over HTTPS” section, toggle the switch to “On.”
-
Choose encryption level (optional): If available, you might have options for different encryption levels. Choose the level that best suits your needs, balancing security with potential performance impact.
-
Save changes: Click “Save” to apply the DoH settings.
Additional Considerations:
- IPv6 support: If your network uses IPv6, repeat steps 6-8 for the IPv6 settings. You’ll need to enter compatible IPv6 addresses for your chosen DNS provider.
- Restart applications: For the changes to take effect fully, it’s recommended to close and reopen any open web browsers or applications that rely on internet access.
- Verification: You can verify if DoH is working using online tools like dnsleaktest.com or browser extensions like “DoH Leak Test.” These tools will check if your DNS requests are indeed encrypted.
Troubleshooting:
- Missing DoH option: If you don’t see the “DNS over HTTPS” option, your Windows 11 version might not support it yet. Ensure you have the latest updates installed.
- Connection issues: If you encounter internet connectivity problems after enabling DoH, try restarting your network adapter or router. You can also revert the changes by following the same steps and disabling DoH.
Benefits of DoH:
- Enhanced privacy: Encrypts your DNS requests, making it harder for third parties to track your browsing activity.
- Improved security: Protects against potential DNS hijacking attempts that could redirect you to malicious websites.
- Potentially faster performance: Some DNS providers offer faster resolution times compared to your default provider.
Potential drawbacks:
- Limited compatibility: Not all applications and websites might fully support DoH yet.
- Performance impact: In some cases, DoH might introduce slight latency compared to unencrypted DNS requests.
Step 1: Go to Settings
Enable DNS Over HTTPS In Windows 11 allows your computer to communicate with your Internet Service Provider (ISP) and other networks using encrypted data. This helps guard against man-in-the-middle attacks, and prevents ISPs and other networks from snooping on your DNS requests.
Microsoft has made it very easy to enable DoH in the Settings app. All you need to do is select the Wi-Fi or Ethernet network tile and then click on the ‘Edit’ button in the ‘DNS server assignment’ section.
In the Edit DNS settings page, change the automatic configuration to manual and then enter the primary and alternate DNS servers that support DoH from the dropdown menus labeled Preferred DNS encryption and Alternate DNS encryption. You may use the DNS server addresses from the table below.
Step 2: Click on Network & Internet
Using DNS over HTTPS (DoH) encrypts the communication between your computer and DNS servers. This enables privacy by eliminating the chance of eavesdropping or DNS spoofing attacks.
To Enable DNS Over HTTPS In Windows 11, open the Settings app and click Network & Internet. Select either Ethernet or Wi-Fi on the left sidebar and then click Change adapter settings.
In the window that opens, choose Manual from the DNS server assignment drop-down menu and enter primary and secondary DNS servers that support DoH in the Preferred DNS encryption and Alternate DNS encryption boxes. Make sure the toggle switch is off for “Fallback to plaintext”.
Then all web browsers and other programs on your Windows 11 computer will communicate with the DNS server via DoH. You can also enable DoH by using the Registry Editor.
Step 3: Change Adapter Properties
In Windows 11, you can manage the network adapters in the new Settings app. This is a much faster and more intuitive way to connect to a Wi-Fi network, enable features, review configurations, configure data limits, and reset network adapters to fix problems.
This guide will show you how to change your Ethernet or Wi-Fi adapter’s DNS server address to one that supports DNS over HTTPS (DoH). DoH protects your privacy by encrypting all DNS queries and responses between the DNS resolver and the client. This prevents eavesdropping, spoofing, and other types of traffic manipulation.
You can also choose the ‘Encrypted only’ option, which forces all DNS resolution to use DoH. However, this may affect compatibility with some networks. You can also select ‘Encrypted preferred, unencrypted allowed’, which enables DoH but allows the system to fall back to unencrypted resolutions in some cases.
Step 4: Click on Change Adapter Settings
DNS-over-HTTPS (DoH) encrypts the data exchanged between your computer and the DNS server, protecting you from man-in-the-middle attacks. It also improves privacy by preventing your Internet service provider from being able to see what websites you visit.
The new network settings in Windows 11 let you check the properties of your Ethernet or Wi-Fi adapter on a single screen, including media state, bytes sent and received, and link speed. This helps you avoid going over your data limit or stay under it when using a metered connection.
You can enable DoH in the Registry by creating a 32-bit DWORD value named “EnableAutoDoh” with a value of 2. This will enable Windows to automatically send and receive DNS requests over HTTPS, so it’s more secure for you and your family.
Step 5: Click on DNS
While your ISP may offer DNS servers, it is a good idea to use alternative DNS resolvers such as Google or Cloudflare that are faster, more reliable and have better privacy. These free DNS resolvers also offer a variety of other services such as SSL/TLS, 1.1.1.1, and DNS over HTTPS (DoH).
DoH is a new protocol that encrypts DNS queries to improve user privacy and prevent malicious individuals from viewing or manipulating your DNS data. It requires a DoH supported server that will encrypt the queries sent by your computer. The Settings app makes it easy to enable this feature. You can also enable it using PowerShell, Command Prompt, or the Control Panel. All four methods have their benefits, but the Settings app is the easiest way for average users to configure it.
Conclusion:
Enabling DoH in Windows 11 is a straightforward process that can enhance your online privacy and security. By following these steps and considering the potential benefits and drawbacks, you can make an informed decision about whether DoH is right for you. Remember to choose reputable DNS providers and keep your system updated for optimal performance and security.
Leave a Reply