How to Enable Bookmarks Bar in Chrome
If you’re using Chrome and want to enable the bookmarks bar in your browser, you’ll first need to enable the extension. To enable the bookmarks bar, go to Chrome’s Settings > General> Bookmarks. If you want to hide the bar, use the right-click menu, but this only works if the bookmarks bar is visible. To disable the bookmarks bar in Edge, hover over the “Show favorites” option, and then select “Never”. To toggle off the bookmarks bar in Chrome, you need to go to Settings > Extensions -> Add-ons.
If you are a regular Chrome user and want to keep track of your bookmarks, you may have noticed that your bookmarks bar is not always synchronized. This is a problem that may be caused by the lack of an appropriate syncing method. In this article we will discuss a few ways to get your bookmarks bar synchronised. First, you must sign in to your Google account. After signing in, you must choose the browser you’d like to sync Google.
First of all, you must log into your Google account. After logging into your Google account, click on the Sync and Google services tab. Enter your email address and phone number and click the “Sign in” button. Now, you will be taken to the Google sync page where you can synchronize your bookmarks. Once the process is complete, you’ll be able to synchronize your bookmarks on other devices.
How Show Bookmarks Bar Chrome Android:
If you’ve always wished for a shortcut to your favorite web pages, you’ll probably love Chrome’s bookmarks bar. This handy feature helps you navigate through the web without the distraction of a toolbar and is a valuable time-saver. If you’d rather not share your bookmarks with the world, you can disable the bookmarks bar with a click of a button.
Using the bookmarks bar will allow you to search for websites by keywords. However, if you’re a heavy bookmarked user, you may quickly become overwhelmed with the amount of bookmarks. As such, it’s important to organize these bookmarks into categories. As a result, it can be difficult to find the sites you’ve previously visited. Fortunately, the bookmarks bar is a customizable feature, so you can keep it private or make it more visible.
How Show Bookmarks Bar Chrome Access:
There are several ways to access your bookmarks on Chrome, including right-clicking them, adding them to a folder, and creating subfolders. Right-clicking a bookmark will open a drop-down menu with options such as Open New Tab, Edit, Delete, or reposition. You may have to hold down Control when clicking a bookmark on a Mac, while a two-finger press on a laptop trackpad is interpreted as a right-click. Clicking “Add Folder” will create a new folder for that bookmark. Drag a bookmark from the current folder to a new folder to store it in.
If you have a Mac or a PC, the same steps apply to Windows. On Windows, press the Command (Cmd) key and then press the Ctrl (Control) key. Once you’re in the Bookmarks Manager, you’ll see the bookmarks bar with all of your saved URLs intact. You can also use this bookmark manager to organize your bookmarks. Organize your bookmarks into folders, so that you can easily access them when you need them.
How Show Bookmarks Bar Customisation:
To customise the bookmarks bar in Chrome, go to the settings menu > General > Customise. Here you can choose the type of bookmark you wish to show on your bar. For example, you can make your bookmark’s name smaller, by removing it. If you want to use a longer name, you can shorten it to the website’s favicon. This method will work for bookmarks on Mac OS X, Windows, Linux, and Chrome OS.
In Chrome, you can customize the bookmarks bar to display the information you need. Using the search bar, you can quickly find a site by typing in the name of the title and clicking “Add bookmark”. Alternatively, you can drag the link to change its title or add a description. You can also right-click the link to edit, rename, or copy it. You can also add your bookmarks to folders.
How To Turning On Or Off:
There are a few easy ways to turn on or off your Chrome bookmarks bar. Changing the settings on the bookmark bar may make it appear or disappear, depending on your personal preference. Fortunately, you can customize the appearance of the bookmark bar to hide only on new tabs. To do this, follow these steps. If you’ve found the bookmarks bar annoying, you can turn it off! Read on to learn how to do it in Chrome.
To make the bookmarks bar show or hide in Chrome, use the browser’s shortcut keys. If you’d prefer to turn the bar off permanently, use the shortcut keys CTRL+SHIFT+B. To disable the bookmarks bar in Chrome, press the CTRL+SHIFT+B keys simultaneously. After the changes, click “Close” to exit the registry editor. Once the shortcut keys have finished, the bookmarks bar will be disabled. Enable Bookmarks Bar In Chrome
How To Showing Or Hiding:
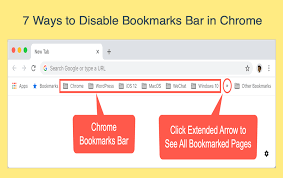
In Chrome, you can easily toggle between showing and hiding the bookmarks bar. The toolbar has three options: Always show, always hide, and only show on new tabs. To enable or disable the bookmarks bar, use the keyboard shortcut CTRL + Shift + B. If you want to hide it, you can click on the Bookmarks bar icon on the right side of the browser window. It will appear when you open a new tab.
Bookmarks In Chrome Via Settings:
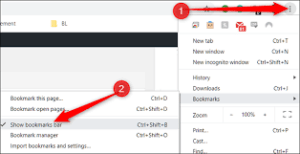
- To view bookmarks in Chrome,
- Click the icon with three horizontal bars
- The upper right corner to open the control panel.
- In the control panel, hover over “Bookmarks” and a second menu will appear
- Where you can click the text “Show bookmarks bar” to turn the bar on or off.
You can also choose to open a blank page without the bookmarks bar by selecting a shortcut from the toolbar or using the “startup” menu. To hide it, click on the ‘new tab’ option, and you’ll see a blank page without any bookmarks. You can also change the bookmarks bar so that it only shows on the home page or startup page. Once you’ve changed the default setting, you can choose to display the bookmarks bar only when you click on it.
Leave a Reply