
How to Enable Auto Caching For Your Site
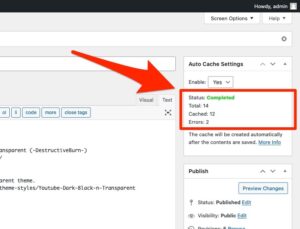
If you want to enable auto caching for your site, the first step is to configure a caching solution. Once you have selected the caching solution, you can start to set the settings for your site. Once you have the settings, you can enable or disable auto caching for your site. This will help you speed up your site. Enable Auto Cache Settings
In order to get the most performance out of a caching solution, you should set its memory usage limit and maximum cache size. While the maximum RAM usage limit is determined by the size of the cache files, the recommended cache size is at least 20 MB. This will limit the amount of RAM that the Intelligence Server uses to store data. The size of the cache file depends on the average file size and the number of cache files Google.

Normally, caching solutions will allow you to configure a maximum time for a cached file. The maximum number of minutes depends on the size of the file. You can set a lower number to limit the number of files that can be cached. Larger files may only be cached for one minute, so be sure to set the maximum file size before enabling file caching.
How To Configure A Caching Solution:
To configure a caching solution to enable auto caches, go to the Advanced Options section, and click on the Advanced Options link. Under the First byte timeout field, choose a value of 15000 milliseconds. After making these settings, click the Activate button to deploy the changes. The next section of the configuration is the Action setting, which controls how the server will respond to a request. The most common workflow is described below.
You can configure a caching solution to enable auto caches using the Project Configuration Editor. You can choose which types of caches to use on a project. When you configure a cache, you can also specify which files to cache for that project. If you use an application that needs to store files or images, you can configure it to allow caches for this data. If you want to keep your data in the cache for a long period of time, you can choose to use the Never expire caches option.
How To Set Up A Caching Solution:
To speed up your website, set up a caching solution. This will help your site load faster and increase your customer satisfaction. You can also use a caching solution to improve your server performance. There are several popular caching solutions. You can find a list of them in the table below.
A cached version of your website is often faster for visitors to view. In the case of WordPress, this can mean reducing the number of back-and-forth queries from the visitor’s browser to the database. Caching your site’s content will also reduce server load.
How To Configure A Caching Solution For Your Site:
A cached page is a static HTML version of a page that doesn’t require any database queries to load. This will reduce server resources needed to serve a page and can help you rank better in search results. In addition, pages that load faster will give visitors a better overall experience. Enable Auto Cache Settings
In addition to caching pages, your caching solution will improve the speed of your site by enabling SSL (HTTPS) requests and Caching URIs with Query String Variables. These options add extra parameters to URLs, which can be used for specific purposes, such as displaying specific data from the WordPress database.
How To Setting W3 Total Cache:
One of the best ways to optimize your cache is to use the state-while-revalidate directive. This directive tells browsers how long they should keep a cached copy of a page, and it should be no more than 84,600 seconds. Depending on your needs, you may want to increase or decrease the time that your site caches its pages.
Enabling Auto-Cache:
- Go to Reports > Report Definitions > All Reports.
- Select a report from the list and click Edit on the toolbar.
- On the Settings tab, check the box Enable automatic caching.
- Click Apply.
Another way to optimize your site’s performance is to enable a content delivery network (CDN). This network distributes your website’s files to powerful proxy servers around the world. They serve them to nearby users. Generally, most website content is static, pre-formatted files, which are prime candidates for caching.
Leave a Reply