
How to Enable and Disable USB Ports in Windows
Enable And Disable USB Port allow you to connect a keyboard, mouse, external hard drive, and other peripheral devices to your laptop or desktop computer. These devices can also be infected with viruses which can cause data loss.
Disabling USB ports on your computer is possible through the BIOS or UEFI setup utility, or by editing the Windows registry.
Enabling and disabling USB ports can be necessary for various reasons, such as security concerns, preventing unauthorized access, or controlling device connections. The process may vary depending on the operating system and the specific requirements of the user. how to enable and disable USB ports on Windows and Linux systems.
Enabling and Disabling USB Ports on Windows:
Method 1: Using Device Manager
- Access Device Manager:
- Press
Win + Xand select “Device Manager” from the menu. - Locate and expand the “Universal Serial Bus controllers” section.
- Press
- Identify USB Ports:
- Identify the USB port you want to enable or disable. Typically, they are listed as “USB Root Hub.”
- Enable/Disable USB Port:
- Right-click on the USB port and choose “Disable” or “Enable” based on your requirement.
- Confirmation:
- Windows will prompt you to confirm the action. Click “Yes” to proceed.
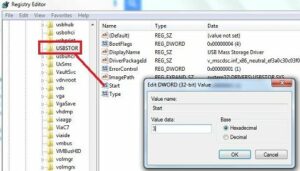
Method 2: Using Registry Editor
- Open Registry Editor:
- Press
Win + R, typeregedit, and press Enter to open the Registry Editor.
- Press
- Navigate to USB Settings:
- Go to
HKEY_LOCAL_MACHINE\SYSTEM\CurrentControlSet\Services\USBSTOR.
- Go to
- Modify Start Value:
- Locate the “Start” entry on the right side and change its value to
4to disable USB ports or3to enable them.
- Locate the “Start” entry on the right side and change its value to
- Restart Computer:
- Restart your computer for the changes to take effect.
Enabling and Disabling USB Ports on Linux:
Method 1: Using Terminal Commands
- Identify USB Controllers:
- Open a terminal and use the command
lsusbto list USB devices and their controllers.
- Open a terminal and use the command
- Identify USB Port:
- Note the Bus and Device numbers for the USB port you want to enable or disable.
- Disable USB Port:
- Use the command
echo '1-1' | sudo tee /sys/bus/usb/drivers/usb/unbind(replace ‘1-1’ with your Bus and Device numbers) to disable the USB port.
- Use the command
- Enable USB Port:
- Use the command
echo '1-1' | sudo tee /sys/bus/usb/drivers/usb/bindto enable the USB port.
- Use the command
Method 2: Using Udev Rules
- Create Udev Rule:
- Open a text editor and create a new Udev rule file, e.g.,
/etc/udev/rules.d/10-usb.rules.
- Open a text editor and create a new Udev rule file, e.g.,
- Define Rule:
- Add a rule to disable USB ports:
bash
ACTION=="add", SUBSYSTEM=="usb", TEST=="power/control", ATTR{power/control}="on"
To enable USB ports, replace
"on"with"auto".
- Add a rule to disable USB ports:
- Reload Udev Rules:
- Run the command
sudo udevadm control --reload-rulesto apply the new rule.
- Run the command
- Reconnect USB Devices:
- Disconnect and reconnect USB devices for the changes to take effect.
Security Considerations:
- Group Policies (Windows):
- For more advanced control, Windows users can use Group Policy Editor (
gpedit.msc) to enforce USB policies across the system.
- For more advanced control, Windows users can use Group Policy Editor (
- USBGuard (Linux):
- On Linux, tools like USBGuard allow for more granular control over USB device access, providing a rules-based framework for managing USB permissions.
Third-Party Software:
- USB Disabler Pro (Windows):
- Third-party software like USB Disabler Pro can provide a user-friendly interface for enabling/disabling USB ports and managing USB device permissions.
- Gnome Disk Utility (Linux):
- Linux users can use tools like Gnome Disk Utility to manage and configure USB storage devices.
Troubleshooting:
- Driver Issues (Windows):
- Ensure that USB drivers are up-to-date. Issues may arise if drivers are outdated or incompatible.
- Permissions (Linux):
- Make sure you have the necessary permissions to execute commands and modify Udev rules.
- Backup Registry (Windows):
- Before making changes in the Windows Registry, it’s advisable to create a backup to avoid potential system issues.
- Kernel Modules (Linux):
- Be cautious when unbinding/bindings kernel modules, as it may affect other system functionalities.
1. Open Device Manager
USB ports allow you to quickly connect a variety of devices like keyboards, mice, and external hard drives. USB also allows you to charge your cell phone, MP3 player, or digital camera. However, this ease of use can be a security risk for businesses as it can lead to data theft and inject harmful viruses into the network. To prevent this, businesses block USB port access. This can be done using a dedicated software application, the Device Manager, or by editing the registry.
In order to disable USB ports on your computer, you will need to open the Device Manager. Once you have opened the device manager, expand the “Universal Serial Bus controllers” heading. From here you can disable any remaining USB options by clicking them, selecting Action, and then Disable device. You can then close the Device Manager and your USB ports will be disabled. There are many alternatives to this method, including purchasing a device that physically blocks the USB port (these devices typically require a special tool or key to remove and can be expensive). Another option is to utilize a software application such as Access Patrol, which provides more granular control over USB mass storage devices and other peripherals.
2. Right-click on the USB device
Having a disgruntled employee at work can be a serious threat to the company. They can introduce harmful viruses to the system, steal data and even destroy important files. Therefore, many companies have blocked USB ports in order to prevent them from being accessed by unauthorized users.
You can disable USB devices on your Windows computer by changing the registry settings. This trick works on all versions of Windows, including Windows 11/10. The process is simple and straightforward, requiring only a few clicks and a restart to get the job done.
In the Device Manager, expand Universal Serial Bus controllers, right-click USB Root Hub, and then select “Properties.” The same General, Driver, Details, and Power Management tabs appear as those for Generic USB Hub. If the value has a value of 4, change it to 3. Click OK, close the Registry Editor, and then restart your computer. The change will take effect as soon as you restart the computer. USB is a convenient and useful tool, but it can be vulnerable to malware that spreads through it.
3. Select “Properties”
The USB Selective Suspend feature, enabled by default in Windows, is supposed to save power by shutting down devices that have been idle for a while. But sometimes it can cause problems, especially with older devices that do not reconnect properly when the port turns back on.
To disable the USB Selective Suspend feature, you can use the registry editor. You will need to be logged in as an administrator. If you are unsure how to do this, consult your manual or online manual.
You can also change the power options for your computer’s USB ports. This can help reduce the risk of data loss from USB devices. However, it is important to remember that this can cause performance issues with your computer.
To disable the power options, you can use the registry editor or the BIOS setup utility. If you choose to use the BIOS or UEFI setup utility, be sure to save and exit the BIOS or UEFI settings before rebooting your computer. This will prevent any changes you made from being saved and applied to the next system boot.
4. Select “Power Management”
Sometimes, USB ports can stop working and require a reboot to regain functionality. This is due to a power management feature called “USB Selective Suspend” which can sometimes cause issues with USB devices. This problem is common on corporate computers and can be very frustrating for users. Fortunately, there is a way around this issue. You can enable your USB ports and drives by diving into the device manager and selecting the ’Universal Serial Bus controllers’ section. Once you find this, click the start option to open the ‘Edit DWORD value’ window. Enter ‘4’ in the value data and click OK.
After this, the USB Selective Suspend setting should be disabled. However, it is important to note that this method may not work on all PCs as it relies on the platform firmware to provide correct information about USB drivers. If this method does not work on your PC, you should try updating your USB drivers using a tool such as Advanced Driver Updater. This tool will scan your computer for outdated drivers and update them automatically.
5. Uncheck “Allow the computer to turn off this device to save power”.
USB ports are a blind spot for many organizations, and disgruntled employees can use them to steal data and spread harmful viruses. Disabling USB ports is a good way to prevent unauthorized data access and keep the network safe from infections.
To disable USB ports, you can either edit the registry or use a third-party software application. The registry editor is a powerful tool that contains important information, options, and settings for programs and hardware on the Windows operating system. However, it can cause serious problems if you make a mistake. Therefore, it is recommended to backup and restore the registry before making any changes.
To disable the USB ports, open the Device Manager and click on the Universal Serial Bus controllers heading. Then, right-click on the USB Root Hub and select “Disable device”. You may have one or more remaining USB options under the Universal Serial Bus controllers heading. Repeat this step for each of the remaining USB options. Note that this method will only disable USB mass storage devices, but keyboards and mice will still work.
Conclusion:
Enabling and disabling USB ports is a crucial aspect of system administration, especially for security-conscious users. Whether you are using Windows or Linux, there are multiple methods available to control USB port access. It’s essential to consider the security implications and choose the method that best suits your requirements. Always follow best practices, and if in doubt, consult the documentation for your specific operating system and seek professional advice.
Leave a Reply