How to Enable All Cores in BIOS
Modern CPUs often have multiple cores that can work together to increase performance. However, demanding tasks can still push a system to its limits. This guide will show you how to enable all cores in BIOS to get the most out of your processor.
You should also enable Hyper Threading, an Intel proprietary function that splits a physical core on your CPU into virtual cores (or logical processors) that each act as an independent processor. This will allow even more tasks to be executed simultaneously, further increasing your processor’s performance.
Modern computers utilize multi-core processors, offering significant performance advantages over single-core counterparts. These cores work in parallel, handling multiple tasks simultaneously, leading to faster processing times and improved multitasking capabilities. However, in some rare cases, not all cores might be enabled by default in the BIOS (Basic Input/Output System), the firmware that initializes your hardware before booting the operating system.
This guide delves into the process of enabling all cores in BIOS, providing detailed instructions and addressing potential concerns. While the specific steps may vary depending on your motherboard manufacturer and BIOS version, the general principles remain consistent.
Before You Begin:
- Identify your motherboard model: This information is crucial for finding specific instructions and troubleshooting potential issues. You can usually find it printed on the motherboard itself or by using system information tools like CPU-Z.
- Back up your BIOS settings: Modifying BIOS settings can sometimes lead to unexpected behavior. It’s highly recommended to back up your current settings before making any changes. This option is usually available within the BIOS itself.
- Consult your motherboard manual: The manufacturer’s manual often provides detailed instructions on navigating the BIOS and modifying specific settings, including core enablement.
Accessing the BIOS:
- Restart your computer: During the boot process, pay close attention to the initial screen for instructions on how to enter the BIOS setup. This typically involves pressing a specific key like Delete, F2, F10, or Esc repeatedly. The exact key may vary depending on your motherboard manufacturer.
- Enter BIOS setup: Once you press the correct key at the right time, you should enter the BIOS setup interface. This interface can vary significantly between manufacturers, but it generally consists of menus and options that allow you to configure various hardware settings.
Finding the Core Enablement Option:
The specific location of the core enablement option can differ based on your BIOS version and manufacturer. Here are some general guidelines:
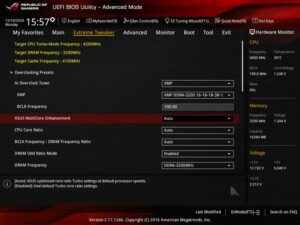
- Look for menus related to CPU configuration, processor options, or advanced settings. These menus might contain options like “Core Control,” “Hyper-Threading,” or “Processor Core Disable.”
- Consult your motherboard manual or online resources for specific instructions. Searching online for “[your motherboard model] + enable all cores” can often lead you to detailed guides and screenshots.
Enabling All Cores:
Once you locate the core enablement option, the steps might involve:
- Identifying the setting: Look for an option labeled something like “Number of Cores,” “Enabled Cores,” or “Core Disable.”
- Changing the value: Depending on the BIOS implementation, you might need to:
- Select the number of cores to enable: Choose the maximum number of cores supported by your processor from a dropdown menu.
- Disable core disabling: If the option is currently enabled, set it to “Disabled” or a similar setting.
- Enter a value of “0”: In some cases, entering “0” might automatically enable all cores.
Saving and Exiting BIOS:
- Save your changes: Once you’ve enabled all cores, locate the option to save your changes and exit the BIOS setup. This is usually done by pressing a specific key like F10 or selecting “Save and Exit” from the menu.
- Confirm changes: The BIOS might prompt you to confirm saving the changes. Select “Yes” or the equivalent option.
- Restart your computer: Your computer will restart with the new BIOS settings applied.
Troubleshooting:
If you encounter any issues after enabling all cores, here are some troubleshooting steps:
- Verify core enablement: Check your operating system to ensure all cores are recognized. You can use tools like Task Manager (Windows) or Activity Monitor (macOS) to view the number of cores available.
- Clear CMOS: If your computer experiences instability after enabling all cores, you might need to clear the CMOS memory. This resets the BIOS settings to their default values. Consult your motherboard manual for specific instructions on clearing CMOS.
- Seek professional help: If you’re unsure about any steps or encounter persistent issues, consider seeking assistance from a qualified computer technician.
Additional Considerations:
- Enabling all cores doesn’t always guarantee performance improvement. In some cases, other factors like thermal throttling or software limitations might bottleneck performance.
- Enabling all cores can increase power consumption and heat generation. Ensure your cooling system is adequate to handle the additional heat.
- Modifying BIOS settings carries inherent risks. Proceed with caution and only make changes you understand.
BIOS is a computer operating system that manages the hardware components of a computer system.
Modern central processor units (CPUs) are equipped with multiple cores that work together to speed up the performance of your computer. However, you may need to change a BIOS setting in order to enable these cores. This is especially true for older versions of Windows that do not support multi-core CPUs.
You can change this setting in the CMOS Setup menu. Once you have done this, restart your computer for the changes to take effect. Then, you will be able to enable all of your CPU’s cores, which will significantly improve the performance of your computer.
Once you have enabled all of your CPU’s cores, you can also enable Hyper Threading. This will split your physical cores into virtual cores, which will operate as independent processors and allow you to complete more tasks simultaneously. In addition, this will improve your PC’s overall performance. However, you should be aware that enabling all of your CPU’s cores can cause your system to run hotter and may result in shortened battery life.
It gives instructions for the Power-On Self Test (POST)
When the computer is turned on, BIOS gives instructions for the Power-On Self Test (POST). This process carefully checks all of the hardware components, such as the motherboard chips, input and output devices, serial/parallel ports, and internal elements. This step is crucial to ensure that the hardware is functioning properly and will work with the operating system. If it finds any problems, the system will stop booting and display an error message.
Modern CPUs come with multiple cores, which help improve multitasking and overall performance. To enable all cores, you must set the BIOS to allow the maximum number of physical processors and turn on Hyper Threading. Hyper Threading splits each physical processor into virtual cores that act as independent processors.
The BIOS also provides a way to see your PC’s current core count. To do this, open the Task Manager and look for a graph that displays the current number of physical processor cores and logical processors.
It manages the boot process
Modern central processing units (CPUs) have multiple cores that work together to perform tasks. This multitasking allows the CPU to distribute work faster, increasing overall performance and speed. This is why many users want to activate all of the cores on their computer. This can be done by changing the BIOS settings or by using Windows 11 and 10’s System Configuration menu.
You can check the number of CPU cores by opening the Task Manager / Performance window and looking at the Cores and Logical processors sections. You can also find this information by typing “msconfig” in the search box.
Once you’ve accessed the BIOS, you can enable all cores by pressing the appropriate key during the boot process. Then, you can restart your PC to apply the changes. However, enabling all cores may cause problems with the boot process and could result in a BAD SYSTEM CONFIG INFO boot error. This is why it’s important to test the new BIOS configuration before committing to it.
It manages the operating system
BIOS is the first software to run when a computer is turned on, and it manages data flow between hardware components and the operating system. It checks the state of all hardware components and initializes them as needed before an OS is loaded. It also handles power management for devices like video cards.
The BIOS also includes functions that intercept hardware interrupt signals and interpret them. For example, when the keyboard or a disk is accessed, BIOS intercepts the interrupt and tells the CPU where to find the appropriate software to operate them. It also provides a library of basic input/output functions that operate peripherals, such as the keyboard and rudimentary text and graphic display.
BIOS resides on a complementary metal-oxide semiconductor (CMOS) chip on the motherboard and is nonvolatile, meaning that it can retain its settings even when the computer is turned off. The CMOS setup utility lets users modify the settings, and these changes are saved to the chip and remain in effect until the next time the machine is turned on.
Conclusion:
Enabling all cores in BIOS can potentially improve your computer’s performance, especially for demanding tasks that benefit from parallel processing. However, it’s crucial to approach this process with caution, following the specific instructions for your
Leave a Reply