
How Do I Enable SSH Connection?
Enable SSH Connection is a popular and secure remote administration tool. The tool is installed by default on Linux desktop systems and can be easily accessed on Windows machines using an SSH client application.
It uses a client-server model and listens on a TCP port, defaulting to port 22, for incoming connections. The ssh daemon then verifies the connection requests and grants access to authorized systems.
SSH, or Secure Shell, is a powerful tool for securely connecting to remote servers and executing commands. It allows you to manage files, transfer data, and configure systems efficiently. However, before you can leverage its benefits, you need to enable SSH on the target machine. This guide will walk you through the process of enabling SSH connections on various operating systems, emphasizing key considerations and best practices.
Understanding the Prerequisites
Before enabling SSH, it’s crucial to understand the prerequisites:
- Administrative Privileges: Enabling SSH often requires administrative access to the system. You’ll need to log in with an account possessing the necessary permissions.
- SSH Server Software: Most Linux distributions come with SSH server software pre-installed (e.g., OpenSSH). On Windows, you might need to install it explicitly.
- Firewall Configuration: Firewalls might block incoming SSH connections by default. You’ll need to configure them to allow access on the appropriate port (usually port 22).
Enabling SSH on Linux Systems
Here’s a general overview of enabling SSH on Linux systems:
- Open Terminal: Access the terminal application. This is usually done through the application menu or by pressing
Ctrl+Alt+T. - Edit SSH Configuration: Use a text editor like
nanoorvimto edit the SSH server configuration file, typically located at/etc/ssh/sshd_config. - Uncomment the
#symbol: Look for the line#PermitRootLoginand remove the#symbol if you want to allow root user login via SSH. Caution: This is generally discouraged due to security risks. Opt for sudo for elevated privileges instead. - Modify other settings (optional): You can modify other settings in the configuration file, such as port number, allowed users, and authentication methods. Refer to the specific documentation for detailed information on each option.
- Save and Exit: Save the changes made to the configuration file.
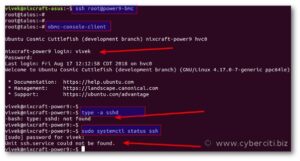
- Restart SSH service: Use the following command to restart the SSH service and apply the new configuration:
sudo systemctl restart ssh
Note: The specific commands and file locations might vary depending on your Linux distribution. Consult the official documentation for accurate instructions.
Enabling SSH on Windows Systems
On Windows 10 and later versions, you can enable SSH through the built-in OpenSSH feature:
- Open Settings: Go to “Settings” -> “Apps & features” -> “Optional features”.
- Add OpenSSH: Click “Add a feature” and search for “OpenSSH Server”. Select it and click “Install”.
- Enable SSH service: Open the “Services” app (search for “services.msc”). Locate “OpenSSH SSH Server”, right-click, and select “Start”.
- Configure settings (optional): You can further configure the OpenSSH server through the “Properties” of the service.
Alternatively, you can use third-party tools like PuTTY to connect to SSH servers on Windows.
Additional Considerations and Best Practices
- Security: Enabling SSH opens a communication channel to your system. It’s crucial to prioritize security by:
- Using strong passwords or SSH keys for authentication.
- Restricting root login via SSH and utilizing sudo for elevated privileges.
- Keeping the SSH server software updated with the latest security patches.
- Limiting access to authorized users and IP addresses through firewall rules.
- Port Forwarding: If you’re behind a firewall, you might need to configure port forwarding to allow incoming SSH connections on port 22. Consult your firewall documentation for specific instructions.
- Testing the Connection: Once enabled, test the SSH connection using a terminal application or an SSH client like PuTTY. Ensure you can connect successfully with the appropriate credentials
Authentication
When logging in to a remote server over SSH, the authentication process is handled by using an asymmetric key pair. The public key is shared with any system to which you wish to connect and the private key resides only on your own computer, meaning that only you have access.
When you connect to a remote system with your public key, the server sends you an encrypted challenge that only your private key can decipher. Once you provide the correct response, the connection is complete and you are logged in.
Many systems also enable passwordless connections by setting a passphrase for the private key. The ssh-agent utility can be used to store this passphrase, allowing you to login without having to enter a password. This is especially useful for automated transfers and scripting. To enable this feature, open the /etc/ssh/sshd_config file on the remote server and edit the stanza that reads PubKeyAuthentication. Set it to yes.
Encryption
The Enable SSH Connection protocol provides a method for authenticating a remote computer and encrypting the data that moves between the two computers. This ensures that even if someone intercepts the packets on the wire, they will not be able to decipher them.
The client and server use a key exchange algorithm to dynamically generate a shared session key and session ID. They then symmetrically encrypt each packet. The resulting encrypted protocol can be read only by the two computers that share the key.
Several other settings in the sshd configuration file allow you to customize the security of SSH connections. For example, you can set the LoginGraceTime to limit the time that a connection can remain idle before it is closed. This can help minimize the number of automated login attempts by attackers. You can also use the PermitRootLogin setting to control whether a root account can be logged in through ssh. This option is often set to no to prevent people from using ssh to gain root access to the server.
Port forwarding
Port forwarding is a security feature that enables you to redirect incoming connections from remote hosts to local applications. This is used to bypass firewalls and other restrictions. It is a powerful tool often used by system administrators and developers.
SSH tunneling is a form of port forwarding that allows you to connect to remote machines and services.
You can set up SSH tunneling on a client machine by using the ssh -L or ssh -f option with a hostname and a port number. Then you can configure other network applications to use the SSH tunnel. You can also enable dynamic port forwarding on a client machine by using the SSH -D option. This allows the tunneling service to manage the assignment of application ports, reducing the chance of conflicts. Dynamic forwarding requires a server that is configured to allow it.
Logging in
The client and server exchange cryptographic keys to create a secure communication channel. The key pair then encrypts subsequent communication. Authentication is used to confirm the identity of each party, and the protocol also provides access control and auditing.
SSH is a highly versatile tool for remote computer management. It enables you to perform tasks such as moving files, installing software, and executing commands on a server. It is particularly useful for system and network administrators, but anyone who needs to manage a computer remotely in a securely encrypted manner can use it.
To enable SSH on a device, you must have the Internet Protocol (IP) address or hostname of the router and permission to connect. You also need to set up port forwarding so that non-SSH connections to the router can be denied. This will prevent users from attempting to Telnet to the router directly and limit the router to SSH connections only.
Conclusion
Enabling SSH connections provides a secure and efficient way to manage remote systems. By following these guidelines and prioritizing security best practices, you can leverage the benefits of SSH while maintaining the integrity of your systems. Remember, adapting these instructions to your specific operating system and environment is crucial for a successful implementation.
Leave a Reply