
How Do I Enable My Adobe Account?
Enable My Adobe Account is a software company that produces a variety of professional applications for desktop publishing and imaging. It was founded in 1982 and is headquartered in San Jose, California.
If you’re having trouble signing in to your account, check to see whether you are using the correct Adobe profile. The profile is based on the plan assigned to your email and your organization’s settings.
Enabling your Adobe account involves a series of steps that ensure your account is active, secure, and ready for use across various Adobe products and services. This process typically involves account creation, verification, and activation. Here’s a detailed guide on how to enable your Adobe account, broken down into key steps.
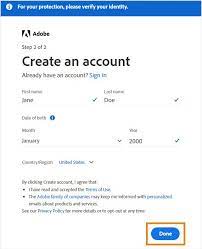
Step 1: Account Creation
The first step in enabling your Adobe account is to create one if you don’t already have one.
- Visit Adobe’s Official Website:
- Open your web browser and navigate to the official Adobe website.
- Click on “Sign In” or “Create Account”:
- If you already have an account, click on “Sign In.” If not, click on “Create Account.”
- Fill in the Required Information:
- Provide the necessary information, including your email address, name, and password. Ensure your password is strong and secure.
- Verification:
- Verify your email address by clicking on the link sent to your registered email.
2: Account Verification and Security
After creating your account, it’s crucial to verify it and enhance its security.
- Login to Your Adobe Account:
- Use the credentials you provided during account creation to log in to your Adobe account.
- Complete Two-Factor Authentication (if available):
- Enhance security by setting up two-factor authentication. This typically involves receiving a code on your mobile device or email to confirm your identity during login.
- Verify Personal Information:
- Confirm and update personal information such as your contact number and recovery email address. This ensures Adobe can contact you for security purposes.
3: Adobe Product Activation
Now that your account is created and verified, it’s time to activate Adobe products.
- Choose Your Adobe Plan:
- Navigate to the Adobe plans section and select the subscription that suits your needs. This might involve choosing between a free trial or a paid plan.
- Provide Payment Information (if applicable):
- If you opt for a paid plan, provide the necessary payment details. Adobe often offers a trial period before any charges are applied.
- Download and Install Adobe Products:
- Once your account is set up, download and install the Adobe products you need. Follow the installation instructions provided by Adobe.
4: Account Management
Now that your Adobe account is active and products are installed, it’s essential to manage your account effectively.
- Access Account Management Dashboard:
- Log in to your Adobe account and explore the account management dashboard.
- Update Payment Information (if applicable):
- Regularly check and update your payment information if you’re on a subscription plan to avoid any interruptions in service.
- Review Security Settings:
- Periodically review and update security settings, including passwords and two-factor authentication preferences.
- Explore Additional Adobe Services:
- Discover additional services available through Adobe and explore how they can benefit your projects or workflow.
5: Troubleshooting and Support
If you encounter any issues during the process, Adobe provides support to help you resolve them.
- Visit Adobe Support:
- If you encounter any issues, visit the Adobe support page for troubleshooting guides, FAQs, and community forums.
- Contact Adobe Support (if needed):
- If you can’t resolve the issue on your own, contact Adobe support directly for personalized assistance.
Signing in
When you sign in, the public login page recognizes your account based on your email address and routes you through the authentication process configured by your organization’s administrators. Some minor variations may occur depending on your organization’s configurations, but the on-screen process is intuitive and easy to follow.
You can choose either your Personal account (for Adobe plans you purchased yourself) or your Company or school account (for apps assigned to you by your managed organization). You might also see a profile chooser when you sign in. If you select a different account or profile, the product activates and opens.
If you’re having trouble activating a product, try signing in with a different Adobe ID. This ensures that you have a valid subscription to the product and helps prevent duplicate accounts from creating.
If you still can’t activate a product, contact your administrator to learn how to resolve the issue.
Subscriptions
If you don’t have access to the email address associated with your Adobe account, you can use other methods of authentication to sign in. For example, you can select Use another method in the sign-in screen and follow the onscreen instructions to send a code to your phone or tablet.
You can also start a free trial of an Adobe product on your computer, tablet, or mobile device to test it out before buying. Click Try next to a product, and follow the onscreen instructions to activate your trial or choose Buy Now.
Subscriptions enable you to work on files stored in the cloud and collaborate with others. You can also download and update apps and add Adobe Stock credits to your subscription. You can manage your subscriptions in the Admin console, where you can view, edit, and delete user profiles, set user authority levels, and deactivate or reactivate users.
Enable My Adobe Account Profiles improve the way you store, manage, and securely collaborate on cloud content. In certain cases, you may be prompted to select a profile at sign-in. You might have a Business and a Personal Profile if your organization uses Directory Trust, or you have two Adobe plans that use different storage models (such as Creative Cloud for teams and Document Cloud for teams).
If you are an administrator of an enterprise account, you can assign users to a Profile through the Admin console, Azure Sync, Google Sync, or the User Sync tool. The assigned profile determines which apps and services the user can use.
Profiles
A user’s Adobe accounts can be assigned one or more product profiles. Each profile has a list of apps and services that a given user is entitled to use. You can manage product profiles in the Admin Console. Administrators, called product profile administrators, assign products to users and/or user groups. Upon assigning a product to a user, the app(s) appear in the user’s account when they sign in with their credentials. You can assign a maximum of 8,000 product profiles in an organization.
When a user signs in with their managed email address, they may be asked to choose a Business or Personal account. A Business Account is for an Adobe plan purchased by your company or school. Content stored in this account can be accessed and controlled by your plan administrator or by other team members, depending on how the account is shared. A Personal Account is for an individual plan, such as Creative Cloud for individuals or a free membership. Content in this account remains solely under your control.
Changes in a user’s email address can affect their ability to sign in to the enterprise version of some apps. This occurs only if the email address is used as the identifier in the SAML handoff between Adobe and your organization’s Identity Provider. To resolve this issue, contact your Identity Provider to ensure that the email addresses are properly mapped.
Billing
The Admin Console provides a central place for administrators to manage the Adobe entitlements of their organization. The Admin Console includes tabs to quickly take actions on licenses, users, packages, and billing.
The Overview tab efficiently displays a wealth of information about the product licenses you or other administrators in your organization have purchased and how they’re allocated. You can also use the quick links to access additional features like viewing available updates, managing app packages, and adding users and administrators.
If you have a plan with a Business profile, you can select the option to view your subscription billing details in the top navigation bar of the Admin Console. You can also access your billing history and download receipts for canceled or other orders by clicking Plans in the top navigation bar. You must be a primary administrator to access the billing information associated with your Creative Cloud for teams account.
When using Microsoft Entra automatic provisioning with the Admin Console, you can select which attributes get synchronized from your identity provider to Adobe. For example, you can choose which values to match in the group attribute mapping section when importing users from a federated directory into the Admin Console.
When a user signs in to the Admin Console, they must successfully authenticate with their organization’s single sign-on and be assigned to a Product Profile. The Admin Console then creates a user account automatically in the identified federated directory based on the email address provided. Users are notified of their new Adobe account in the form of a confirmation email and can update their attributes within the Admin Console if needed.
Conclusion:
In conclusion, Enable My Adobe Account involves a combination of account creation, verification, product activation, and ongoing account management. Following these detailed steps ensures a smooth and secure experience with Adobe products and services. Remember to stay vigilant about security, keep your account information up to date, and explore the full range of features Adobe has to offer.
Leave a Reply