How Do I Allow My Webcam?
Allow My Webcam are used to transmit an image over a network. This can be for video chat, recording or live streaming. They can also capture still images.
The process varies depending on the operating system and browser. If the camera is not available, it may be because your device settings are blocking access to the camera and microphone.
Allowing your webcam involves configuring your computer’s settings, permissions, and potentially adjusting browser settings if you’re using web applications. Below is a comprehensive guide that covers various aspects of allowing your webcam. Please note that the exact steps might vary slightly depending on your operating system and the specific applications you are using.
Introduction:
Using your webcam can enhance communication, collaboration, and online experiences. Whether you’re attending virtual meetings, recording videos, or participating in video chats, enabling your webcam is crucial. Here’s a step-by-step guide to help you allow your webcam on different platforms.

1: Check Hardware Connection:
Ensure your webcam is physically connected to your computer. If it’s an external webcam, plug it into an available USB port. If it’s built-in, make sure it’s properly integrated.
2: Update Webcam Drivers:
Outdated or incompatible drivers can cause issues. Visit the manufacturer’s website or use your operating system’s update tools to ensure you have the latest webcam drivers installed.
3: Adjust Webcam Settings in Windows:
For Windows users, follow these steps:
a. Right-click on the Start menu and select “Device Manager.” b. Find and expand the “Imaging devices” category. c. Right-click on your webcam and select “Enable” if it’s disabled.
4: Configure Webcam Settings on Mac:
If you’re using a Mac, check your webcam settings:
a. Open “System Preferences” and select “Security & Privacy.” b. Go to the “Privacy” tab and click on “Camera.” c. Check the box next to the application you want to allow access to the camera.
5: Allow Webcam in Browser:
When using web applications, browsers need access to your webcam. Follow these general steps:
a. Open your browser settings. b. Navigate to the privacy or security section. c. Find and grant permissions for camera access.
For Google Chrome:
Open Chrome and go to Settings. b. Scroll down and click on “Privacy and security.” c. Under “Content,” click on “Camera” and ensure your preferred camera is selected.
For Mozilla Firefox:
Open Firefox and go to Options. b. Navigate to “Privacy & Security.” c. Scroll down to the “Permissions” section and check if your camera is listed.
For Microsoft Edge:
Open Edge and go to Settings. b. Scroll down and click on “View advanced settings.” c. Under “Privacy and services,” ensure camera access is allowed.
6: Grant Webcam Permissions in Applications:
Individual applications may require permission to access your webcam. Adjust settings within each application accordingly.
7: Test Your Webcam:
Use built-in utilities or online platforms to verify that your webcam is working correctly. You can use the Camera app on Windows or Photo Booth on Mac for basic tests. Alternatively, websites like webcamtests.com can help you verify functionality.
How do I allow my webcam to be used by a website?
The process for granting or denying website access to your camera or microphone varies by operating system and browser. For example, macOS and iOS allow you to control camera and microphone permissions through the Privacy menu in Settings.
If you have an iPhone or iPad, the first time a site asks to use your camera or microphone, a pop-up appears in the upper-right corner of the screen asking you to allow it or not. You can also click on the microphone icon to mute sites.
Firefox offers granular permission controls for websites in the Site Settings menu (three horizontal lines, top right). You can see which sites have camera or microphone access and change their status to either Allow or Block. You can also check a box to remember your choice for future visits.
In Chrome, the first time a site requests to use your camera or microphone, a window will open just below the URL bar. You can choose to either Allow or Deny access. You can also check a box to prevent this window from appearing again.
The Boast website is configured to ask permission for your camera and microphone when you submit a testimonial video. The following steps show you how to enable this setting in your web browser so that the Boast website can properly record and upload your video testimony.
How do I allow my webcam to be used by an app?
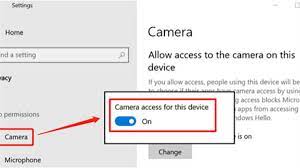
Many apps require access to your computer’s webcam in order to function. However, you have the ability to decide which apps are able to use your camera on a per-app basis. On Windows 10, you can do this by going to Settings > Privacy and choosing which Apps can access your camera. Once you have made this choice, you can then toggle the button to On or Off to give or deny access to your camera to individual apps.
On Android, you have even more control over the permissions that are granted to apps. The latest version of Android, 11, provides additional transparency and control over these permissions by requiring that apps request access every time they need to use the camera or microphone. In addition, you can grant one-time permissions that only allow an app to access your camera or microphone for a specific amount of time, which helps prevent the app from accessing sensitive data without your knowledge.
It is also important to note that you should never allow any app to use your camera, microphone, or other hardware on your device unless you know exactly what it is doing. This is a common way for malware to gain access to your computer and monitor your activity. Therefore, if you do not trust an app with your camera or microphone, you should always revoke access through the System Settings on your computer.
How do I allow my webcam to be used by a game?
The most popular pieces of software used to overlay a webcam onto a game screen in Linux are OBS Studio and XSplit Game caster. These applications allow you to select a video source such as your webcam, then adjust the camera settings for each individual game.
The EV3 SDK software offers “webcam” versions of its sample Blocks and Op Modes, demonstrating how to use an external UVC camera for robot vision tasks. If using one of these configurations, be sure to verify that the intended camera name referenced in the Op Mode is active and enabled before opening or editing it.
If you are using a laptop bundled with a camera for video recording or joining a video conference call, be sure to enable access to the webcam through Windows settings (privacy & security > camera). It may also be necessary to install any required drivers or additional software to obtain full functionality.
How do I allow my webcam to be used by a chat application?
If you can’t see your camera, microphone or speaker in the dropdown menus when starting a video/audio chat, this indicates that your browser or your computer’s system-level privacy controls are blocking access to these devices. Follow the instructions for your operating system to resolve this issue.
Brazen allows you to choose which device to use for your individual live video/audio chats, and you can also blur or set a virtual background for your chat. If you want to change the device used, click the Video Settings icon in the video control panel and scroll down to the Input Devices section.
Some users have reported that their webcam is blocked when they start a video chat in Zoom, Skype or any other such application. If you have this problem, one solution that has worked for many people is to restart your Windows camera app. This process resets the camera app and is generally easy to do, but you may need to restart your laptop or PC in order for it to take effect. If you are unable to resolve the problem using this method, it is recommended that you contact your laptop or PC manufacturer. They may be able to provide you with the latest driver for your camera, which can potentially fix the problem.
Conclusion:
Enabling your webcam involves a combination of hardware connections, driver updates, operating system configurations, browser settings, and application permissions. Following these steps ensures a smooth experience when using your webcam for various purposes, contributing to effective communication and collaboration in both personal and professional settings.

Leave a Reply