
How to Enable Remote Desktop on Windows 11
Enable Remote Desktop Windows 11 is a useful feature for managing files and apps on your PC from another location. It’s also great for providing support to other users.
If you’re having trouble connecting to Remote Desktop, it may be because your antivirus or firewall is blocking the app. Try turning them off temporarily.
Enabling Remote Desktop on Windows 11 allows you to connect to your computer from another device, providing a convenient way to access files and applications remotely. To set up Remote Desktop on Windows 11, follow these steps.
1. Check System Requirements:
Before proceeding, ensure that your Windows 11 edition supports Remote Desktop. Only Windows 11 Pro, Enterprise, or Education editions allow incoming Remote Desktop connections.
2. Verify Network Connectivity:
Ensure that both the computer you want to connect to and the device you’re connecting from are on the same network. Remote Desktop works best within a local network, although it can be configured for external access.
3. Enable Remote Desktop:
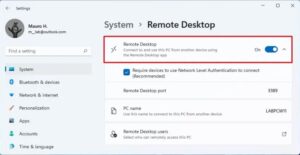
- Right-click on the Start button and select Settings.
- In the Settings window, click on System.
- Choose the Remote Desktop tab from the left sidebar.
- Toggle the switch to enable Remote Desktop.
4. Configure Remote Desktop Settings:
- Click on the Advanced settings link.
- In the Advanced settings, ensure that the option “Network Level Authentication” is selected for enhanced security.
- Note down the name of your computer under the “How to connect to this PC” section. You will need this information to connect remotely.
5. Adjust Firewall Settings:
- Search for “Firewall” in the Start menu and open Windows Defender Firewall with Advanced Security.
- In the left sidebar, click on Inbound Rules.
- Look for Remote Desktop (TCP-In) in the list. If it’s not enabled, right-click and choose Enable Rule.
6. Check Port Forwarding (Optional for External Access):
- If you plan to access your computer remotely from outside your local network, you may need to set up port forwarding on your router.
- Forward TCP port 3389 to the internal IP address of your computer.
7. Configure Power Settings:
- In the Settings window, go to System and then click on Power & sleep.
- Adjust the sleep settings to ensure your computer stays awake when you want to connect remotely.
8. Set Up Remote Desktop Connection (On the Client Device):
- On the device you want to connect from, open the Remote Desktop client. This could be another Windows PC or a device with a Remote Desktop app installed.
- Enter the name of your computer (from step 4) in the “Computer” field and click Connect.
- Enter your username and password when prompted.
9. Troubleshoot Connection Issues:
- If you encounter issues connecting, double-check firewall settings, network connectivity, and ensure that Remote Desktop is enabled on the target computer.
- You might need to restart the Remote Desktop services on both machines.
10. Enhance Security (Optional):
- For added security, consider using a Virtual Private Network (VPN) when connecting remotely.
- Regularly update passwords and install security updates to keep your system secure.
11. Log Out or Disconnect:
- Remember to log out or disconnect when you’re done with the remote session to ensure the security of your computer.
1. Open the Control Panel
Remote Desktop is a feature of the Windows operating system that allows users to access files and apps on their own computers from another location. This can be helpful if you’re trying to help someone troubleshoot an issue or just want to check up on some settings.
You can enable Remote Desktop using the modern settings app on Windows 11 or the traditional Control Panel. If you’re using the latter, you’ll also have to open the Windows Firewall so that connections are allowed.
If you’re using the modern settings app, you can select “Require computers to use network-level authentication to connect” to make the connection more secure. You can also set the number of minutes that users can remain connected, as well as which keyboard shortcuts will work on the computer. The settings page also displays the current Remote Desktop port if you need to configure your router to allow external connections. The default is 3389.
2. Open Powershell
Remote Desktop is a feature that allows you to access your computer remotely. This can be useful for work or home, and it can help you stay productive no matter where you are. However, it is not enabled by default on Windows systems. To enable it, you can use the PowerShell command line.
To open PowerShell, press Win + R and type cmd. This will launch an elevated Command Prompt window. Type the following command to change related registry settings:
This will allow you to connect to your computer from any location, even when you are away from home or the office. You can also set up security options to control who is allowed to connect. For example, you can choose to allow connections only from computers with network-level authentication. You can also tweak other settings like the connection bar or the display. These settings will make your remote session more convenient and secure. You can even use all monitors if you have a multi-monitor setup.
3. Open the Settings app
If you want to use Microsoft Remote Desktop to connect to a Windows 11 PC from another operating system or device (such as a Mac, an iPhone or iPad), you need to have admin rights on the computer and enable it through the settings app. You can also enable it through PowerShell, but this isn’t recommended for non-administrators because you have to open a command window with elevated privileges.
To enable remote desktop in Windows 11, open the Settings app on the computer and go to System. Then, click the Remote Desktop switch to turn it on. You can also configure advanced options here, such as requiring computers to use Network Level Authentication to connect remotely, which can make connections more secure.
4. Open the System and Security settings
Remote Desktop is a great feature that allows you to access and control your computer from another location. However, if you want to use the feature on your Windows 11 device, it’s important to enable it first.
You can enable the feature on your PC using the System and Security settings, which are available in the Control Panel or the Settings app. The System and Security settings also allow you to specify which accounts can connect remotely, as well as configure firewall rules.
The System and Security settings also contain the option to disable a policy that limits blank password use on RDP. You can do this by changing the value of the Limit Blank Password Use registry key. Once you’ve done this, you should be able to login to your Windows 11 computer remotely from other computers and devices. The process is similar on a Mac or an iPhone or iPad. The only difference is that you’ll need to download and install the Microsoft Remote Desktop app for those operating systems.
Leave a Reply